


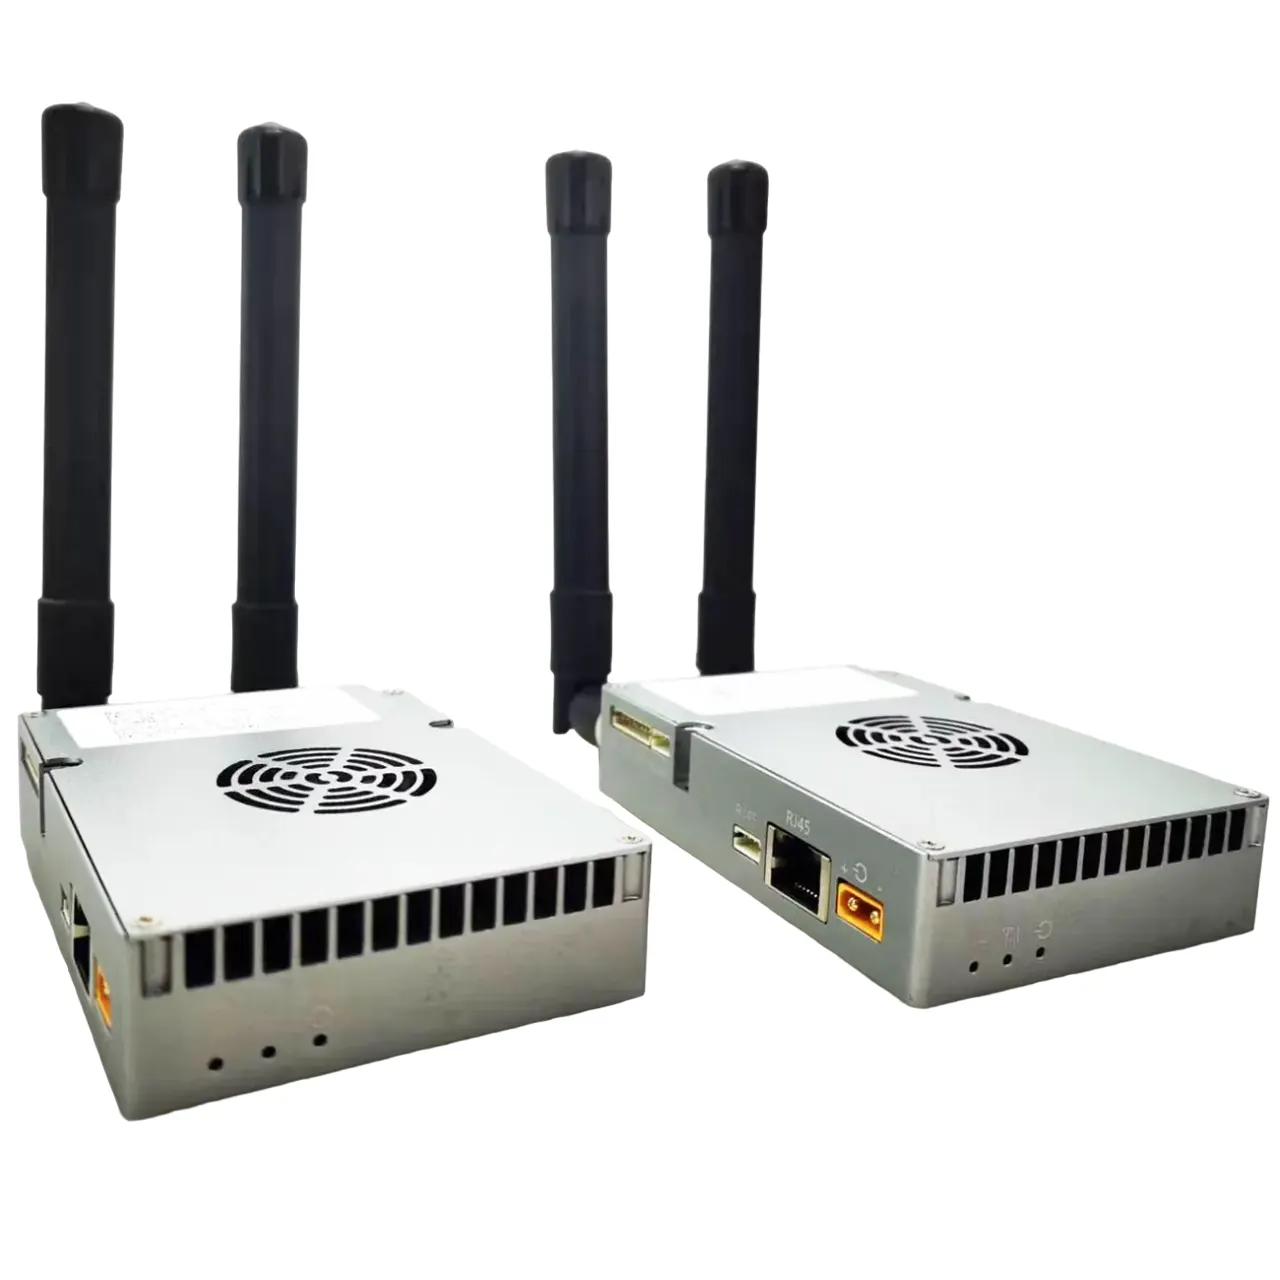
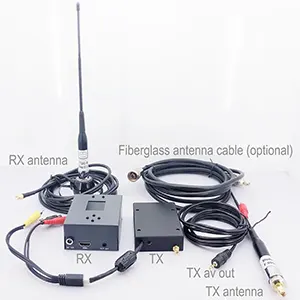


FHD Video Data RC Transmission System
سلب مسئولیت
- لطفا قبل از استفاده دفترچه راهنمای کاربر را به دقت بخوانید. حتما به هشدارها توجه کنید و تمام نکات را کاملا درک کنید.
- لطفاً به شدت از مقررات مدیریت فرکانس رادیویی محلی پیروی کنید.
- لطفاً برای استفاده از این محصول مراحل نصب در دفترچه راهنما را دنبال کنید. شرکت و نماینده ما هیچ مسئولیت قانونی در قبال آسیب دیدن تجهیزات یا پرسنل ناشی از نصب و اصلاح کاربران نخواهد داشت.
- This copyright of this manual belongs to VCAN Group Limited No one may make copies without written consent.
احتیاط
توجه به نصب
1. قبل از روشن شدن, مطمئن شوید که اتصال آنتن قابل اطمینان است . در غیر این صورت, باعث آسیب به دستگاه خواهد شد.
2. مطمئن شوید که ولتاژ در محدوده استفاده است.
3. لطفاً به EMC تمام تجهیزات الکترونیکی پهپاد خود توجه کنید.
4. توصیه می شود آنتن را به سمت پایین نصب کنید و آنتن را از فلز روی پهپاد دور نگه دارید..
5. حتما از آنتن منطبق استفاده کنید.
قبل از استفاده
1. مطمئن شوید که همه کابل ها به درستی و محکم وصل شده اند.
2. بدون جسم خارجی (به عنوان مثال،. مایعات, شن, و غیره.) را می توان در داخل دستگاه وارد کرد.
3. طول می کشد 15 ثانیه برای راه اندازی دستگاه. تا زمانی که دستگاه بوت نشده باشد، نمی توان ویدئو و داده را منتقل کرد.
4. لطفاً مطمئن شوید که محیطی که در آن تجهیزات استفاده می شود عاری از سایر تداخلات الکترومغناطیسی باشد.
5. هنگامی که سیگنال ضعیف می شود, با تغییر جهت آنتن می توانید جلوه را بهبود بخشید.
لیست بسته بندی
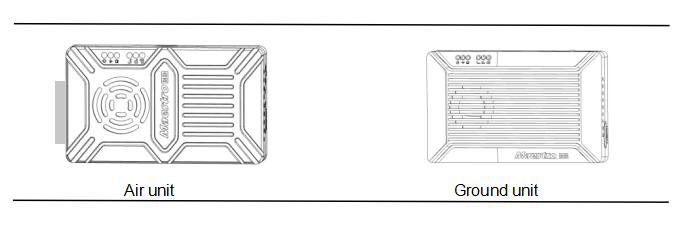
Modules
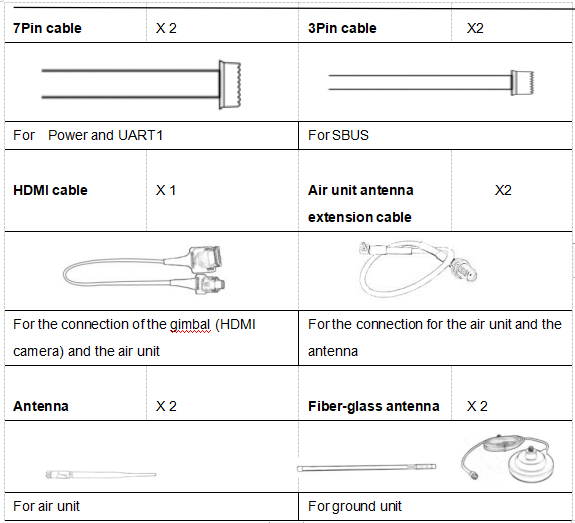
تجهیزات جانبی
بررسی اجمالی
M50&M51, طراحی شده برای پهپاد , is a kind of wireless FHD video and data transmission system. این از مزایای اندازه کوچک برخوردار است,low power consumption and long distance. این سیستم می تواند فیلم FHD را انتقال دهد, داده های کنترل پرواز, داده های کنترل گیمبال, و داده های کنترل RC به طور همزمان. با فناوری مدولاسیون ویدیویی H.265 CODEC و OFDM, M50&M51 می تواند به تاخیر کم دست یابد, انتقال ویدئو با وضوح بالا.
با فناوری پیشرفته فرکانس رادیویی, M50&M51 می تواند از سه باند فرکانسی پشتیبانی کند. کاربران می توانند باند فرکانسی را به راحتی تغییر دهند. کاربران می توانند باند فرکانسی مناسب را طبق مقررات محلی انتخاب کنند. شناسه تأیید نوع رادیویی چینی 2019DP8189 (شناسه CMIIT) است:2019DP8189). همچنین می توانید در شرایط خاص حالت پرش فرکانس یا ثابت را انتخاب کنید.
واحد هوای M50&سیستم M51 را می توان در حالت نقطه به نقطه یا حالت تکرار کننده پیکربندی کرد. کاربران فقط به یک واحد هوای بیشتر و پیکربندی ساده برای دستیابی به انتقال از راه دور نیاز دارند. لطفا برای اطلاعات بیشتر فیلم آموزش را مشاهده کنید.
M50&M51 یک عملکرد رمزگذاری دارد. در صورت لزوم کاربران می توانند این عملکرد را فعال یا غیرفعال کنند. تنظیم کد رمزگذاری با استفاده از Maestro Assistant یا Web UI آسان است.
دستگاه دارای 2 UART—UART1 و UART2 است. دو پروتکل, ماولینک و شفاف, پشتیبانی می شوند. کاربران می توانند از آن برای داده های کنترل پرواز و انتقال داده های کنترل گیمبال استفاده کنند. همچنین سیستم می تواند فاصله کنترل RC را از طریق پورت SBUS بهبود بخشد. در واحد زمینی M50&M51, یک USB وجود دارد 3.0 بندر. کاربر می تواند یک دستگاه ذخیره سازی USB برای ذخیره فیلم FHD اضافه کند.
M50&M51 از انواع رابط ورودی و خروجی ویدئو پشتیبانی می کند, مانند HDMI, شبکه محلی کابلی, SDI, CVBS . همچنین می تواند با بیشتر گیمبال های بازار مطابقت داشته باشد.
توضیحات مدل
M 5X H/S*:
M ایستاده برای سریال Maestro.
5کد سطح فاصله ایکس*.
نشانگر H/S رابط تصویری واحد هوا.
*50 7 کیلومتر است,51 17 کیلومتر است,H مخفف HDMI است,S مخفف SDI است. لطفا در هنگام سفارش مدل مناسب را به ما بگویید.
به عنوان مثال:M50H ایستاده برای 7 کیلومتر,رابط تصویری واحد هوا HDMI (هر دو با HDMI و اترنت) است.。
امکانات
مسافت طولانی تلفیق
-تا 17 کیلومتر @ LOS– OFDM
رابط ویدیویی رابط داده
-HDMI/Ethernet/SDI/CVBS – UART (TTL/RS232)/SBUS,
پرش / فرکانس ثابت باند فرکانس
-درست شد: تعریف شده توسط کاربر – 800مگاهرتز/1.4 گیگاهرتز/2.4 گیگاهرتز,
-پریدن: اتوماتیک حالت کار
BW – واحد هوا می تواند باشد :حالت نقطه به نقطه
-3/5/10/20 حالت تکرار کننده مگاهرتز
کدک نرخ بیت های ویدئویی
– H.265 / H.264 – 500kbps~5Mbps
دمای کار محدوده قدرت
– 40℃ ~ + 70 ℃ – باتری DC 9~28V 3S~6S
توضیحات رابط M51
واحد هوا
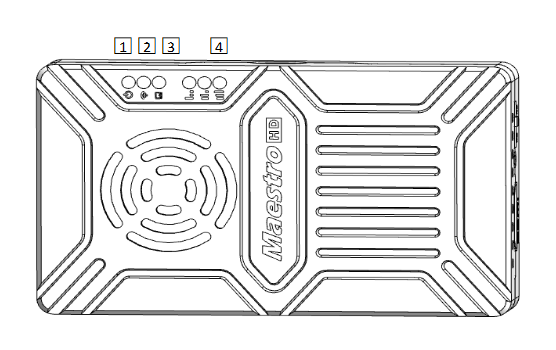
1. شاخص توان
هنگامی که واحد هوا در حال بوت شدن است، این نشانگر سبز ثابت است.
وقتی واحد هوا راه اندازی شد, indicator light blinks once per second if there is no video source input to HDMI. And indicator light will be solid green if there is video source.
2. شاخص لینک
| توضیحات الگوی LED |
| پیوند بی سیم سبز جامد برقرار شد |
| light off Wireless link is lost |
3. شاخص وضعیت
| الگوی LED (فقط در هنگام راهاندازی چشمک زدن) توضیحات |
| چشمک زدن 3 times Initialization OK, Frequency is 2.4GBlink 2 times Initialization OK, فرکانس 1.4 گیگابایت لینک است 1 time Initialization OK, فرکانس 800M است |
| solid green Air unit abnormal |
4. RSSI Indicator
| توضیحات الگوی LED |
| 3 سبز جامد سیگنال بی سیم قوی ترین است |
| 2 سبز جامد سیگنال بی سیم متوسط است |
| 1 سبز جامد سیگنال بی سیم ضعیف است |
| همه LED خاموش می شوند بدون سیگنال بی سیم |
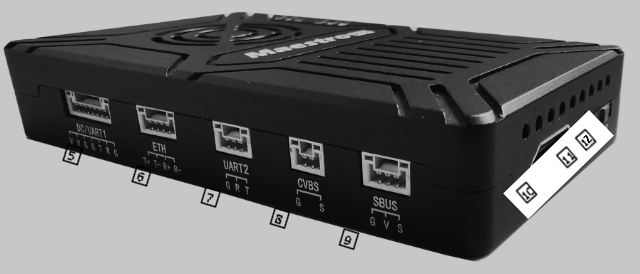
5. DC/UART1
| عدد | شخصیت | شرح | ورودی/خروجی |
| 1,2 | V | +ورودی برق Vcc(9~28 ولت) | من |
| 3,4,7 | G | GND | درجه فاصله اختیاری |
| 5 | T | TXD (از واحد هوا به خارجی) | O |
| 6 | R | RXD (از واحد خارجی به واحد هوا) | من |
6. شبکه محلی کابلی
| عدد | شخصیت | شرح | ورودی/خروجی |
| 1 | t+ | TX+ | O |
| 2 | T- | TX- | O |
| 3 | r+ | RX+ | من |
| 4 | R- | RX- | من |
7. UART2
| عدد | شخصیت | شرح | ورودی/خروجی |
| 1 | G | GND | درجه فاصله اختیاری |
| 2 | R | RXD (از واحد خارجی به واحد هوا) | من |
| 3 | T | TXD (از واحد هوا به خارجی) | O |
8. رابط ورودی ویدئو CVBS
| عدد | شخصیت | شرح | ورودی/خروجی |
| 1 | G | GND | درجه فاصله اختیاری |
| 2 | S | CVBS ویدئو IN | من |
9. رابط خروجی SBUS
| عدد | شخصیت | شرح | ورودی/خروجی |
| 1 | G | GND | O |
| 2 | V | +5خروجی V (Imax 1A) | O |
| 3 | S | SBUS_OUT | O |
10. رابط ورودی ویدئو HDMI را تایپ کنید
11. دکمه
را فشار دهید 10 ثانیه, واحد هوا تمام پارامترها را به تنظیمات کارخانه باز می گرداند。
12. سوئیچ حالت
WB باند پهن است,با استفاده از باند فرکانس وسیع بی سیم.
NB باند باریک است,با استفاده از باند باریک به انتقال چند ماژول.
نکات: حالت WB توصیه می شود,زیرا این حالت در انتقال نقطه به نقطه عملکرد بهتری دارد.
واحد زمینی
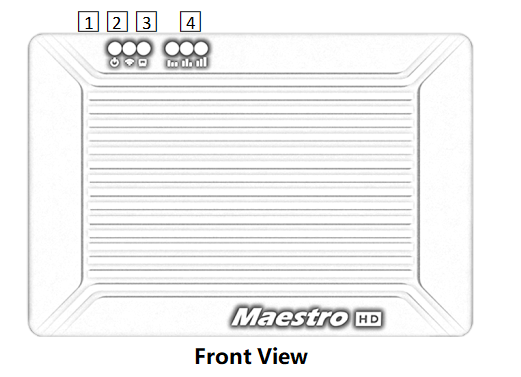
1. شاخص توان
هنگامی که واحد زمین روشن است، این نشانگر سبز ثابت است.
2. شاخص لینک
| توضیحات الگوی LED |
| پیوند بی سیم سبز جامد برقرار شد |
| light off Wireless link is lost |
3. نشانگر وضعیت
| توضیحات الگوی LED |
| چشمک زدن 3 times Initialization OK, Frequency is 2.4GBlink 2 times Initialization OK, فرکانس 1.4 گیگابایت لینک است 1 time Initialization OK, فرکانس 800M است |
| سبز جامد واحد زمین غیر عادی است |
4. RSSI Indicator
| توضیحات الگوی LED |
| 3 سبز جامد سیگنال بی سیم قوی ترین است |
| 2 سبز جامد سیگنال بی سیم متوسط است |
| 1 سبز جامد سیگنال بی سیم ضعیف است |
| همه LED خاموش می شوند بدون سیگنال بی سیم |
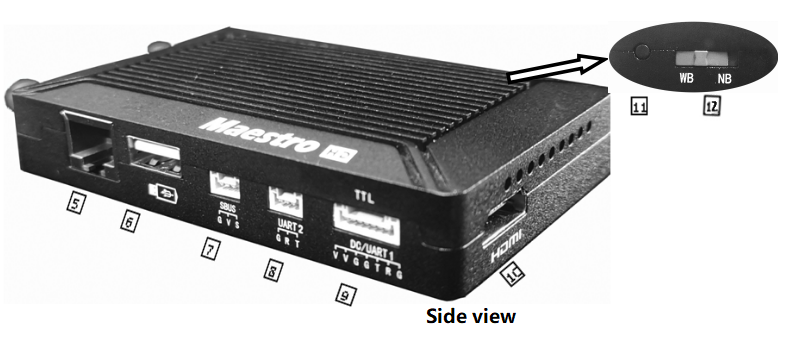
5. پورت اترنت (RJ45)
اتصال به کامپیوتر میزبان. پشتیبانی از پروتکل RTSP/TCP/UDP.
6. پورت USB (نوع A)
برای ضبط ویدئو به دیسک USB متصل شوید
7. پورت ورودی SBUS
| عدد | شخصیت | شرح | ورودی/خروجی |
| 1 | G | GND | O |
| 2 | V | +5V خروجی | O |
| 3 | S | SBUS_IN | من |
8. UART2
| عدد | شخصیت | شرح | ورودی/خروجی |
| 1 | G | GND | درجه فاصله اختیاری |
| 2 | R | RXD (از واحد خارجی به واحد زمینی) | من |
| 3 | T | TXD (از واحد زمینی به خارجی) | O |
9. DC/UART1
| عدد | شخصیت | شرح | ورودی/خروجی |
| 1,2 | V | +ورودی DC Vcc (9 ~ 28 ولت) | من |
| 3,4,7 | G | GND | درجه فاصله اختیاری |
| 5 | T | TXD (از واحد زمینی به خارجی) | O |
| 6 | R | RXD (از واحد خارجی به واحد زمینی) | من |
10. HDMI (نوع A)
پورت خروجی فیلم FHD .
11. دکمه
نگه دارید برای 3 ثانیه برای شروع ضبط ویدیو و سپس نگه دارید 3 ثانیه برای توقف ضبط. ابتدا باید دستگاه ذخیره سازی USB را وارد کنید.
10 ثانیه نگه دارید, واحد زمین تمام پارامترها را به تنظیمات کارخانه بازیابی می کند。
12. سوئیچ حالت
WB باند پهن است,با استفاده از باند فرکانس وسیع بی سیم.
NB باند باریک است,با استفاده از باند باریک به انتقال چند ماژول.
واحد هوا و زمین باید در یک جهت باشند.
نصب و راه اندازی
هوا
1. نصب واحد هوا بر روی پهپاد شما
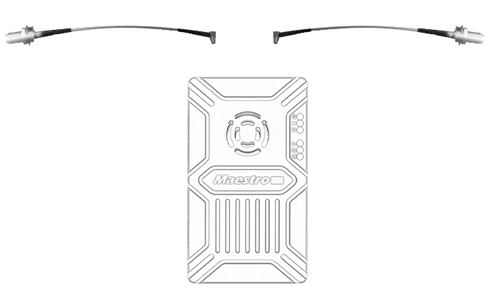
1.1 کابل MMCX-to-SMA را به پورت های کناری دستگاه هوا وارد کنید. وقتی صدای کلیک می شنوید, یعنی ارتباط خوب.
1.2 دستگاه و کابل RF را در پهپاد خود تعمیر کنید. آنتن را نصب کنید. برای سفت شدن به اتصال آنتن دقت کنید. آنتن را به سمت پایین بکشید. هیچ فلز یا محافظی در 20 سانتی متری آنتن وجود ندارد.
2. دوربین را وصل کنید (گیمبال).
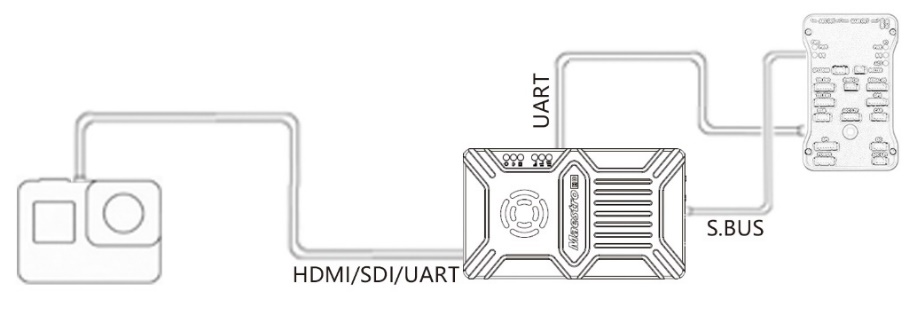
دوربین/گیمبال را با کابل HDMI/SDI/Ethernet به واحد هوا وصل کنید. و UART1 و SBUS را به فلایت کنترلر وصل کنید. آنتن را نزدیک موتور یا ESC قرار ندهید, در غیر این صورت دستگاه دچار اختلال می شود.

ترسیم نصب کامل پهپاد
زمین
1. آنتن را وصل کنید
1.1 آنتن فایبر گلاس که به همراه دستگاه عرضه شده است را به یونیت زمین وصل کنید. آنها پورت مشترک دارند - SMA. حتما مفصل را سفت کنید. این 2 آنتن فایبر گلاس باید 1.5 متر از هم فاصله داشته باشد.

1.2 کابل HDMI را وصل کنید .
پورت HDMI را با کابل HDMI به مانیتور وصل کنید. سیگنال ویدئویی FHD مستقیماً روی مانیتور نمایش داده می شود.
2. به ایستگاه زمینی متصل شوید
ایستگاه زمینی دارای دو راه ارتباطی با واحد زمینی M51 است, برای انتقال ویدئو و داده.
دریافت ویدیو
1. از طریق HDMI مستقیم
اگر ایستگاه زمینی دارای مانیتور HDMI باشد, فقط یونیت زمین را مستقیماً از طریق کابل HDMI به مانیتور وصل کنید.
2. از طریق اترنت
پورت اترنت را با کابل CAT به کامپیوتر یا ایستگاه زمینی وصل کنید. کاربر می تواند از نرم افزارهای شخص ثالث برای رمزگشایی استفاده کند, مانند VLC, برنامه ریز ماموریت.
اگر یک دوربین IP را به واحد هوای M51 متصل کنید, واحد زمینی همچنین می تواند ویدیوی FHD را برای نظارت مستقیم از طریق HDMI پخش کند. Please watch the video tutorial and other parts of this document.
Get data
1.You can get data from ground unit via UART1 and UART2. Maybe you need a UART to USB converter.
2. You can get data from Ethernet port using UDP/TCP protocol.
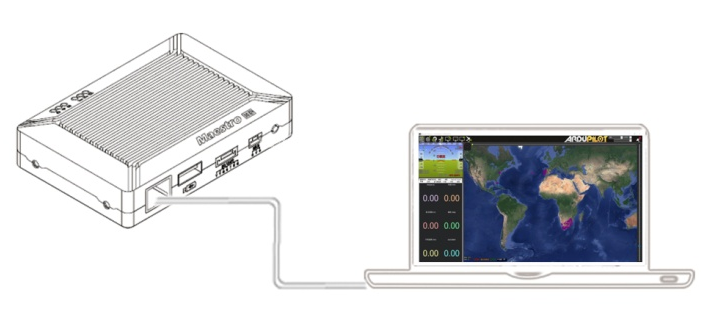
Drawing of connection on ground
M51 دستورالعمل
Quick start
1. Preparing
Make sure all the connections are ready, including the antenna, HDMI cable and so on.
2. قدرت
The DC voltage is 9~28V. After power on, the POWER LED will be solid green.
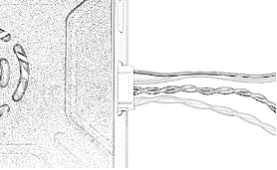
سوالی هست, please refer to the FAQ. طول می کشد 15 ثانیه برای راه اندازی. After the system starts, the wireless transmission can be established. Video transmission will take 15 more seconds.
M51 with Mission Planner
Follow the steps to use M51 with Mission Planner:
1. Connect the UART1 of M51 air unit to flight controller, such as Pixhawk. Connect the gimbal to the M51 ETH or HDMI.
2. Make sure all the air and ground cable connection is finished. Power on the system.
3. Install Mission Planner to your computer.
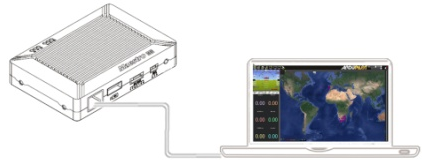
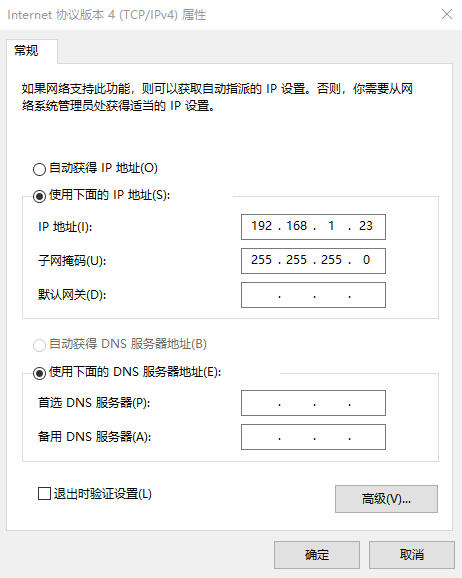
4. Set the IP address of the computer.
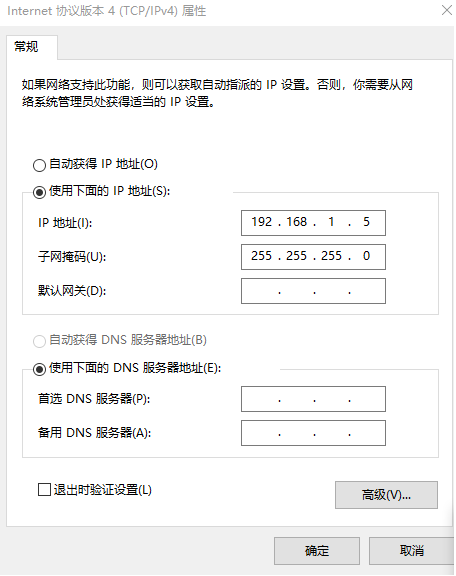
Open “Network and Internet”setting. Select “Internet Protocol version 4 (TCP / IPv4) properties”. Change IP address to “192.168.1.xxx”(xxx is in 0~255,جز 192.168.1.36 and 192.168.1.100)。
5. Get data
There are three methods to get data from M51 ground unit, using Mission Planner:
- UDP port via Ethernet;
- TCP port via Ethernet;
- UART (COM)
5.1 Get data from UDP port.
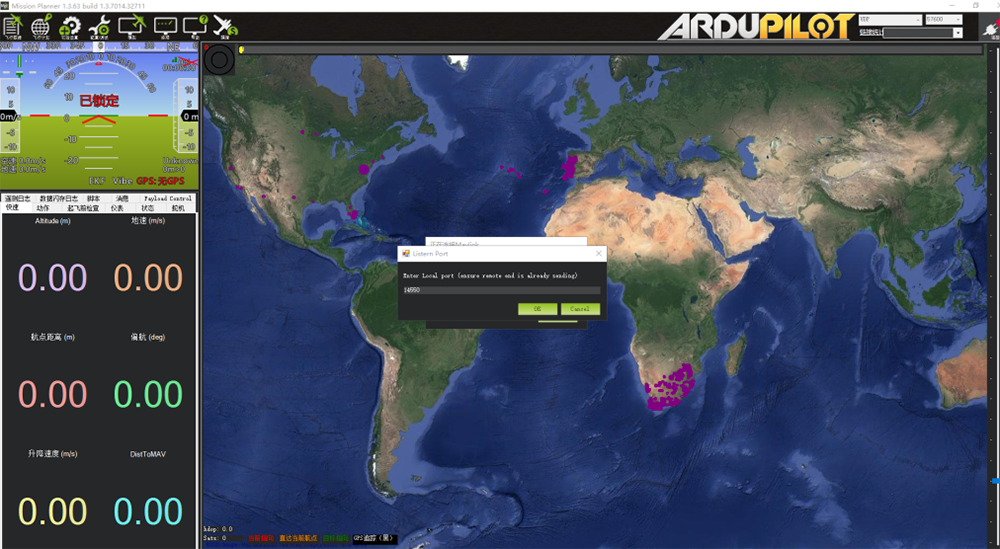
Open Mission Planner,select UDP,click the “connect” button, it will bring up a new window ‘Listen port’,change the port to 14550(If the UDP port number has been changed on the web page, please fill in the new number. برای اطلاعات بیشتر, please go to the web page configuration).Then click “OK”, Mission Planner will get flight data。
5.2 Get data from TCP port.
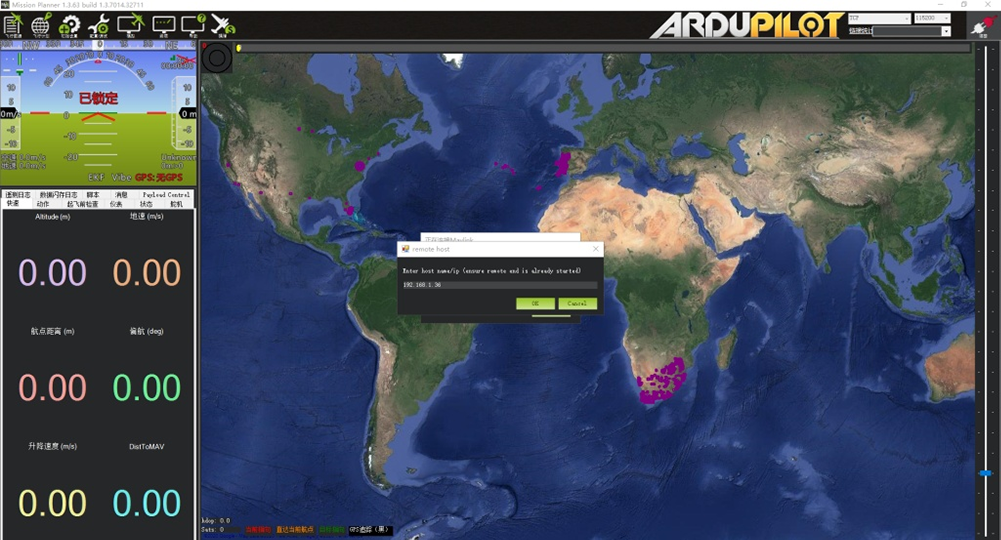
Open Mission Planner,select TCP,click the “connect” button, it will bring up a new window ‘Listen port’,fill in the blank with IP: 192.168.1.36, remote port is 5760
(If the IP address and TCP port number has been changed on the web page, please fill in the new IP and port number. برای اطلاعات بیشتر, please go to the web page configuration).Then click “OK”, Mission Planner will get flight data.
5.3 Get data from UART(COM);
Connect the ground unit UART1 with a UART(TTL)
to USB converter to the computer. Before this, لطفا
install the driver in the computer.
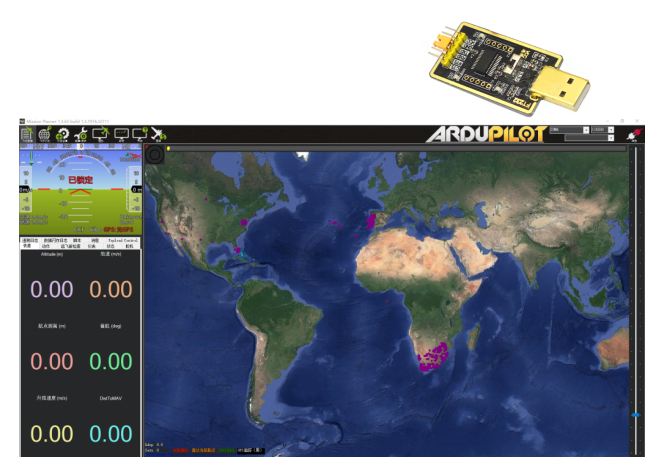
Open Mission Planner, select COM (Please check the COM number) and the right baud rate,click the “connect” button, Mission Planner will get flight data.
6. دریافت ویدیو
When you open the Mission Planner, click Video and then Set GStream Source,as show below:
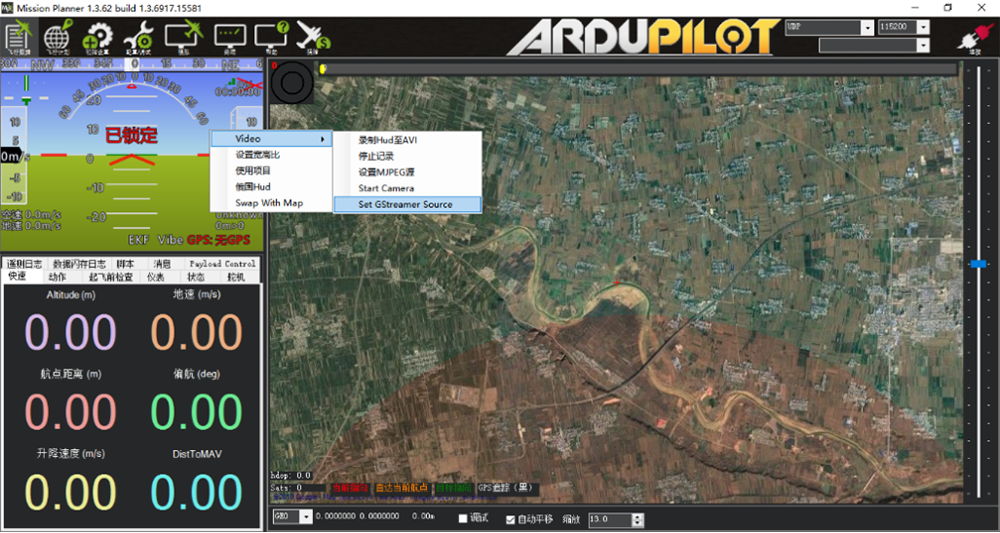
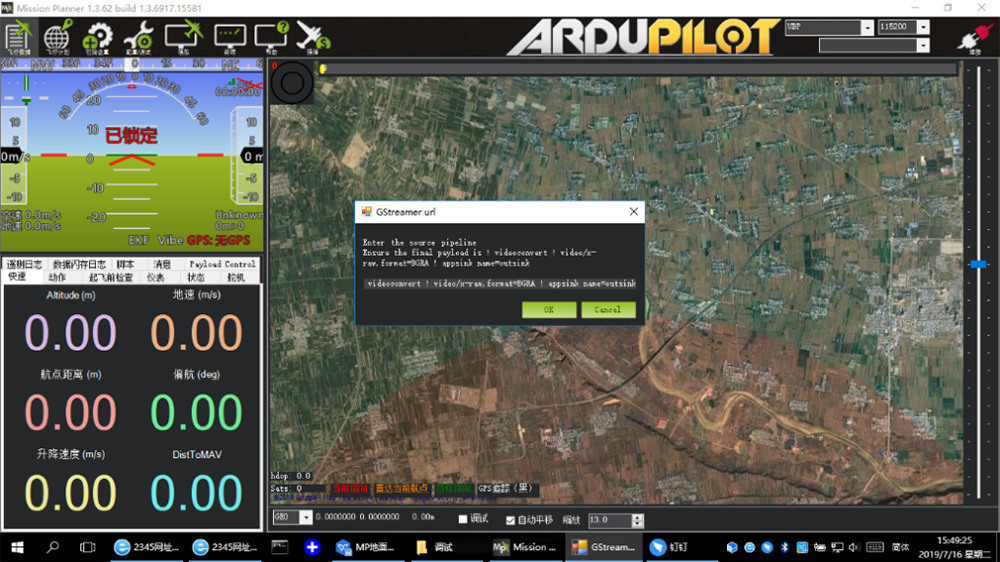
Input the address: rtspsrc location=rtsp://192.168.1.36/stream0 latency=0 ! decodebin ! videoconvert ! video/x-raw,format=BGRA ! appsink name=outsink
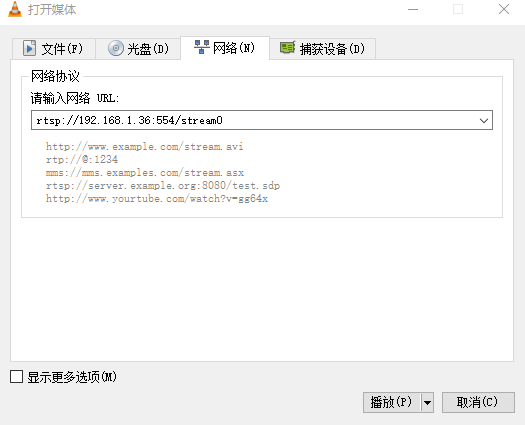
M51 with VLC
- Set the IP address of the computer as mention above. Make sure M51 is working properly.
- In the “open media” page, please input the following address:
rtsp://192.168.1.36:554/stream0
Improve RC controller distance through SBUS
- Connect air unit SBUS to flight controller RC IN.
Using the SBUS cable in the accessory box to connect the air unit to the flight controller. The cable is 3 سنجاق.
توجه:The SBUS port of air unit is output. The maximum of +5V output current is 1A. If you don’t need the +5V, let it open. Do not take it as input. در غیر این صورت, the stability of the system will be affected.
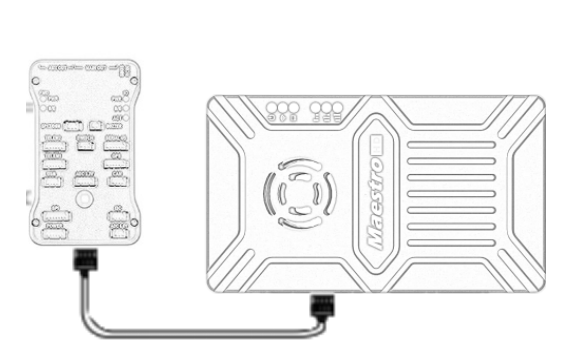
- Connect the RC receiver to the ground unit
Using the SBUS cable in the accessory box to connect the ground unit to the RC receiver.
توجه:The SBUS port of ground unit is input. The maximum of +5V output current is 1A. You can use it to power the RC receiver. Please pay more attention to the cable line order.

Recording video on ground unit
1. Inserted the USB storage device into the USB port on the ground unit. The HDMI output display “USB device is inserted”.
2. Press the button on the ground unit for 3 seconds to start recording. The HDMI output display “Recording…” and start timing recording.
3. To stop recording, hold down the button for 3 ثانیه. The video is automatically saved to the storage device.
4. You can play video with third-party video players.
Maestro Assistant
Interface of Maestro Assistant
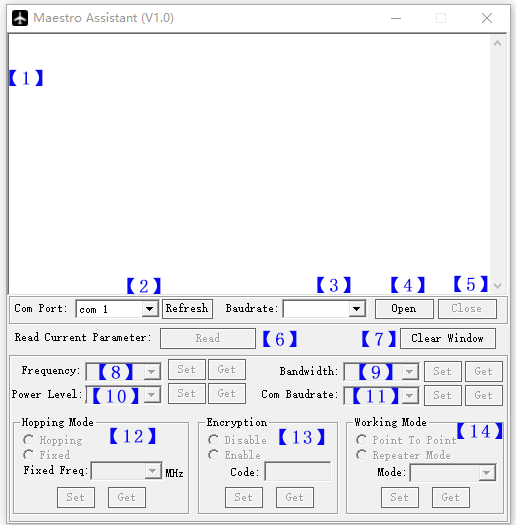
شرح عملکرد:
【1】Information display:display status information for the M51。
【2】UART(COM) انتخاب کنید:Select the right COM number of the computer to connect M51. If you want to change to another COM , please click the ‘Refresh’ button.
【3】Baud rate select:Select the right baud rate for the COM. Make it the same as M51 UART1.
【4】Open COM button.
【5】Close COM button.
【6】Read current parameter button:click this button to get the current parameter of device。
【7】Clear window button: to clear the information display.
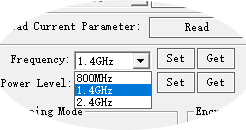
【8】Select frequency:There are three frequency bands to be selected——800MHz/1.4GHz/2.4GHz. Choose the band you needed,and click ‘Set’ button to complete setup. Click the ‘Get’ button to get current frequency band.
【9】Select BW:There are four BW to be selected——3MHz/5MHz/10MHz/20MHz. Choose the BW you needed,and click ‘Set’ button to complete setup. Click the ‘Get’ button to get current BW.
【10】Select Power Level:سه سطح توان برای انتخاب وجود دارد——بالا/متوسط/پایین سطح توان مورد نیاز خود را انتخاب کنید,and click ‘Set’ button to complete setup. برای دریافت سطح توان فعلی، روی دکمه «دریافت» کلیک کنید.
【11】 نرخ باود را انتخاب کنید:شما می توانید نرخ باود مناسب برای M51 Uart1 را در این کادر انتخاب کنید.
نرخ باد مورد نیاز خود را انتخاب کنید,and click ‘Set’ button to complete setup. برای دریافت نرخ باود فعلی، روی دکمه «دریافت» کلیک کنید.
【12】 حالت پرش را انتخاب کنید: دو حالت برای انتخاب وجود دارد——Hopping/Fixed. حالت مورد نیاز خود را انتخاب کنید,and click ‘Set’ button to complete setup. برای دریافت حالت، روی دکمه «دریافت» کلیک کنید. وقتی حالت ثابت را انتخاب می کنید, شما باید فرکانس ثابت زیر را انتخاب کنید. فرکانس ثابت مربوط به باند فرکانسی و BW است.
【13】 رمزگذاری را انتخاب کنید: می توانید رمزگذاری را غیرفعال یا فعال کنید. وقتی این تابع را فعال کنید, می توانید رمز عبور خصوصی خود را تنظیم کنید. The password should in the range of 100000~999999. Devices with different password do not link.
【14】Select Working mode: There are two working mode of M51——Point to Point mode and Repeater mode. Choose the working mode you needed,and click ‘Set’ button to complete setup. Click the ‘Get’ button to get current working mode. This function only needs to be set up on the M51 air unit. The ground unit can synchronize automatically. If you select Repeater mode, you need to select the air unit whether it is TX or repeater.
How to use Maestro Assistant
1. Connect M51 with Maestro Assistant。
Maestro Assistant is a Windows software that configures M50/M51. قبل از پیکربندی, please connect the UART1 to computer via UART(TTL) to USB converter.
Select the right COM and baud rate. Click ‘open’ button.
2. Read current parameter。

After step1, click ‘Read’ button. All current parameter will print on the information display. Because the Working mode is only for air unit. The Working mode box will turn grey on ground unit configuration.
3. تنظیمات.
3.1 باند فرکانس
There are three frequency bands to be selected
——800MHz/1.4GHz/2.4GHz. You can choose the
suitable frequency band according to local regulations.
The specific frequencies for each band are as follow:
800مگاهرتز:806825 مگاهرتز;
1.4گیگاهرتز:1427~1447MHz;
2.4گیگاهرتز:2408~ 2480 مگاهرتز;
3.2 پهنای باند
There are four BW to be selected——3MHz/
5مگاهرتز/10 مگاهرتز/20 مگاهرتز. The greater the BW, the more
data can be transmitted, but the weaker the
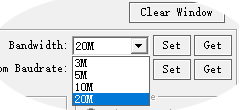
ضد تداخل. In Fixed frequency mode, M50/M51 will have
more frequency to fix with small BW.
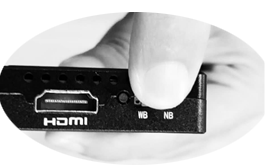
Additional, there is a shortcut key on M50/M51.
You can change BW easily. While NB is narrow band,
and WB is wide band. For both the air and ground unit,
the shortcut key should in the same place. در غیر این صورت, they can not link.
3.3 قدرت RF
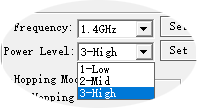
M50/M51 has three levels of power to choose.
In order to cause interference between devices, لطفا
select the appropriate transmission power. The specific
RF power values are as follow:
1-کم:15DBM به;
2-اواسط:20DBM به;
3-بالا:25DBM به。
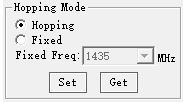
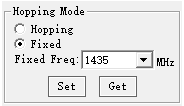
3.4 Hopping/Fixed Mode
There are two mode to be selected——Hopping
/درست شد. In Hopping mode, M51 can automatically adjust
frequency when there is interference. In fixed mode,
the device is fixed to a special frequency . So in one
باند بسامد, up to four sets of devices can be used.
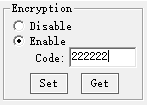
3.5 رمزگذاری
The wireless signal can be encrypted during transmission.
وقتی این تابع را فعال کنید, می توانید رمز عبور خصوصی خود را تنظیم کنید.
The password should in the range of 100000~999999. Devices with different password do not link. When disable this function, different M51 air and ground can link each other.
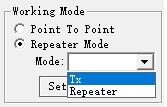
3.6 حالت کار
M51 can work in Point to Point Mode and Repeater
حالت. Only the air unit of M51 need to be set. The ground
unit can synchronize automatically. In Repeater mode, این
air unit can be set to TX (فرستنده) or Repeater.
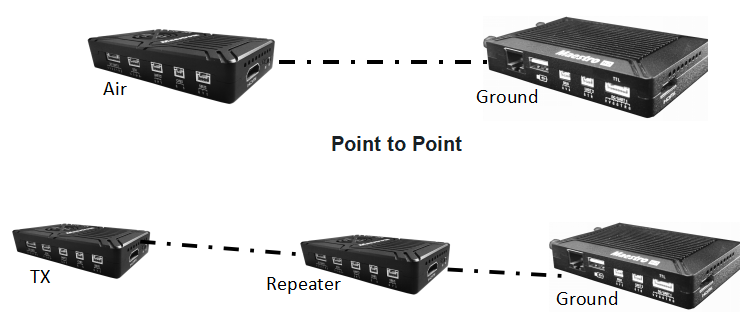
With Repeater mode, M51 can be easily used under NLOS situation. You only need to buy one more air unit and then can establish a repeater system easily.
M51 Web UI Configuration Description
Parameter of M51 can also be set through web UI. User can enter IP address through the browser to access the web UI. The air unit default IP is 192.168.1.100. The ground is 192.168.1.36. In Repeater mode. TX is 192.168.1.100. Repeater is 192.168.1.101.
If you change the device to another IP address, please access the web UI through the new IP. If you forget the IP you changed, press the button on the device for 10 seconds when the device is power on to restore to factory settings.
You need to change your computer IP to 192.168.1.X so as to access the device web UI. همانطور که در شکل زیر نشان داده شده است:
M51 Air Web UI
1. ورود
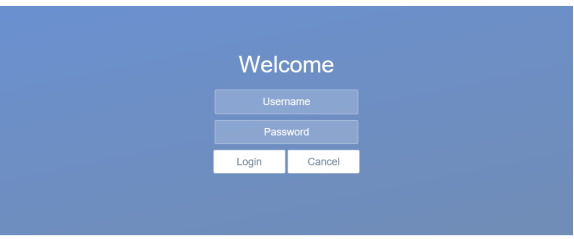
After you enter IP address 192.168.1.100 in the browser, صفحه "خوش آمدید" را خواهید دید. نام کاربری پیش فرض است: مدیر, رمز عبور است: 123456. سپس می توانید وارد شوید.
2.تنظیم هوا
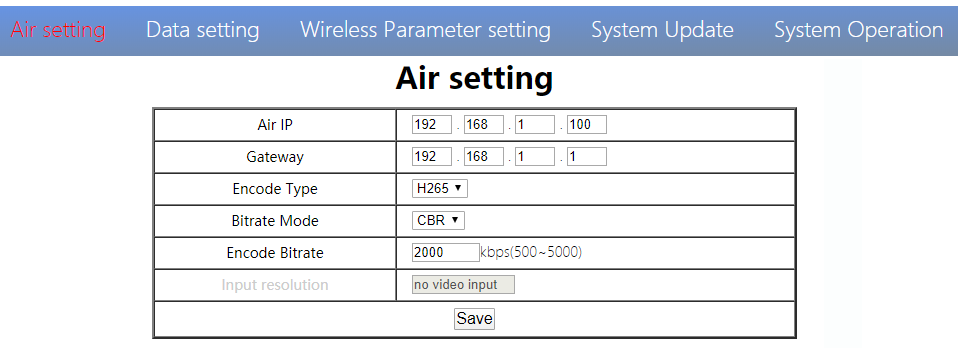
در صفحه تنظیمات هوا, کاربر می تواند IP هوا را تغییر دهد 、 دروازه و پارامترهای دیگر. می توانید به جدول زیر مراجعه کنید.
| پارامتر | ارزش | شرح |
| آی پی هوا | به طور پیش فرض 192.168.1.100 | کاربر می تواند تغییر کند |
| دروازه | به طور پیش فرض 192.168.1.1 | کاربر می تواند تغییر کند |
| نوع رمزگذاری | H265/H264 | پیش فرض H265 |
| حالت نرخ بیت | CBR/VBR | CBR پیش فرض |
| رمزگذاری نرخ بیت | 500kbps~5Mbps | کاربر می تواند تغییر کند, پیش فرض 1M |
| وضوح ورودی | تشخیص خودکار ورودی | نمایش وضوح ورودی HDMI فعلی |
اگر پارامتر دستگاه را تغییر دهید, پس از راه اندازی مجدد اعمال خواهد شد. اگر آدرس IP را تغییر دهید, لطفا بعد از راه اندازی مجدد آدرس جدید را در مرورگر خود وارد کنید.
3.تنظیم داده ها
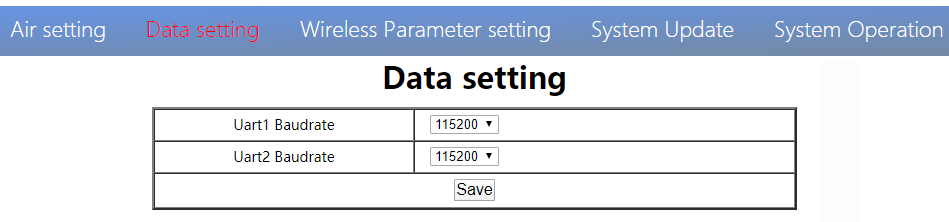
کاربر می تواند نرخ Baud UART1 و UART2 را در صفحه تنظیمات داده تغییر دهد. پس از راه اندازی مجدد اعمال خواهد شد.
4. تنظیم پارامتر بی سیم
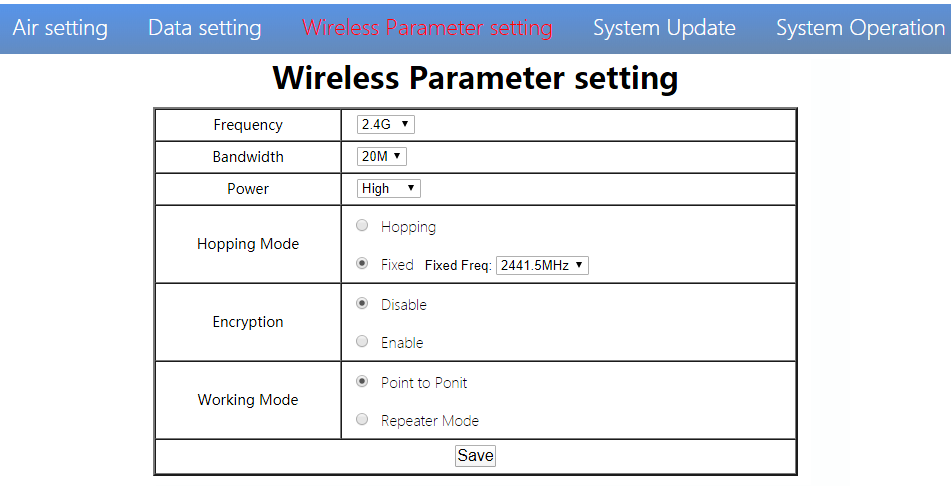
کاربر می تواند پارامتر بی سیم را در صفحه تنظیمات پارامتر بی سیم تغییر دهد . می توانید به جدول زیر مراجعه کنید.
| پارامتر | ارزش | شرح |
| فرکانس | 800M/1.4G/2.4G | اختیاری |
| پهنای باند | 3/5/10/20M | اختیاری |
| قدرت | بالا / متوسط / پایین | اختیاری |
| حالت پرش | پرش / رفع شد | اختیاری |
| رمزگذاری | غیر فعال کردن/فعال کردن | اختیاری |
| حالت کار | Point to Point Repeater Mode | Only the air unit of M51 need to be set. The ground unit can synchronize automatically |
Web UI configuration is the same as Maestro Assistant. User can check it in ‘How to use Maestro Assistant’ part 3 for more details.
When you configure parameter through Web UI, پس از راه اندازی مجدد اعمال خواهد شد
5.به روز رسانی سیستم
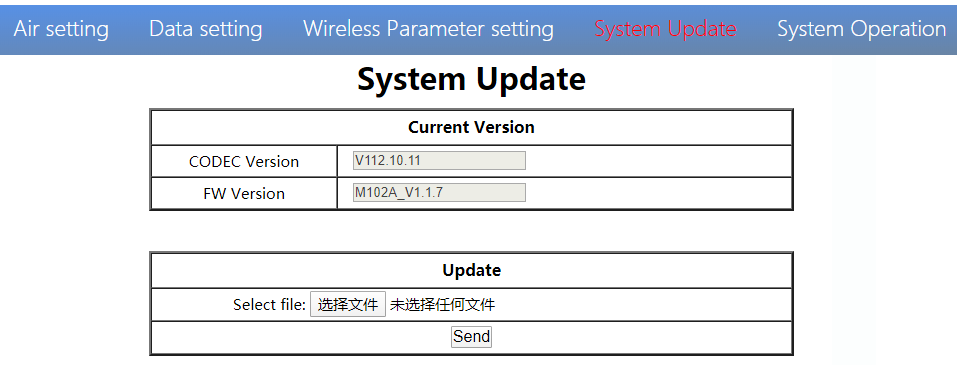
User can update CODEC version and FW version in System Update page. Before update, please download the latest software version from our website.
Click ’browse…’. Select the upgrade file. Click ‘Send’. You will see the upgrade progress bar. The system will restart when the upgrade is complete. You can check the CODEC and FW version in this web page
علاوه بر این, CODEC Version is for video encoding. The upgrade file is large and no need to upgrade frequently. So we update the CODEC and FW files separately. لطفا به نسخه جداگانه توجه کنید..
6.عملیات سیستم
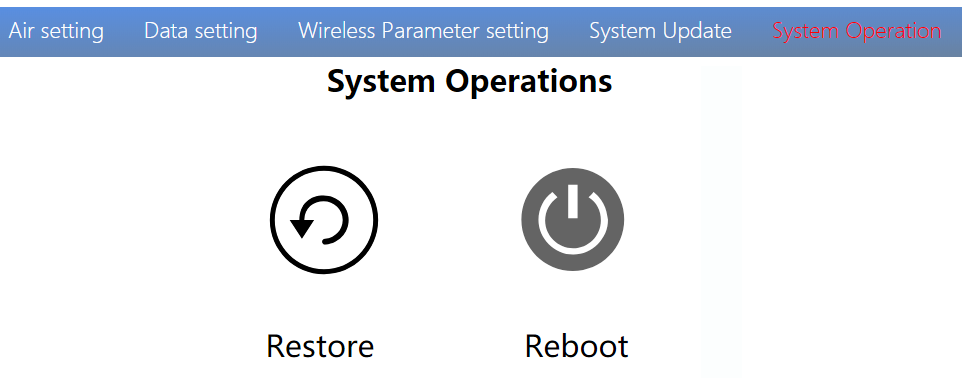
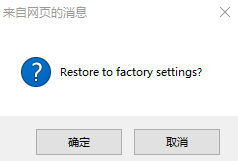
کاربر می تواند در صفحه عملیات سیستم بازیابی و راه اندازی مجدد شود. در حالی که "Restore" برای بازگرداندن تمام پارامترها به تنظیمات کارخانه است。
"راه اندازی مجدد" برای راه اندازی مجدد سیستم استفاده می شود。
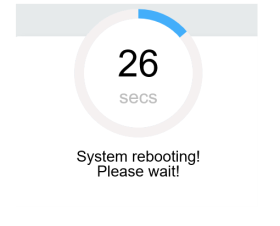
اگر کاربر آدرس IP دستگاه را تغییر ندهید, پس از راه اندازی مجدد به صفحه ورود به سیستم می رود. اگر آدرس IP را تغییر دهید, پس از راه اندازی مجدد باید آدرس IP جدید را در مرورگر خود وارد کنید.
M51 Ground Web UI
1.ورود
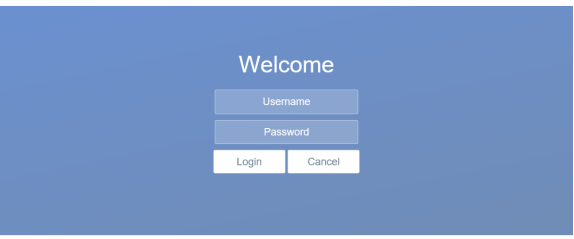
After you enter IP address 192.168.1.36 in the browser, صفحه "خوش آمدید" را خواهید دید. نام کاربری پیش فرض است: مدیر, رمز عبور است: 123456. سپس می توانید وارد شوید.
2.تنظیم زمین
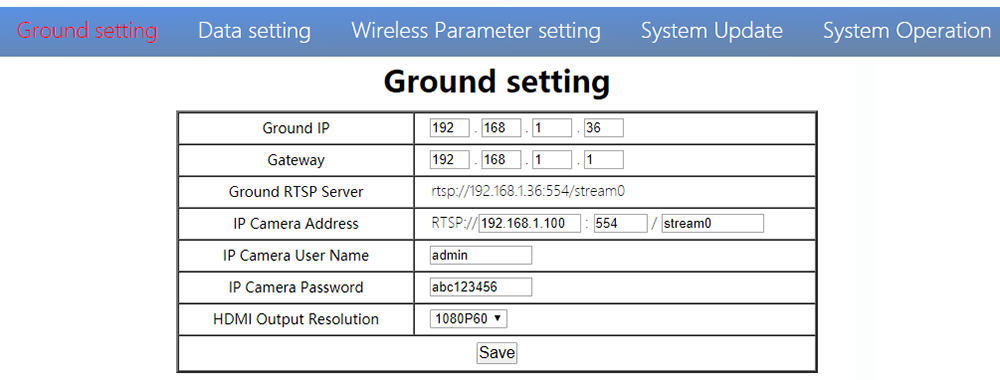
در صفحه تنظیمات زمین, کاربر می تواند IP هوا را تغییر دهد 、 دروازه و پارامترهای دیگر. می توانید به جدول زیر مراجعه کنید.
| پارامتر | ارزش | شرح |
| IP زمینی | به طور پیش فرض 192.168.1.36 | کاربر می تواند تغییر کند |
| دروازه | به طور پیش فرض 192.168.1.1 | کاربر می تواند تغییر کند |
| سرور RTSP زمینی | کاربر نمی تواند ویرایش کند. | برای گفتن آدرس سرور RTSP به کاربر استفاده می شود |
| آدرس دوربین IP | پیش فرض 192.168.1.100، IP رمزگذار واحد هوا است | کاربران می توانند آدرس دوربین IP خود را تغییر دهند |
| نام کاربری / رمز عبور دوربین IP | طبق دوربین IP | اگر دوربین نیاز به گواهینامه دارد, please enter the right name and password |
| HDMI Output Resolution | 1080P60/1080P50/1080P30/1080P25/1080P24/1080I60/1080I50/720P60/720P50 | User can set the HDMI resolution |
اگر پارامتر دستگاه را تغییر دهید, پس از راه اندازی مجدد اعمال خواهد شد. اگر آدرس IP را تغییر دهید, لطفا بعد از راه اندازی مجدد آدرس جدید را در مرورگر خود وارد کنید.
3.تنظیم داده ها
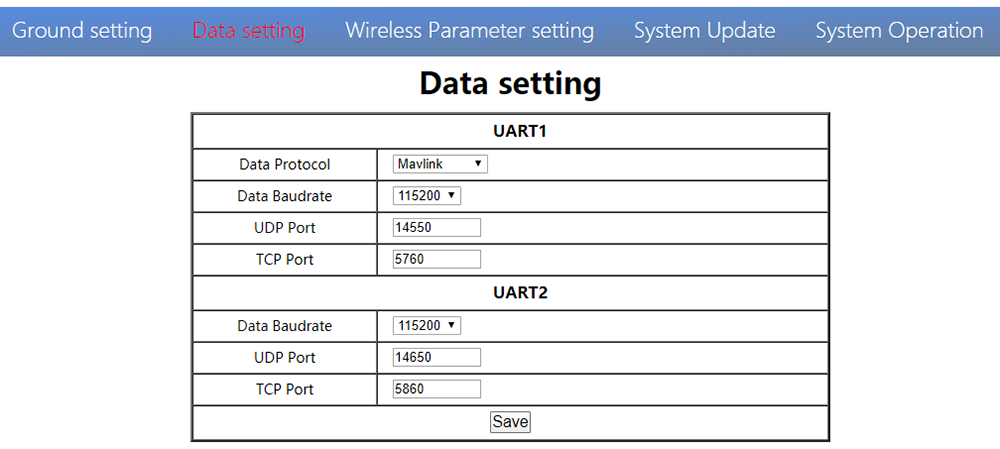
User can change parameter of UART1 and UART2 in Data setting page. UART1 supports two protocols—Mavlink (به طور پیش فرض) and Transparent. User can change protocol、نرخ علامت در ثانیه、UDP/TCP port easily. The UART data can be transmitted to the computer through the Ethernet of the ground unit.
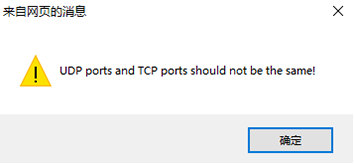
توجه,UDP and TCP ports of UART1 and UART2 should not be the same.
4. تنظیم پارامتر بی سیم
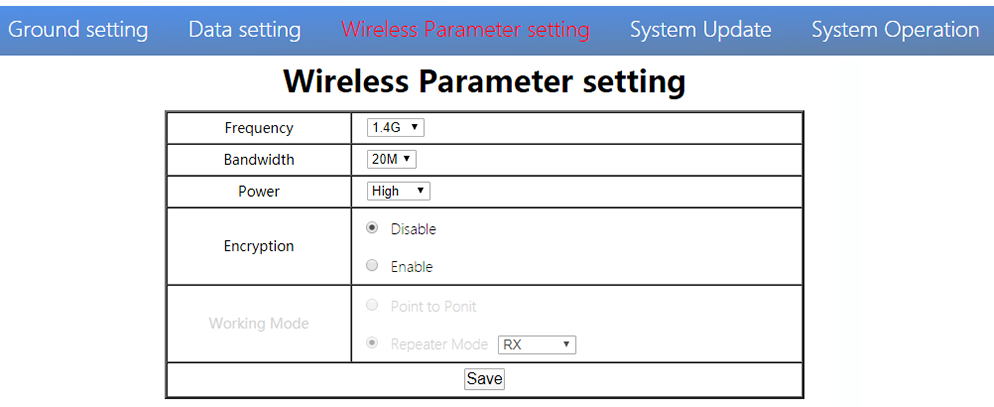
کاربر می تواند پارامتر بی سیم را در صفحه تنظیمات پارامتر بی سیم تغییر دهد . می توانید به جدول زیر مراجعه کنید.
| پارامتر | ارزش | شرح |
| فرکانس | 800M/1.4G/2.4G | اختیاری |
| پهنای باند | 3/5/10/20M | اختیاری |
| قدرت | بالا / متوسط / پایین | اختیاری |
| رمزگذاری | Disable/Enable | اختیاری |
| حالت کار | Synchronize automatically | Turn grey |
When you configure parameter through Web UI, پس از راه اندازی مجدد اعمال خواهد شد
5. به روز رسانی سیستم
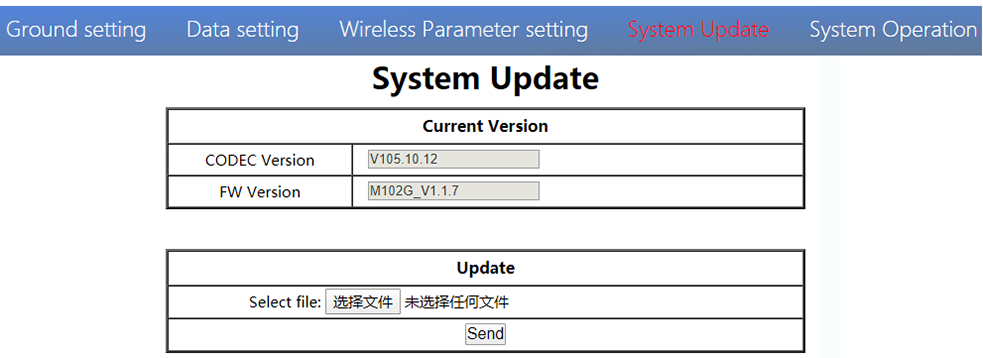
Both ground and air unit are upgraded in the same way. Please refer to other parts of this document.
6. عملیات سیستم
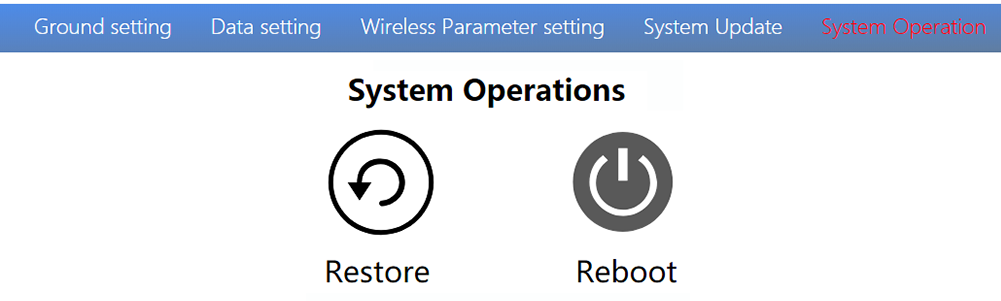
Both ground and air unit system operation are in the same way. Please refer to other parts of this document.
مشخصات
| باند فرکانس | 800مگاهرتز/1.4 گیگاهرتز/2.4 گیگاهرتز |
| محدوده فرکانس | 800مگاهرتز:806MHz ~ 825MHz1.4GHz:1427مگاهرتز × 1447 مگاهرتز 2.4 گیگاهرتز:2408MHz~2480MHz |
| عرض باند | 3مگاهرتز/5 مگاهرتز/10 مگاهرتز/20 مگاهرتز |
| حالت مدولاسیون | OFDM |
| EIRP | 25DBM به 1DB ± |
| حساسیت | ≤-92dBm |
| برد | 17کیلومتر*1 |
| نرخ بیت های ویدئویی | 500k~5Mbps |
| دی سی 9 ~ 28V (Battery 3S~6S) | |
| هوا | 6.5W |
| زمین | 5W |
| انتن | Air 2*MMCX ,Ground 2*SMA |
| UART | TTL 3.3V,1 بیت شروع, 8 بیت داده, 1 ذرهء ایست نما, بدون برابری. |
| UART1and UART2 | |
| نرخ Baud 115200 (پیش فرض),57600, 38400, 19200, 9600 | |
| HDMI (نوع A) | 1 |
| SBUS | 1 |
| 网口 | 1 (Air GH1.25 4Pin) |
| 1(Ground RJ45) | |
| یو اس بی (نوع A) | 1 (زمین) |
| CVBS | 1(Air GH1.25 2Pin) |
| وضوح | 1080P60 backward compatible |
| کدک | H.265 / H.264 |
| نرخ بیت های ویدئویی | 500kbps~5Mbps |
| Video delay | below 250ms |
| رابط | MMCX |
| نوع | Glue stick antenna |
| نوع قطبش | عمودی |
| کسب کردن | 2.5دسی |
| SWR | ≤2.0 |
| رابط | دبیرستان |
| نوع | آنتن فایبر گلاس |
| نوع قطبش | عمودی |
| کسب کردن | 7دسی |
| SWR | ≤2.0 |
| دمای کار | -40℃ ~ + 70 ℃ |
| دمای ذخیره سازی | -40℃ ~ + 85 ℃ |
| رطوبت | 5~ 95٪,غیر متراکم |
| اندازه | هوا 93.5 ایکس 54.5 ایکس 17 mmGround 112 ایکس 63.5 ایکس 19 میلی متر |
| وزن | Air 105gGround 143g |
*1 فاصله تحت شرایط بدون تداخل و LOS آزمایش می شود.
توجه داشته باشید:The explanation right of the above product specification belongs to Shenzhen Mainlink Aero communication Technology Co., محدود.
پرسش و پاسخ
| 1 شرح | The power indicator light is not on after powering up |
| راه حل: 1. Check the wiring order of the power cable. 2. Check the DC power range. | |
| 2 شرح | Link indicator light is not on after powering up. |
| راه حل: 1. Check that the RF cable is connected properly. 2. Check that the BW shortcut keys of the air and ground are in the same position. 3. Check the antenna is OK. | |
| 3 شرح | The air and ground link is OK, but no HDMI output. |
| راه حل: 1. Check that camera is work well and the cable is in good connection; 2. Check the HDMI monitor; 3. Please contact our company’s after-sales service. | |
| 4 شرح | DescriptionHDMI monitor output OSD“Transmitter Loss”. |
| راه حل: 1. This OSD means the ground unit does not establish a connection with the air unit. 2. Check the antenna and the RF cable. 3. Please contact our company’s after-sales service. | |
| 5 شرح | HDMI monitor output OSD “No Video Source Input”。 |
| راه حل: 1. This OSD means the ground unit has established a connection with the air unit. But the air does not add a camera or the camera can not be recognized by the air unit. 2. Check the HDMI cable or the Ethernet cable that connecting the camera and the air unit. 3. Please contact our company’s after-sales service. | |
| 6 شرح | The link indicator light is OK. But no data output. |
| راه حل: 1. Check the UART cable wiring order. 2. Check the UART baud rate. 3. Please contact our company’s after-sales service. | |
| 7 شرح | The ground unit can’t output RTSP video streaming. |
| راه حل: 1. Check the cable connection and wireless link is OK. 2. Check the IP address of computer is right. 3、Check the RTSP server address is correct. 4、Please contact our company’s after-sales service. | |
| 8 شرح | SBUS communication error. |
| راه حل: 1.Check the wire order of the SBUS and +5V is right. 2. Please contact our company’s after-sales service. |
توجه داشته باشید:برای اطلاعات بیشتر, please check out our official video tutorial. Foreign users please check You Tube .
سوال بپرسید
از پاسخ شما سپاسگزاریم. ✨