


IP to HDMI CVBS video decoder board H264 low latency

Table of Contents
Feature
- H.264 video decoder board, high definition output up to 1920*1080@60
- IP Ethernet RJ45 input video stream, HDMI + AV Analog CVBS output to the monitor
- Audio codec with audio output
- Video record with a Micro SD card or USB disk (power on automatic start)
- Two ways to set or configure the parameter. Webpage via browser or UART AT command via serial port.
- The normal video latency is about 200 milliseconds when paired with our encoder module
- Support proprietary H.264 video decompression only used p-frames for lowest latency as 50 milliseconds to 130 milliseconds
- RTSP to HDMI converter/decoder


Advantage
- Our video decoder board has H.264 video decoding and audio codec capabilities. It receives video streams through an IP Ethernet connection, decodes them, and outputs the display via HDMI and AV interfaces.
- The board offers a variety of signal outputs, including HD video at resolutions of 1080P and 720P, down-converted HD CVBS monitor video, and two channels of analog audio.
- The video decoder board also features DVR recording functionality, allowing users to record onto a Micro SD card or USB disk using dedicated recording switch controls.
- Moreover, it includes a built-in RTSP server that facilitates video streaming over Ethernet for use with remote software or hardware decoders (optional).
- Designed to be compact, our video board is ideal for embedded applications and enables real-time live video monitoring through wireless links or Ethernet connections.
Specification
Input and Output
| HD video output | HDMI type A connector |
| Composite video output | 6PIN PH2.0mm connector |
| Audio output | Embedded HDMI and 6PIN PH2.0mm connector |
| Power in | 2PIN PH2.54mm connector |
| USB Host | 4PIN PH2.0mm connector |
| Keys+LEDs | Extension port for assembling keys and LEDs on necessary |
| 3.3V TTL data uart | 3PIN PH1.25mm connector |
| 3.3V TTL control uart | 4PIN PH1.25mm connector |
| TF-Card | TF-Card slot |
| Ethernet | 6PIN PH2.0mm connector |
Video and Audio
| Video output | HDMI and CVBS |
| Video formats | 1080P or 720P, 720*480 60I(NTSC), 720*576 50I(PAL) |
| Video Decoding | H.264 |
| Audio output | Embedded HDMI and AV audio |
| Audio Decoding | AAC |
| Decryption | AES256 |
| Storage | USB disk or micro SD card |
| Ethernet stream protocol | Support UDP TS stream decoding, RTSP client decoding, RTSP server forward |

Monitoring and control
- Webpage via computer browser (default IP address 192.168.1.24)
- Send the UART AT command via the serial control port.
Temperature range
Full specification: 0° to +70°C Ambient (Optional: -40° to +85°C )
Storage: –40° to +85°C
Physical Characteristics
Dimensions: 80.4 * 50.8mm(not including connectors out of the board)
PCB thickness: 1.2mm, maximum height of up components less than 7mm, maximum height of bottom less than 2.5mm.
Weight: 27.3g
Power requirements
Input range: 9~30VDC
Power consumption: <250mA@12V
I/O signals:
Power in and USB Host
The power input interface is a 2PIN PH2.54mm connector. The USB host is a 4PIN PH2.0mm connector.
The AV out is a 6PIN PH2.0mm connector. The Ethernet port is a PH2.0mm connector, 100M ethernet port. This video decoder board supports UDP TS video stream decoding, RTSP client decoding, and also RTSP server forward.
Data-uart and control-uart
Data uart: 3PIN PH1.25mm connector, TTL 3.3V. When the video decoder board works paired with our video encoder module and Ethernet linker (wireless or wire), the uart data of the encoder module will be transferred to this uart.
Control uart: 4PIN PH1.25mm connector, TTL 3.3V. This video decoder board system can be set up via this control uart with AT command.
LEDs and Keys
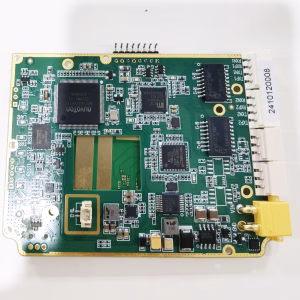
The extension port is designed for assembling keys and LEDs if necessary, it’s a 2.0mm 5*2PIN connector, please view the PCB silk printing for its signals (as the photo above).
| LED | Description |
| Power-LED | Light on when the board is normally powered |
| Video-LED | Blinks when the video stream is normally received and decoding |
| Record-LED | Light on when video is being recorded with a USB disk or TF card |
OSD_key
OSD key: turn on/off the status of the OSD displaying, and long press it to switch(more than 1s). the status will be kept after reboot. When the OSD status is on without any OSD data input from the data uart, the system will display video information (video bitrates, etc.) on the video screen. When the OSD status is on with data input from the data uart, the system will display text information of the uart data on the video screen.
Rec_Key
Record key: switch button for video recording, short press to change its status. The system will automatically check the storage device(TF card or USB disk, priority TF card) after power on and start to record video when the storage device is inserted. Just press the button to stop or record again.
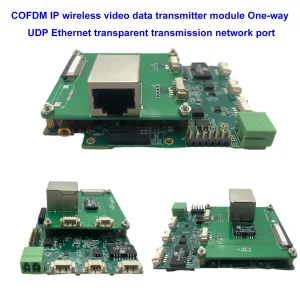
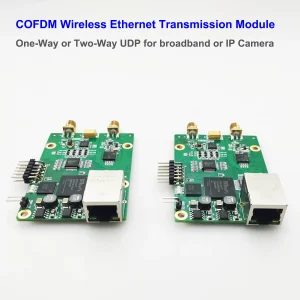
RJ45 ethernet COFDM Transmitter for the IP camera video Transmission

FAQ
Q: How can I use the Rec key to record the video?
A: After the storage device is connected, the system detects the storage device and automatically records the video.
Q: Can I use the Rec_key pin?
A: Connect a button between the REC_Key pin and the GND pin (if there is no button, simulate the button operation by short-circuiting REC_Key and GND), or use the MCU’s gpio to connect the REC_Key pin for control.
Q: Do you have an appropriate box for your video LAN modules?
A: No, if you need, we have to make one metal box for you, it has extra cost.
We only provide these two boards to customers as accessories. Customers will install them in their own iron boxes. Customers will also install other boards together, so the shell is made by the customers themselves.
Q: One of them has an FPGA that heats up during operation.
A: It is normal for the operating temperature to be high during encoding and decoding. Our boards can pass high and low temperature tests at -40 degrees and 80 degrees. If necessary, you can add your own heat sink, or add a cooling fan to the case. Whether it is very hot or not is also related to the local temperature and working environment. Heat dissipation can also be achieved by using thermal conductive adhesive to stick a small heat sink of appropriate size on larger ICs such as CPU and DDR.
Encoder Modules Boards


Decoder Modules Boards


Available for Customization
New Encoder Products
| No. | Product Name | Configuration | Key Features | Status |
|---|---|---|---|---|
| 1 | Dual-Channel USB UVC Visible Light Video Encoder | 2× USB input | Supports dual USB camera video encoding, and RTSP streaming; local CVBS/HDMI output; switchable display modes | Mass Production |
| 2 | Dual-Channel Encoder (1× USB Visible Light + 1× USB Thermal Imaging camera) | 2× USB input | Supports dual USB camera (visible + thermal) capture, encoding, and RTSP streaming; local CVBS/HDMI output; switchable display modes | Mass Production |
| 3 | RTSP Decoder HDMI/CVBS Display Module | HDMI + CVBS output | Supports up to 4×1080P@30fps RTSP stream decoding; Support video streaming protocol forwarding; HDMI/CVBS output display | Sample Available |
| 4 | RTSP Decoder HDMI/CVBS Display Module with 4.3"/5" LCD | HDMI output + LCD screen | Supports up to 4×1080P@30fps RTSP stream decoding; protocol forwarding; HDMI/CVBS output display | Debugging |
| 5 | Dual-Channel Encoder (1× USB Visible Light + 1× CVBS Analog) | 1× CVBS + 1× USB UVC input | Dual video (USB + CVBS), encoding and RTSP streaming; local CVBS/HDMI output; switchable display modes | Debugging |
| 6 | Dual-Channel Encoder (1× USB UVC + 1× AHD Analog) | 1× AHD + 1× USB UVC input | Dual video capture (USB + AHD), encoding and RTSP streaming; local CVBS/HDMI output; switchable display modes | Debugging |
| 7 | Dual-Channel Encoder (1× CVBS + 1× AHD Analog Video) | CVBS + AHD 2 video input | Dual analog video capture, encoding and RTSP streaming; local CVBS/HDMI output; switchable display modes | Debugging |
| 8 | Dual-Channel Encoder (1× CMOS Camera + 1× USB Thermal Imaging camera) | 1× USB interface | Supports CMOS + USB thermal camera capture, encoding and RTSP streaming; local CVBS/HDMI output; switchable display modes | Mass Production |
For customized video input/output conversion solutions not listed in our products, please contact us for OEM/ODM support. We can develop tailored products based on your requirements.


iVcan.com –
I have been using this IP to HDMI CVBS H.264 video decoder board for a few months, and it has exceeded my expectations. The video quality is excellent, with smooth 1080P output and minimal latency, making it perfect for real-time monitoring. Setting up via the web interface or UART commands is straightforward, and recording to a TF card or USB drive works seamlessly. The board is compact, robust, and reliable, even under continuous operation. I highly recommend it for industrial or embedded video applications.