


Micro COFDM Video Transmitter FPV1887 Wireless Video Transmission System Users Manual

Daftar isi
Micro COFDM Video Transmitter FPV1887 Feature
- Sangat terintegrasi, desain gabungan modular
- Using COFDM modulation technology and H.265 encoding technology
- Can simultaneously transmit one channel of analog video signal and one channel of unidirectional data supporting the highest rate of 230400bps
- Latensi rendah, end-to-end latency minimum 120ms
- Omni-directional communication, extremely strong diffraction performance
- High-speed on-the-go communication
- Transmitter heat sink aluminum casing, tahan guncangan dan tahan benturan
- Tidak saling berhadapan (NLOS) transmisi seluler, ground transmission, when the sending and receiving height is 3 meter, the transmission distance is not less than 3Km, and the distance under line-of-sight conditions is not less than 30 kilometer (with slight non-co-frequency electromagnetic interference), the furthest The distance can reach more than 100Km (the electromagnetic environment is clean)
- Kecepatan gerak maksimalnya bisa mencapai 600Km/jam (actual measurement)
- The receiver video signal is synchronously outputted in high-definition HDMI1080P with multiple formats optional, and standard-definition outputs DVD image quality
- Penerima dapat mewujudkan fungsi perekaman video dan cadangan
- 128-enkripsi dan dekripsi AES bit
- Kustomisasi penuh tersedia
Mirco COFDM Video Transmitter FPV1887 Application
This product is mainly used in technical reconnaissance and evidence collection by public security and safety inspection departments. Because of its extremely strong diffraction performance and narrow-band high anti-interference ability, this product is particularly suitable for video transmission of low-altitude, high-speed drones and ground unmanned equipment.

The relationship between transmission distance and height
Micro COFDM Video Transmitter Parameter Indicators
COFDM Video Transmitter Appearance (hanya gambar standar, kecuali untuk penyesuaian)

Whole machine sample drawing

COFDM Video Transmitter Specification
| Metode modulasi | COFDM |
| Tegangan Kerja | DC11V~DC18V |
| Bekerja Saat Ini | Mainboard current: 160mA; whole machine current: 0.5-Watt PA @≤0.6A DC12V; 1-Watt PA @≤0.8A DC12V; 2-Watt PA @≤1.1A DC12V; 3-Watt PA @≤1.8A DC12V, |
| Antarmuka Kontrol | Antarmuka RS232 standar: 8 bit data 1 berhenti sedikit Bahkan paritas Tingkat baud: 19200 |
| transparent Data interface | A one-way transparent serial port transmission 8 bit data 1 berhenti sedikit Supports odd parity, Bahkan paritas, Wireless parity, Tingkat baud: 1200, 2400, 4800, 9600, 19200, 38400, 57600, 115200 ,230400 |
| Metode Enkripsi | 128-enkripsi AES sedikit |
| Pemetaan Modulasi | QPSK (4QAM), 16QAM, 64QAM (factory default is QPSK) |
| Koreksi Kesalahan Teruskan | 1/2 2/3 3/4 5/6 7/8 (factory default is 1/2) |
| Guard Interval | 1/32 1/16 1/8 1/4 (factory default is 1/32) |
| Number of Carriers | 2K |
| Bandwidth Frekuensi | 2/3/4/5/6/7/8M dapat disesuaikan (factory setting is 2MHz) |
| Arus Transportasi | 1200kbs~20000kbs dapat disesuaikan (factory default is 1500kbs) |
| Mengirimkan Kekuatan | Motherboard output power: -7dBm (average power); Overall machine output: 0.5W/1W/2W/3W/5W (disesuaikan) |
| Frekuensi Transmisi | 170-2900MHz frequency is continuously adjustable With a step of 100KHz (the default frequency of the tuner is 1MHz) The frequency of the whole machine needs to be customized |
| Kerataan kekuatan | Kurang dari 0,2dB pada pita 10MHz |
| Belt to shoulder Ratio | Mainboard: 52dB; When the output power of the whole machine is 30dB The belt-to-shoulder ratio is better than -30dB |
| harmonik kedua | ≤-65dB |
| MER | 32dB |
| Enter Video | CVBS: NTSC/PAL |
| Format pengkodean video | H.265 |
| Video Time Lapse | End-to-end ≤120ms |
| Protection standards | All-aluminum radiator chassis, anti-rust, anti-shock design |
| Ukuran | Ukuran papan utama: 50mm×35mm×10mm; Overall machine size: 67*48*23mm |
| Berat | Motherboard: ≤15g; Whole machine ≤85g (2keluaran W) |
Micro COFDM Video Receiver Parameter Indicators
COFDM Video Receiver Appearance


COFDM Video Receiver Specification
| Menerima Rentang Frekuensi | 170-860MHzVHF&UHF Over 860Mhz~6000Mhz needs to add Konverter Turun Frekuensi |
| Bandwidth Frekuensi | 2/3/4/5/6/7/8MHz, dapat disesuaikan |
| Tingkat masukan RF | -94dBm~0dBm (pada bandwidth 8M) -98dBm~0dBm (pada bandwidth 2M) |
| Impedansi masukan RF | 50 ohm |
| Konektor masukan RF | Perempuan SMA |
| Metode demodulasi | COFDM |
| Zodiac sign | QPSK, 16QAM, 64QAM (opsional) |
| Koreksi kesalahan ke depan | 1/2,2/3,3/4,5/6,7/8 (opsional) |
| Jumlah operator | 2k, |
| Guard Interval | 1/32,1/16,1/8,1/4 (opsional) |
| Penguraian Video | H.265 |
| Screen Aspect Ratio | 4:3 16:9 |
| Keluaran Video | HDMI/CVBS |
| Tegangan Kerja | DC12V<0.3A |
| Suhu Kerja | -35℃~+80℃ |
| Ukuran penampilan | 80*60*16mm(ukuran PCB); Complete machine136*115*35mm |
| Equipment Weight | 0.1kg (berat PCBA); 0.35kg (complete machine weight) |
Micro COFDM Video Transmitter Parameter Adjustment Instructions

Parameter adjuster (Transmitter Programmer is optional, not at the default packing)
Transmitter Parameter Configuration Tool Functional Area Description
- Functional Area Description
- “SEMUT”: Transmisi antarmuka antena, silakan sambungkan antena sebelum menyalakan
- “HDMI”: Antarmuka masukan video definisi tinggi, masukan di bawah 1080/50P
- “Ctrl”: transmitter frequency modulator connection interface
- “DC 12V”: Port masukan daya DC12V. “+” adalah kutub positif dari catu daya, “-” adalah kutub negatif dari catu daya
- “DC”: Lampu indikator daya. When this light is always on, itu berarti input daya modul transmisi normal.
- “TS”: Lampu indikator deteksi masukan video. This light is always on to indicate that the video is input and encoded normally.
Transmitter Parameter Configuration Instructions
Connect the transmitter parameter adjuster and press the “MENU/OK” button to enter the menu.
The encryption key and data serial port parameters are first displayed.
Press the left or right button to move the cursor and use the up and down buttons to adjust the parameters.

When this parameter setting is completed, tekan “MENU/OK” to enter the next level menu. Saat ini, the interface is displayed as shown in the figure

Press the left or right button to move the cursor, and press the up or down button to adjust the required parameters. The interface prompt is as shown in the figure.

When all parameter settings are completed, tekan “MENU/OK” kunci untuk mengonfirmasi, and the display will appear as shown below.

Setelah pengaturan selesai, parameter berhasil ditulis, dan tampilannya seperti pada gambar.
Micro COFDM Video Receiver Parameter Adjustment Instructions
Receiver Parameter Configuration Tool Functional Area Description
- “RF dalam1” “RF dalam2”: antarmuka antena penerima. It is recommended to connect the antenna before turning on the power switch, because static electricity from the human body may cause the receiver to crash.
- “HDMI”: Antarmuka keluaran Video, format video keluaran dapat disesuaikan melalui “HDMI” menu pada panel kontrol.
- “DC 12V”: Power input interface, harap ikuti dengan ketat persyaratan tegangan catu daya, and over-voltage input is strictly prohibited.
- “USB”: Video storage interface. When the U disk is inserted, tekan “KELUAR” key to start recording. After successful recording, the recording time will appear on the video monitor, and the storage file name is “TS”.
Receiver LCD parameter description
- Functional Area Description
- CH01 TIDAK TERKUNCI(TERHADAP)
- “CH01” is the receiver channel number, “TIDAK TERKUNCI” is the receiving signal that is not locked, dan “TERHADAP” is the signal that is locked. “CH00” of the receiver is the starting writing channel, dan saluran default yang sesuai dengan pengoperasian normal pemancar adalah “CH001”
- FREKUENSI:602.0MHz
- “602.0MHz” adalah frekuensi penerimaan penerima. This frequency must be consistent with the frequency set by the transmitter. Jika tidak, the receiver cannot search or receive the transmitter signal.
- BW:6.0MHz
- “BW” lebar pita, seperti yang ditunjukkan pada gambar, “BW: MHz” is understood to mean that the radio frequency bandwidth is 6MHz (default is 2MHz). This bandwidth must be consistent with the bandwidth set by the transmitter, jika tidak, the receiver will search for or cannot receive the transmitter signal.
- FEC:1/2
- “FEC:1/2” is channel error correction. This parameter synchronizes the transmitter setting parameters and cannot be modified by the receiving end.
- GI:1/32
- “GI:1/32” adalah interval penjaga saluran. This parameter synchronizes the transmitter setting parameters and cannot be modified by the receiving end.
- PETA: QPSK
- “PETA: QPSK” adalah pemetaan modulasi. This parameter is synchronized with the transmitter setting parameters and cannot be modified by the receiving end.
- SNR: 0.0dB(SNR:15.0dB)
- “SNR:15.0dB” adalah kualitas sinyal (yaitu. rasio sinyal terhadap kebisingan, semakin besar nilainya, semakin baik). Kapan “0.0dB” ditampilkan, kualitas sinyalnya adalah 0, dan penerima tidak akan dapat mengunci.
- “(SNR:15.0dB)” berarti rasio signal-to-noise penerima lebih besar dari 15dB. Di “QPSK” keadaan pemetaan modulasi, the receiver can lock as long as the signal-to-noise ratio is greater than 6dB.
- PW:-72.1dBm(PW:-72.1)
- PW adalah kekuatan sinyal yang diterima, (nilai tingkat referensi). The farther away the receiving end is from the receiving end, the weaker the signal strength, and the larger the displayed value. When the transmitter is not turned on, if the signal strength of the receiver is greater than -90dBm (such as -79.7dBm), it can be considered as adjacent frequency interference
Receiver Parameter configuration description
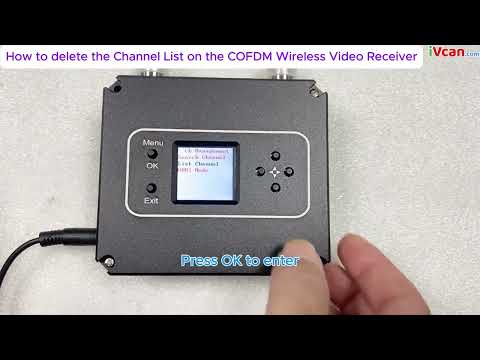
Turn on the power of the receiver and press the “MENU/OK” button to enter the menu. The menu with adjustable parameters is first displayed. If you want to search for a specified frequency, tekan “MENU/OK” button to enter the menu. If you need to remove a channel, press the down button to select “ListanbulChannel”, and then press the “MENU/OK” button to enter the menu operation; if you need to save the current channel, tekan “MENU/OK” at the same time and right-click to confirm the save.


The frequency search method is as follows. After entering the frequency setting menu, the interface is displayed as shown in the figure. Press the left or right button to move the cursor, press the up or down button to adjust the frequency, radio frequency bandwidth, dan kunci rahasia yang cocok dengan pemancar. Tekan “MENU” /OKE” key to search. Perhatikan bahwa pemancar harus dihidupkan saat ini, otherwise the receiver will not be able to lock because it cannot search for signals.


Ketika pencarian selesai, tekan “MENU/OK” untuk mengkonfirmasi. Saat ini, the channel is saved in the parameter adjustment board register, seperti yang ditunjukkan pada gambar. If you need to save the channel to the receiver register, tekan “MENU/OK” kunci dan kunci kanan secara bersamaan.

Setelah pengaturan parameter penerima selesai, the panel button functions are as follows:
“^””↓“: Each individually selectable receiver channel “CH **”
“←””→”: Anda dapat memilih untuk melihat parameter tersembunyi dari receiver
“KELUAR”: memulai dan berhenti merekam
Micro COFDM Video Transmitter and Receiver Typical troubleshooting
| Fault phenomenon | Larutan |
| No image, no sound | 1. Check whether the transmitter battery is charged and whether the transmitter indicator light is normal. Pay special attention to the distance and wiring pattern of the transmitter video cable and power cable from the antenna. 2. Check whether the camera battery is charged, whether the audio and video cable has been connected to the transmitter, and whether the camera is in standby mode. 3. Check whether the receiver antenna is connected properly and whether the antenna connector is wet or loose. 4. Check whether the monitor audio and video cables are connected properly and whether the startup screen is normal. 5. Check the frequency settings, and whether the frequency settings for transmitting and receiving are the same. 6. Check the electromagnetic environment to see if there is interference from same-frequency signals nearby |
| The receiver has no picture, but the sound is normal | 1. Check whether the video cables of the camera and transmitter are connected properly 2. Check whether the video cable between the receiver and the PC is properly connected |
| No sound or noise from the receiver but the normal picture | 1. Check whether the audio cables of the camera and transmitter are connected properly. 2. Check whether the audio cable between the receiver and the TV or audio output device is properly connected. |
| The image is continuous, then pauses, and a black screen appears. | 1. The signal is not good, which is normal. 2. Whether the signal quality display on the LCD screen on the receiver keyboard is normal, and whether the parameter value fluctuates greatly (lebih dari 10). Jika demikian, it means there is some frequency interference. |
| Coverage suddenly becomes smaller | 1. Check whether the transmitting antenna and receiving antenna are connected properly and whether there is water or poor contact 2. Check whether the power supply voltage of the transmitter is normal. 3. Check the surrounding environment for electromagnetic interference from signals of the same frequency. |
| The coverage is small and the transmission distance is not far enough | Check the installation position of the receiving antenna, increase the height of the receiving antenna, and use high-gain omnidirectional and directional antennas and diversity reception if necessary |
| There is image and sound, but the image is blurry | Check whether the camera at the front end of the transmitter is focused accurately and whether the autofocus function setting is turned on. |
Video Operation Guide
How to delete the Channel List on the COFDM Wireless Video Receiver
[VF-202408]
Berikan pertanyaan
Terima kasih atas tanggapan Anda. ✨