
Encoder Modulator Decoder Demodulator Module Parameter Configuration Instructions COFDM AT Command
Encoder Modulator Decoder Demodulator Module Parameter Configuration Instructions COFDM AT Command

Download the Encoder Modulator Decoder Demodulator Module Parameter Configuration Instructions below if you need a PDF file.
Update Record:
| संस्करण | तारीख | विवरण |
| 1.0 1.1 1.2 1.3 1.4 1.5 1.6 1.7 1.8 1.9 2.0 2.1 | 2016-10-24 2016-11-1 2016-12-26 2017-2-14 2017-2-28 2017-3-27 2017-4-19 2017-5-18 2017-9-12 2018-3-15 2019-6-25 2023-2-24 | Initial version ATDR reply distinguishing module ATSE, ATGE add audio switch Add ATSP protocol Add ATST, ATGT protocol ATGE command add AESfor status acquisition Added ATGB protocol AV and HDMI output control Support for obtaining the current AV output standard Added ATSU, ATGUcommands Added ATOSD, ATSIP, ATGIP commands Added ATSAD, ATGAD commands |
Users may need to modify the configuration parameters of the module during the use of the COFDM modulator and demodulator module. In order to simplify the user’s operation, we design the parameter configuration into a few simple AT commands. The user only needs to use the specified AT command and pass the corresponding parameters to complete the parameter setting of the COFDM module.
Suitable Models
-
 ड्रोन UAV वायरलेस वीडियो ट्रांसमीटर और रिसीवर Vcan1870 के लिए COFDM रिले रिपीटर मॉड्यूल
 -
 सीओएफडीएम मॉड्यूलेटर डेमोडुलेटर मॉड्यूल एनकोडर डिकोडर एचडीएमआई सीवीबीएस एवी इनपुट एईएस 256 FHD आरएफ स्ट्रीमिंग
 -
 कैमरे के लिए वायरलेस वीडियो ट्रांसमीटर और रिसीवर, एचडीएमआई एचडी एच 265 264 एनकोडर 1W/2.5W PA 1080P60 Vcan1726
 -
 यूएवी ड्रोन रोबोटिक के लिए एचडीएमआई टू आईपी एनकोडर मॉड्यूलेटर सीवीबीएस एच.265 एच.264 एन्कोडिंग बोर्ड पीसीबीए ईथरनेट आरएसटीपी यूडीपी
Command Introduction
The AT command for configuring COFDM module parameters starts with “AT” and ends with an underscore “_”. Each AT command has several or no parameters, and each AT command has a return value. For details, please refer to the introduction of the following commands.
Users can configure the parameters of the module through the configuration serial port (टीटीएल स्तर, 3.3वी) of the COFDM module. For detailed serial port configuration, refer to the figure below. Please use tools such as “Serial Port Debugging Assistant” to send AT commands to the COFDM module, pay attention to the use of मूलपाठ, उदाहरण के लिए:

सीommand Classification
The AT commands for configuring COFDM module parameters are mainly divided into the following two categories:
| Query Commands | ATDR, ATGD, ATGE, ATGI , ATGR, ATGT, ATGB, ATGU, ATGIP |
| Setting Commands | ATSD, ATSG, ATSM, ATSE, ATSI, ATSO, ATSR, ATSP, ATST, ATSU,ATOSD, ATSIP |
From the perspective of whether to save after power-off, the setting commands can be divided into:
| Power-off Saving Commands | ATSD, ATSE, ATSI, ATSO, ATSR, ATSP, ATST, ATSU, ATSIP |
| Power-off Not Saving Commands | ATSG, ATSM, ATOSD |
According to the configuration transmitter or receiver, the classification is as follows:
| Sender Configuration Commands | ATDR, ATSD, ATGD, ATSG, ATSM, ATSE, ATGE, ATSI, ATGI, ATSO, ATSP, ATST, ATGT, ATSU, ATGU, ATOSD |
| Receiver Configuration Commands | ATDR, ATSR, ATGR, ATSP, ATST, ATGT, ATGB, ATSIP, ATGIP |
Command Details
Ping Command
| स्वरूप | ATDR_ |
| पैरामीटर | नहीं |
| उपयोग | for the integrated system to check whether the serial port is connected and identify the connected modules. |
| प्रतिलाभ की मात्रा | RCB returns the “device profile” string SUE1 returns “ATDRSUE1 OK” string SHD1 returns “ATDRSHD1 OK” string |
| टिप्पणी | क्वेरी आदेश |
Set Device Command
| स्वरूप | ATSD $(mimo), $(gi), $(विन्यास योग्य आरएफ आउटपुट पावर), $ (constellation), $(फ्रीक(KHz)), $(bw(KHz)), $(tx1_gain), $(tx2_gain)_ उदाहरण: ATSD0,1,0,0,800000,8000,86.0,86.0_ |
| पैरामीटर | One Antenna/Dual antenna mimo: 0 mimo disable; 1 mimo enable Guard Interval GI: 0 1/32; 1 1/16; 2 1/8; 3 1/4 Convolution Code Rate: 0 1/2; 1 2 /3; 2 3/4; 3 5/6; 4 7/8; नक्षत्र: 0 QPSK; 1 QAM16; 2 QAM64; RCB Carrier Center Frequency(kHz) 200000~2700000(200MHz~2.7GHz, 1केएचजेड चरण) RC900 Carrier center Frequency(kHz) 750000~930000(750मेगाहर्ट्ज ~ 930MHz, 1केएचजेड चरण) RCB Channel bandwidth bw(KHz) 2000~8000(2मेगाहर्ट्ज ~ 8 मेगाहर्ट्ज, 1केएचजेड चरण) RCB Channel bandwidth bw(KHz) 2000~8000 (2मेगाहर्ट्ज ~ 8 मेगाहर्ट्ज, 1केएचजेड चरण) Transmitting antenna 1 gain tx1_gain 0.0~89.75dB, 0.25डीबी स्टेपिंग Transmitting antenna 2 gain tx2_gain 0.0~89.75dB, 0.25डीबी स्टेपिंग |
| Return Value | जैसे कि:ATSD0,1,0,0,800000,8000,86.0,86.0_ SISO,सैनिक: 1/16, सीआर:1/2, MOD: QPSK, फ्रीक:800000KHz,bw:8000KHz,tx1_gain:86.000000 tx2_gain:86.000000 ठीक |
| ध्यान दें | Set command, save when power off. Different Bandwidths, गार्ड अंतराल, Convolution code rates, Data rate calculation formulas corresponding to constellations Air interface rate Rate(विन्यास योग्य आरएफ आउटपुट पावर) विन्यास योग्य आरएफ आउटपुट पावर (बैंडविड्थ(मेगाहर्ट्ज) * 8.0/7.0) / (1+सैनिक) * 1512/2048*विन्यास योग्य आरएफ आउटपुट पावर(विन्यास योग्य आरएफ आउटपुट पावर) * विन्यास योग्य आरएफ आउटपुट पावर * 188/204. Taking 8MHz bandwidth as an example, different guard intervals, convolution code rates, data rates corresponding to constellations and required receiving signal-to-noise ratios  |
एसet Gain Command
| स्वरूप | ATSG$( tx1_gain),$( tx1_gain)_ उदाहरण: ATSG85.0,85.0_ |
| पैरामीटर | tx1_gain: ट्रांसमीटर 1 बढ़त tx2_gain: ट्रांसमीटर 2 बढ़त |
| उपयोग | To dynamically adjust the output power. If the signal SNR/RSSI of the receiver is high, the output power can be reduced through the remote control link. When the SNR/RSSI of the end signal is low, increase the output power (ट्रांसमीटर) |
| Return Value, | उदाहरण: ATSG85.0,85.0_set gain 85.000000 85.000000 ठीक |
| टिप्पणी | setting command, power off will not save. |
Set Modulation Mode commanडी
| स्वरूप | ATSM$(gi), $(विन्यास योग्य आरएफ आउटपुट पावर), $(constellation)_ उदाहरण: ATSM1,1,2_ |
| पैरामीटर | Gard interval GI: 0 1/32; 1 1/16; 2 1/8; 3 1 /4; Convolution code rate: 0 1/2; 1 2/3; 2 3/4; 3 5/6; 4 7/8; नक्षत्र: 0 QPSK; 1 QAM16; 2 QAM64 |
| उपयोग | Dynamically adjust the air interface rate, the air interface rate can be increased when the distance is short, and the air interface rate can be reduced when the distance is long (ट्रांसमीटर) |
| Return Value | उदाहरण:ATSM1,1,2_GI:1/16, सीआर:2/3, MOD: QAM64, ठीक |
| टिप्पणी | setting command, power off will not save. |
जीet Device Status Command
| स्वरूप | ATGD_ |
| पैरामीटर | नहीं |
| उपयोग | query the current number of transmit antennas, रक्षक मध्यांतर, convolution code rate, number of constellations, transmit frequency, बैंडविड्थ, gain parameters (ट्रांसमीटर) |
| Return Value | उदाहरण: ATGD_ SISO, सैनिक:1 /16, सीआर: 1/2, MOD: QPSK, फ्रीक: 800000KHz, bw: 8000KHz, tx1_gain: 86.000000 tx2_gain: 86.000000 ठीक |
| टिप्पणी | क्वेरी आदेश |
Set Encoder Command
| स्वरूप | ATSE$(llc),$(rt),$(bitrate) ,$(gop),$(ऑडियो)_ उदाहरण: ATSE0,0,0.0,0,0_ |
| पैरामीटर | 1. Enhanced data reliability option llc: 0 disable; 1 सक्षम (requires the receiving end to enable this option at the same time, use in pairs, because more redundant data is added to enhance reliability, the video bit rate of the transmitting end should be set when this option is turned off half of) 2. Real-time priority/quality priority rt: 0 image quality priority; 1 real-time priority; 3. बिटरेट: 0 let system decide; >0 specify bitrate(float) 4. I frame interval GOP: 0 let system decide; >0 specify GOP 5. Audio encoding option audio: 0 disable; 1 सक्षम |
| उपयोग | Used to set encoding parameters (ट्रांसमीटर) |
| Return Value | उदाहरण:ATSE0, 0,0.0,0,0_ मोड:0,RT:0,bitrate: 0.0एमबीपीएस,gop:0,ऑडियो:0,ठीक |
| टिप्पणी | setting command, save when power is off. |
Get Encoder Command
| स्वरूप | ATGE_ |
| पैरामीटर | नहीं |
| उपयोग | querying encoding parameters (sending end) |
| Return Value | उदाहरण:ATGE_MODE:0, RT:0,bitrate:4.0एमबीपीएस,gop:10,ऑडियो:0,aes:0, ठीक |
| टिप्पणी | Query command AES means the current encryption status: 0 disable; 1 सक्षम |
Get Input Command
| स्वरूप | ATGI_ |
| पैरामीटर | नहीं |
| उपयोग | query the current camera input parameters (ट्रांसमीटर) |
| Return Value | उदाहरण:ATGI_input_size: 1080पी, input_rate: 60एफपीएस, sensor_type: HDMI,ठीक |
| टिप्पणी | क्वेरी आदेश |
Set Input Command
| स्वरूप | ATSI$(input_size),$(input_rate)_ उदाहरण: ATSI1080,25_ |
| पैरामीटर | 1. Input resolution input_size: 0 let the system detect; >0 specify input size 2. Input frame rate input_rate: 0 let the system detect; > 0 specify input fps |
| उपयोग | To specify the input resolution and frame rate to meet some special signal sources, or some special application needs (ट्रांसमीटर) |
| Return Value | उदाहरण: ATSI1080,25_ Input_size:1080पी,input_rate: 25एफपीएस, ठीक |
| टिप्पणियों | After the user specifies the input resolution and frame rate through this command, the system will no longer detect the signal source (use with caution). The user can restore the default through the following command: ATSI0,0_Set the command and save it after power-off. |
Set Output Command
| स्वरूप | ATSO$(output_size),$(output_rate)_ उदाहरण: ATSO720,30_ |
| पैरामीटर | 1. ट्रांसमीटर: encoding output resolution output_size: 0 equal to input_size; >0 specify output size 2. रिसीवर: HDMI output resolution (720, 1080) 3. ट्रांसमीटर: encoding output frame rate output_rate: 0 equal to input_rate; >0 specify output_rate (एफपीएस) 4. रिसीवर: HDMI output frame rate 720p supports frame rate (50, 60); 1080p supports frame rate (24, 25, 30, 50, 60) |
| उपयोग | 1. ट्रांसमीटर: Used to specify the encoding output resolution and frame rate to meet the requirements of certain applications for zooming and frame reduction 2. रिसीवर: used to configure the resolution and frame rate of HDMI output |
| Return Value | उदाहरण: ATSO720,30_ output_size: 720पी, output_rate: 30एफपीएस, ठीक |
| टिप्पणियों | 1. For HDMI input only, this command is invalid for AV input 2. Output_size <= input_size; output_rate<=input_rate 3. Set the command and save it after the power is off. |
Set Input Sources Command (switch HDMI / CVBS इनपुट)
| स्वरूप | ATSU$(vin),$(ain)_ उदाहरण: ATSU0,1 _ |
| पैरामीटर | 1. Video input selection VIN: 0 let the system detect; 1 force CVBS input; 2 force hdmi/SDI input 2. Audio input selection AIN: 0 let the system detect; 1 force analog input |
| उपयोग | Used to meet specific application requirements (उदाहरण: HDMI/SDI input video, MIC input audio) |
| Return Value | उदाहरण: ATSU0,1_ ATSU0,1 OK |
| टिप्पणी | setting command, power-off save. |
Get User Command
| स्वरूप | ATGU _ उदाहरण: ATGU_ |
| पैरामीटर | नहीं |
| उपयोग | To query user-specific configuration |
| Return Value | उदाहरण: ATGU_ ATGU0,1 OK |
| टिप्पणी | क्वेरी आदेश return parameter description please refer to the ATSU command |
Set Receiver Command
| स्वरूप | ATSR $(फ्रीक), $(bw ), $(llc), $(cvbs)_ उदाहरण: ATSR320000,6000,0,0_ |
| पैरामीटर | 1. DR2C carrier frequency freq(KHz) 200000~860000(200मेगाहर्ट्ज ~ 860MHz, 1केएचजेड चरण) 2. DR900 carrier center frequency freq(KHz) 200000~1600000(200MHz~1.6GHz, 1केएचजेड चरण) 3. DR2C channel bandwidth bw(KHz) 2000~8000(2मेगाहर्ट्ज ~ 8 मेगाहर्ट्ज, 1केएचजेड चरण) 4. DR900 channel bandwidth bw(KHz) 3200~8000(3.2मेगाहर्ट्ज ~ 8 मेगाहर्ट्ज, 1केएचजेड चरण) 5. Enhanced data reliability option llc: 0 disable; 1 सक्षम (it is required that the transmitter should also enable this option at the same time, and use it in pairs. Since more redundant data is added to enhance reliability, the video bit rate of the transmitter should be set to when this option is turned off half of) 6. AV output system cvbs: 0 pal; 1 ntsc |
| उपयोग | To set the receiver parameter |
| Return Value | example: ATSR320000,6000,0,0_ ATSR320000,6000,0,0 OK |
| टिप्पणी | setting command, save when power is off. |
Get Receiver Command
| स्वरूप | ATGR_ |
| पैरामीटर | नहीं |
| ATGR_ | the receiving end parameter |
| Return Value | उदाहरण: ATGR_ ATGR320000,6000,0,aes:0,cvbs:0 ठीक |
| टिप्पणी | 1. Query command 2. Aes parameter indicates the current encryption status: 0 disable;1 सक्षम 3. CVBS parameter Indicates the current AV output standard: 0 pal;1 ntsc |
Get Bit Error Rate Command
| स्वरूप | ATGB_ |
| पैरामीटर | नहीं |
| उपयोग | querying the bit error rate and signal strength of the dual antennas at the receiving end |
| Return Value | उदाहरण: ATGB_ ATGB ber1:0.00% ber2:0.00% RSSI1 :54 RSSI2:53 Lock1:1 Lock2:1 ठीक |
| टिप्पणियों | 1. Query commands 2. Ber1 and ber2 respectively indicate the bit error rate of each antenna, से लेकर 0.0% सेवा मेरे 100.0% 3. RSSI1 and RSSI2 respectively indicate the signal strength of each antenna, से लेकर 0 सेवा मेरे 100 4. Lock1 and Lock2 respectively indicate the signal locking status of each antenna (1 Represents signal lock) |
Set Password Command
| स्वरूप | ATSP$(password), $(password)_ उदाहरण: ATSP123456, 123456_ |
| पैरामीटर | AES key password: 6-digit password (ASCII) AES key password: 6-digit password (ASCII) (repeat it for confirmation) |
| उपयोग | Used to set the AES key of the transceiver (ट्रांसमीटर और रिसीवर) |
| Return Value | उदाहरण: ATSP123456_ ATSP123456 OK |
| टिप्पणी | 1. When the password is all 0, AES encryption is turned off. 2. Set the command and save it after powering it off. |
Set Data Transfer Command
| स्वरूप | ATST$(बॉड दर), $( parity)_ उदाहरण: ATST115200,0_ |
| पैरामीटर | 1. Baud rate baud rate: 1200、2400、4800、9600、19200、38400、57600、115200 2. Check Code: 0: कोई नहीं; 1: Odd; 2: Even |
| उपयोग | Used to set the baud rate and parity bit of the serial port for data transparent transmission |
| Return Value | उदाहरण: ATST115200,0_ ATST115200,0 OK |
| टिप्पणियों | Set command |
Get Data Transfer Command
| स्वरूप | ATGT_ |
| पैरामीटर | नहीं |
| उपयोग | Used to query the baud rate and check code |
| Return Value | उदाहरण: ATGT_ ATGT115200,0 OK |
| टिप्पणियों | Query command |
Set IP Address Command
| स्वरूप | ATSIP$(ip), $(ip)_ उदाहरण: ATSIP192.168.1.215,192.168.1.215_ |
| मापदंडों | Local IP address Local IP address (repeat to confirm) |
| उपयोग | Used to set the receiver IP address |
| Return Value | उदाहरण: ATSIP_192.168.1 .215,192.168.1.215_ ATSIP192.168.1.215 OK |
| टिप्पणियों | 1. After setting the IP address, the receiving end needs to be restarted to take effect. 2. Set the command and save it after powering it off. |
Get IP Address Command
| स्वरूप | एटीजीआईपी_ उदाहरण: एटीजीआईपी_ |
| पैरामीटर | नहीं |
| उपयोग | प्राप्तकर्ता के वर्तमान आईपी पते को क्वेरी करने के लिए |
| प्रतिलाभ की मात्रा | उदाहरण: एटीजीआईपी_ ATGIP192.168.0.215 ठीक है |
| टिप्पणी | क्वेरी आदेश |
OSD Overlay Protocol
| स्वरूप | ATOSD$(idx), $(एक्स), $(y), $(str)_ उदाहरण:ATOSD0,40,20,height: 100m_ |
| पैरामीटर | 1. IDX index: 0~7 (supports OSD overlay for 8 areas) 2. X-coordinate: 0~1919 3. Y coordinate: 0~1079 4. str: the string to be displayed at the corresponding coordinates (the space symbol is used to clear the display) |
| उपयोग | on the video screen.OSD information |
| प्रतिलाभ की मात्रा | नहीं |
| टिप्पणियों | 1. The user specifies the x and y coordinates of the OSD display according to the maximum 1920×1080 पिक्सल, and the system will correct the coordinates according to the actual display situation. 2. The ‘_’ character cannot be contained in the str parameter |
Set Gain To Adjust
| स्वरूप | ATSAD$(फ्रीक),$(adjust) _ उदाहरण:ATSAD700000,2.5_ |
| पैरामीटर | wireless central working frequency: फ्रीक(KHz) 200000~2700000(200MHz~2.7GHz, step: 1KHz) Adjust the value(डीबी): ATSD cmd will subtract this value to set the wireless gain |
| समारोह | Specify and adjust the value for the wireless gain setting using by ATSD cmd |
| प्रतिपुष्टि | उदाहरण: ATSAD700000,2.5_ freq:700000,adjust:2.50 ठीक |
| टिप्पणियाँ | Setting command is still valid when stopping power or resetting. |
Get Gain To Adjust
| स्वरूप | ATGAD[$(फ्रीक)]_ उदाहरण:ATGAD700000_ |
| पैरामीटर | wireless central working frequency: फ्रीक(KHz) 200000~2700000(200MHz~2.7GHz, step: 1KHz) When no parameter provides, it will list all the freq that have adjusted value. |
| समारोह | Inquiry adjust the value for wireless gain setting using ATSD cmd |
| प्रतिपुष्टि | उदाहरण: ATGAD700000_ freq:700000,adjust:2.50 OK ATGAD_ freq:700000 750000 ठीक |
| टिप्पणियाँ | Inquiry command. |
Serial Port Utility software download
hTTPS://www.alithon.com/downloads
सामान्य प्रश्न
1. How can I return to the No Password setting with 000000 indications after the change?
Reset the password to 000000 (one must not be missing) through the Parameter Configuration Panel Board.
or set it through NS ATSP_command
2. I see that Gain is the output power of the transmitter. Please tell me the range of settings of this parameter. All setting level (लाभ) good for linear output operation? Or do you suggest some limited range for better linear operation?
The Gain of the COFDM configuration is the internal Gain, not the actual output power of the transmitter. The internal gain range is 0~89.75dB and the linear output:
1. At around 300~500MHz, the Gain is set to 89.75, and the actual output power of the transmitter module is about -5dBm.
2. At around 1000~1500MHz, the Gain is set to 89.75, and the actual output power of the transmitter module is about -6dBm to -10dBm.
3. I tried to set – B bandwidth (kHz) and E bit rate (एमबीपीएस). When I set E, the new value does not apply. So. the E setting is only for monitoring of available bitrate? if I wish to change the E (बिटरेट) I have to change only B (बैंडविड्थ)? Am I right?
It is not recommended to modify the video bit rate ‘E’ directly, because if the output video bit rate is greater than the wireless air interface rate, the system will not work normally.
डिफ़ॉल्ट रूप से, the internal video bit rate ‘E’ will be set to 0 for automatic. Customers only need to modify ‘B’ to modify the wireless parameters, and the video bit rate will automatically adapt.
You can also adjust the wireless air interface rate by modifying GI and CR.
For more details on the Encoder Modulator Decoder Demodulator Module, please send an inquiry to us.


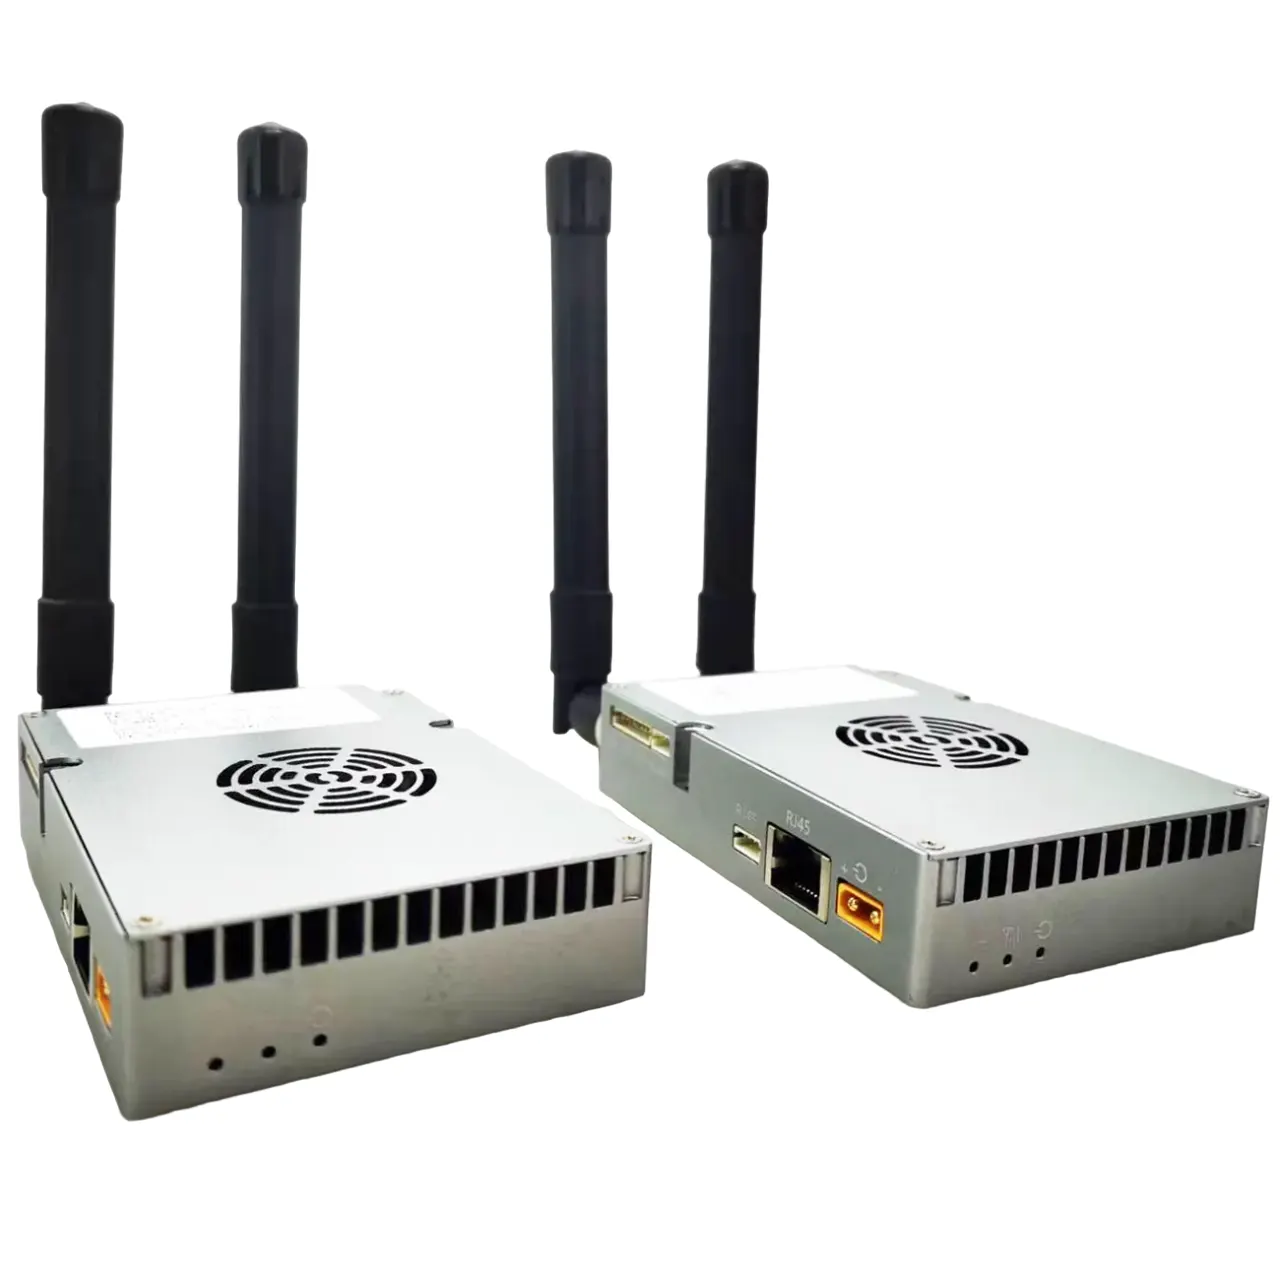
सीओएफडीएम मॉड्यूलेटर डेमोडुलेटर मॉड्यूल एनकोडर डिकोडर एचडीएमआई सीवीबीएस एवी इनपुट एईएस 256 FHD आरएफ स्ट्रीमिंग
$0.00
सीओएफडीएम मॉड्यूलेटर डेमोडुलेटर मॉड्यूल एनकोडर डिकोडर एचडीएमआई सीवीबीएस एवी इनपुट एईएस 256 FHD आरएफ स्ट्रीमिंग

विषयसूची
Another side view


COFDM Encoder module, CVBS / HDMI इनपुट, आईपी आउटपुट

For More details about the COFDM encoder board, please visit here
COFDM Encoder module Advantage:
- अल्ट्रा-लो लेटेंसी H.265/H.264 ऑडियो और वीडियो एन्कोडिंग अधिकतम समर्थन 1080P@60 रीयल-टाइम वीडियो कैप्चर और एन्कोडिंग
- एचडीएमआई या एवी ऑडियो और वीडियो इनपुट, एन्कोडिंग के बाद, ईथरनेट पोर्ट आउटपुट या वायरलेस मॉड्यूल के लिए आउटपुट, वीडियो एन्कोडिंग बिट दर को गतिशील रूप से कॉन्फ़िगर किया जा सकता है
- ऑडियो इनपुट और ऑडियो डिकोडिंग उत्पादन का समर्थन करें
- दो वीडियो का समर्थन करें (एचडीएमआई + एवी) एक साथ इनपुट एन्कोडिंग (विकल्प, डिफ़ॉल्ट एचडीएमआई या एवी एन्कोडिंग है, दो इनपुट सोर्सिंग में से एक चुनें). )
- वेब यूआई या सीरियल पोर्ट UART एटी कमांड विन्यास प्रबंधन के लिए

COFDM transmitter module


सीओएफडीएम मॉड्यूलेटर-डीमोडुलेटर डेटाशीट डाउनलोड
COFDM डेमोडुलेटर Vcan1776RX-H264 डेटाशीट

The last version of the TX RX board
टेक्सास: V6.5.6p
RX: 4.1.2पी
पूछे जाने वाले प्रश्न

- Question1: Could you please tell me part number of this component, we try to find localy and check. उत्तर 1: It is a inductance named LOH32PN2R2NNC.

- Suggest Check Points: If the power supply current of the board is well but there is no RF output, maybe the below component TC1-1-13MX+ is generally damaged.
- In order to avoid damage to this device during transportation (the device itself is relatively high), we ordered red glue protection for this device when we shipped it.

- The engineer also suggests that you check to see if the cable is loose or in poor contact.
- Please try to replace the FPC cable connecting the two boards
- We can provide spare parts if you're sure which one.
ज़रूर
कृपया नीचे दिए गए लिंक की जाँच करें.
Encoder Modulator Decoder Demodulator Module Parameter Configuration Instructions COFDM AT Command

3. प्रश्न, If our camera quality is good enough for both 4 MHz and 8 मेगाहर्ट्ज बैंडविड्थ. इस मामले में, Should the customer choose 4 मेगाहर्ट्ज या 8 मेगाहर्ट्ज?
उत्तर: Our one-way COFDM shipments use 4Mz wireless bandwidth by default, corresponding to a video bit rate of 3.12Mbps, which is enough for 1080p; If changed to 8MHz wireless bandwidth under the same conditions, the video bit rate doubles to 6.24Mbps. All customers can choose between wireless bandwidth 4MHz and 8MHz, even 6MHz can also be considered.
4. प्रश्न: Which is better for this tx+rx set from a receive sensitivity view?
उत्तर: For wireless links, it can be simply considered that the receiving sensitivity will be higher at lower wireless bandwidths. From the perspective of receiving sensitivity, 4मेगाहर्ट्ज>6मेगाहर्ट्ज>8मेगाहर्ट्ज
ज़रूर
कृपया नीचे दिए गए लिंक की जाँच करें
ड्रोन UAV वायरलेस वीडियो ट्रांसमीटर और रिसीवर Vcan1870 के लिए COFDM रिले रिपीटर मॉड्यूल

Single channel receiving sensitivity:
-97+/-1डी बी at QPSK 8MHz,
-98+/-1डी बी at QPSK 6MHZ,
Sensitivity increased by 3dbm when receiving with dual antennas
The receiver default firmware supports RTSP player, some clients prefer UDP player, which we also can offer, then RTSP player doesn't support. (RTSP and UDP can only choose one of the two firmware)
कृपया नीचे दिए गए लिंक पर डाउनलोड करें.
Splayer_v4.2_2020.6.6
https://drive.google.com/file/d/1ihzUhfnx2Wo3zLO8UAs1aUQeLswonJD-/view?usp=sharing
Splayer_v4.3_2022.10.22
https://drive.google.com/file/d/1PQc-LZ55qGnjeMsjkHYSloHfY3NEUsGH/view?usp=drive_link
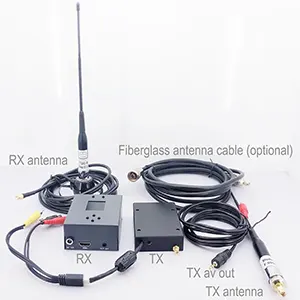
ज़रूर, कृपया नीचे दी गई तस्वीर की जाँच करें.

How to switch HDMI or CVBS video input via the UART AT command?
How to upgrade the COFDM video receiver
How to upgrade the COFDM drone video encoder modulator board

SDI+AHD+CVBS Video Encoder and H264 H265 decoder
Some clients also need SDI AHD CVBS video encoder modulator transmitter video decoder demodulator receiver HDMI output. We also have another model Vcan1776-SDI+AHD+CVBS supports these functions.

Which video decoder board supports H264 H265 and super-low latency?

The left-side blue decoder board supports H265 and H264 decoding but does not support low-latency decoding. (Samsun Chipset)
The right-side blackboard supports H264 decoding but supports H264 low-latency decoding. (HiSilicon)
| वीडियो इनपुट | एचडीएमआई + सीवीबीएस, SDI+AHD+CVBS |
|---|
सबसे पहले समीक्षा करने वाले बनें "सीओएफडीएम मॉड्यूलेटर डेमोडुलेटर मॉड्यूल एनकोडर डिकोडर एचडीएमआई सीवीबीएस एवी इनपुट एईएस 256 FHD आरएफ स्ट्रीमिंग”
संबंधित उत्पाद


वीडियो ट्रांसमीटर
हैंडहेल्ड वायरलेस रिसीवर 7 इंच टच स्क्रीन COFDM रिसीवर डिजिटल वीडियो रिसीवर के साथ 7 इंच मॉनिटर


समीक्षा
कोई समीक्षा के लिए अभी तक कर रहे हैं.