


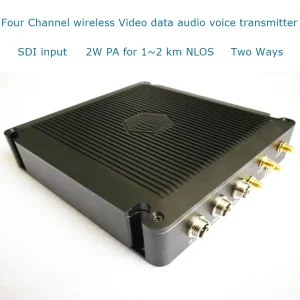
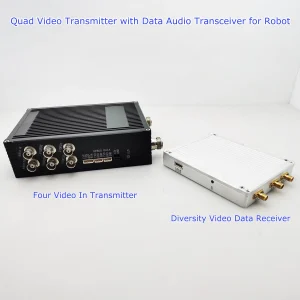
5Módulo de comunicación G para transmisor y receptor de vídeo inalámbrico.

| número de serie | bit number | nombre | definición de señal |
| 1 | ANT3 | 5G Antenna Port 1 | 5G RF |
| 2 | ANT4 | 5G Antenna Port 2 | 5G RF |
| 3 | ANT5 | 5G Antenna Port 3 | 5G RF |
| 4 | ANT6 | 5G Antenna Port 4 | 5G RF |
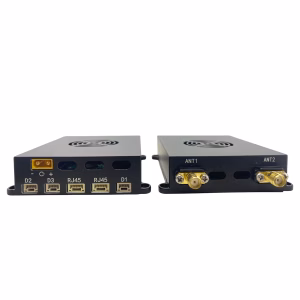
| 5 | ANT1 | Mesh antenna port 1 | MESH RF |
| 6 | ANT2 | Mesh antenna port 2 | MESH RF |
| 7 | ANT7 | BD antenna interface | BD RF |
| 8 | Sim | SIM card slot | Nano-SIM |
| 9 | DATA1 | 100M network interface 1 | TX+ |
| Texas | |||
| RX+ | |||
| / | |||
| / | |||
| RX- | |||
| / | |||
| / | |||
| 10 | DATA2 | reserve | |
| 11 | RS232 | RS232 serial interface | Tierra |
| RX | |||
| Texas | |||
| / | |||
| / | |||
| / | |||
| 12 | corriente continua | 24V power interface | 24V |
| Tierra | |||
| 13 | FUERZA | Indicador de encendido | |
| 14 | MALLA | Mesh Network Indicator | |
| 15 | 5GRAMO | 5G network indicator light |
Tabla de contenido
Embalaje
- One communication module host
- 2 dedicated frequency band (1.4Ghz) antenas (depending on different models, other types of antennas are optional)
- 4 general frequency band (5Ghz) antenas (depending on different models, other types of antennas are optional)
- 1 GPS/BD antenna (depending on different models, other types of antennas are optional)
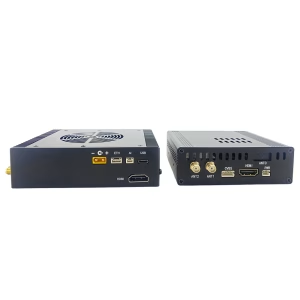
- One 100M network port conversion cable (airline plug to RJ45 network port)
- 1 serial port conversion cable (aviation plug to RS232 serial port)
- DC 24V adapter 1 (enchufe de aviación 2 cores)
1.3 Installation steps
- Install the self-organizing network antenna: connect the dedicated frequency band antenna (or feeder) to the N head (ANT1, ANT2), press and rotate to fix it, and ensure that the antenna is tightened and not loose;
- Install the 5G antenna: connect the 5G frequency band antenna (or feeder) to the SMA head (ANT1, ANT2, ANT3, ANT4), press and rotate to fix it, and ensure that the antenna is tightened and not loose;
- Install the Beidou antenna: Connect the Beidou antenna (or feeder) to the SMA head (ANT7), press and rotate to fix it, and ensure that the antenna is tightened and not loose;
- Install the network port conversion cable: connect the network cable to the host aviation seat (DATA1), and ensure good contact after plugging in; (5). Install the serial port conversion cable: connect the network cable to the host aircraft seat (RS232), and insert it tightly (6). Install the power cord: Connect the DC 24V power supply to the host aviation seat (corriente continua) through the aviation plug (2 cores), and then tighten the nut to ensure good contact.

1.4 Boot steps
(1). Press the switch, turn on the power, the indicator light of the power switch (FUERZA) is on, and the system starts self-test (It is forbidden to turn on the power without connecting the antenna, and it forbidden to use other types of adapters)
LED status
| indicator light | estado | significado |
| corriente continua | apagado | Not powered on |
| always on | powered on | |
| MALLA | brillante | Redes |
| Rojo fijo | signal difference | |
| solid yellow | General Signal | |
| green steady | good signal | |
| 5GRAMO | apagado | 4G/5G is not connected to the network |
| brillante | 4G/5G has entered the network |
Especificación
| Basic parameters of duty room communication module | |
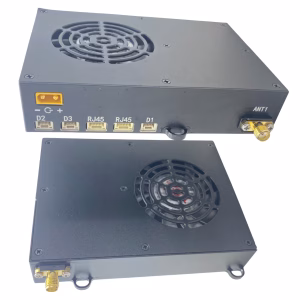
| device interface | Interfaz de energía: 2-core aviation plug × 1 |
| 100M Ethernet interface: 8-core aviation plug | |
| RS232 interface: 6-core aviation plug × 1 | |
| Ad hoc network radio frequency interface: N-type radio frequency interface × 2 | |
| 5G radio frequency interface: SMA type radio frequency interface × 4 | |
| Beidou RF interface: SMA type RF interface × 1 | |
| indicator light | Indicador de encendido |
| Ad Hoc Network Indicator | |
| 5G indicator light | |
| wireless specification | Ad hoc network: 1400~1500Mhz |
| GPS/BD | |
| 5GRAMO | |
| Potencia de salida | 37dBm*2 |
| ancho de banda del canal | 2.5Mhz/5Mhz/10Mhz |
| performance parameters | |
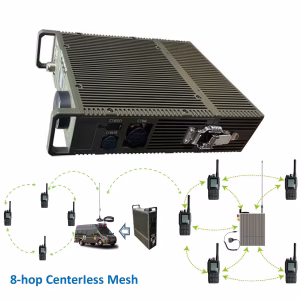
| Networking method | Ad hoc network/5G (automatic switching) |
| multiple antennas | DESPITE |
| peak rate | 50mbps |
| hop count | más que 10 lúpulo |
| Número de nodos | ≥32 ganglios |
| Hora de inicio | ≤60 seconds |
| transmission encryption | AES 256 |
| hardware parameters | |
| tamaño | 202*133*72mm |
| peso | 3.5kilos |
| antena | Standard 5dBi omnidirectional fiberglass antenna |
| fuente de alimentación | CC 24 V |
| consumo de energía | Peak 70W |
| Temperatura de funcionamiento | (-20ºC to 65ºC) |
| Humedad de trabajo | 10% a 90% sin condensación |
| installation method | Ship-mounted/vehicle-mounted/fixed erection |
Precaution
- Make sure the antenna is tightened;
- Keep the antenna vertical to the ground during the test;
- Do not touch the antenna with your hands or other objects during the test;
- It is not advisable to get too close to each other between devices, and they should be separated by more than 5M;
- If there are test conditions, choose a commanding height to erect one of the nodes;
- Check whether the communication link is normal through the network indicator light, and the network indicator light is always on, indicating that the link layer has been successfully connected;
- Check the environmental noise situation through the WEB interface to know whether there is co-channel interference around;
- Acerca de 5 seconds after the networking is successful, you can check the network connectivity of each node through the ping packet;
- Make sure that the cameras, PC, and other devices that need to be connected are in the same IP address segment, and can communicate normally under the condition of a wired connection, without using the same address segment of NexFi devices (NexFi devices communicate through MAC addresses);
- Traffic flow, people flow, edificios, and trees will have varying degrees of impact on communication quality;
- When doing penetration tests inside and outside the building, the external nodes should not be too close to the building, and the distance should be more than 10M;
- If you need to achieve a longer test distance, you can adjust the bandwidth to 2Mhz through the management interface, and if you need to achieve a larger bandwidth, you can adjust it to 20Mhz;
- If it is used for video transmission, in order to avoid video freeze, you can optimize the video effect by adjusting the camera resolution, velocidad de fotogramas, transcoding stream, y otros parámetros;
- If used for open-air day and night testing, please take waterproof measures and ensure good heat dissipation contact.


Reseñas
Aún no hay reseñas.