


HD პორტატული COFDM მობილური ვიდეო უსადენო გადაცემის სისტემის მომხმარებლის სახელმძღვანელო
COFDM Mobile Video Wireless Transmission users manual for COFDM-908T and COFDM-912T
Users Manual for COFDM Mobile Video Wireless Transmission
This is a manual for COFDM-912T and COFDM-908T. If the HD input is mentioned in the text, it refers to the COFDM-908T model. If the SD input is mentioned in the text, it refers to the COFDM-912T model. Please Pay attention to the distinction.


Სარჩევი
1. მახასიათებლები
- უაღრესად ინტეგრირებული, მოდულარული დიზაინი
- მიიღეთ COFDM მოდულაციის ტექნოლოგია, H.264 გამოსახულების კოდირების ტექნოლოგია
- Can transmit one 1080P HDMI signal and one unidirectional data up to 230400Kbps
- Დაბალი შეყოვნება, the minimum end-to-end latency is 350ms
- ყოველმხრივი ურთიერთობა, არ ეშინია აშენებს კედლები
- High-speed travel-to-travel communication,
- გადამცემის სითბოს რადიატორის ტიპის ალუმინის კორპუსი, shockproof and impact resistant
- Non-line-of-sight (NLOS) მობილური გადაცემა, the transmission distance of 2W power is not less than 30 kilometers under the condition of no interference, the transmission distance of 5W power is not less than 50 კილომეტრი, and the transmission distance of 10W power is not less than 80 კილომეტრი
- მოძრაობის მაქსიმალურმა სიჩქარემ შეიძლება მიაღწიოს 600 კმ / საათს (იზომება)
- აუდიო და ვიდეო სიგნალების სინქრონული მიღება, მაღალი განმარტება HDMI1080P მრავალფორმატიანი არასავალდებულო, სტანდარტული განსაზღვრის გამომავალი DVD გამოსახულების ხარისხი
- მიმღებს შეუძლია გააცნოს ვიდეოს ჩაწერისა და სარეზერვო ფუნქციები
- 128-bit AES დაშიფვრა და გაშიფვრა
- Can provide full customization
2. განაცხადის
This product is mainly used in technical reconnaissance and evidence collection of public security and safety inspection departments, real-time picture transmission of drones and unmanned ships, radio and television broadcasting, broadcasting live broadcasting: მაუწყებლობის სფეროში, სპორტული მაუწყებლობა, სოციალური ამბების、საჰაერო live、სტუდია, mountaineering expeditions and more. ის განკუთვნილია მაღალი ხარისხის სურათების რეალურ დროში მობილური გადაცემისთვის სხვადასხვა რთულ გარემოში, მაგალითად, ურბანულ ადგილებში, ზღვები, და მთები.
3: Parameter Indicators
1: გადამცემის (only standardized pictures, except for customization)


Product parameters:
| მოდულაცია | COFDM |
| ოპერაციული ძაბვის | DC11V~DC17V |
| სამუშაო მიმდინარე | 1W:≤1.3A DC12V,5W:≤2.5A DC12V,10W:≤5.2A DC12V, |
| საკონტროლო ინტერფეისი | Standard RS232 interface, 8 მონაცემთა ბიტი, 1 გაჩერება ცოტა, კი პარიტეტს, baud განაკვეთი: 19200 |
| მონაცემთა გამჭვირვალე ინტერფეისი | ცალმხრივი გამჭვირვალე სერიული პორტის გადაცემა, 8 მონაცემთა ბიტი, 1 გაჩერება ცოტა, მხარს ვუჭერთ უცნაური პარიტეტულ, კი პარიტეტს, უკაბელო პარიტეტი, baud განაკვეთი: 1200, 2400, 4800, 9600, 19200, 38400, 57600, 115200 、230400 |
| Encryption | 128-ბიტიანი დაშიფვრის მხარდაჭერა |
| მოდულაციის ასახვა | QPSK(4QAM)、16QAM、64QAM |
| წინ შეცდომა კორექცია | 1/2 2/3 3/4 5/6 7/8 |
| დაცვის ინტერვალი | 1/32 1/16 1/8 1/4 |
| პუნქტების მატარებლები | 2k |
| სიხშირის გამტარობა | 2/3/4/5/6/7/8M რეგულირებადი |
| სატრანსპორტო ნაკადი | 2000kbs~20000kbs რეგულირებადი |
| გადაცემა ძალა | 1W/5W/10W |
| გადაცემის სიხშირე | Any frequency can be customized, the frequency is continuously adjustable, the adjustable range is ±20MHz, and the step is 1MHz |
| Power სიბრტყეს | Less than 0.2dB in 10MHz band |
| Shoulder თანაფარდობა | The shoulder-to-shoulder ratio is better than -28dB at full power output |
| second harmonic | ≤-45 დბ |
| MORE | 32dB |
| შეყვანის ვიდეო | 720×480 60I(NTSC), 720×576 50I(PAL), 720 50P, 720 60P, 1080 50მე, 1080 60მე, 1080 24P, 1080 25P, 1080 30P, 1080 50P, სხვადასხვა რეჟიმი ადაპტაციურია. |
| HD ინტერფეისი | HDMI |
| ვიდეოს კოდირების ფორმატი | H.264 |
| დაცვის სტანდარტული | ყველა ალუმინის რადიატორის ტიპის შასი, ანტიკოროზიული, შოკისგან დამცავი დიზაინი |
| სრული ზომა | 102*80*30mm(1w)/102*90*30mm(5W)/188*47*34mm(10W)/228*55*40mm(20W) |
| Total Weight | ≤0.20KG (1W) / ≤0.27KG (5W) ≤1.5KG (10W) ≤2KG (20W) |
2: მიმღები


Product parameters:
| Portable multi-bandwidth HD receiver parameters | |
| სიხშირის დიაპაზონის მიღება | 170-860მეგაჰერციანი VHF&UHF |
| სიხშირის გამტარობა | 2/3/4/5/6/7/8MHz, სურვილისამებრ |
| RF შეყვანის დონე | -94dBm ~ -15 dBm (at 8M სიჩქარეს)/-98dBm ~ -15 dBm (at 2M bandwidth) |
| RF შეყვანის წინაღობა | 50 ohms |
| RF input connector | N თავი |
| demodulation მეთოდი | COFDM |
| Constellation way | QPSK, 16QAM, 64QAM (სურვილისამებრ) |
| წინ შეცდომა კორექცია | 1/2,2/3,3/4,5/6,7/8 (სურვილისამებრ) |
| პუნქტების მატარებლები | 2k, |
| დაცვის ინტერვალი | 1/32,1/16,1/8,1/4 (სურვილისამებრ) |
| ვიდეოს დეკოდირება | MPEG-2MP@ML/H.264 |
| screen aspect ratio | 4:3 16:9 |
| Video output image | 720*576@8MHz 1080P@60P、50P、50მე、30P、 |
| აუდიო გამომავალი რეჟიმი | Stereo unbalanced 300/ 200მვ |
| აუდიო გამომავალი | 2აუდიო გამომავალი + 2ვიდეო გამომავალი |
| ოპერაციული ძაბვის | AC220V/DC12V <0.4A |
| ოპერაციული ტემპერატურა | -20~ + 50 |
| physical dimension | 136*115*35mm non-standard all-aluminum shell |
| აღჭურვილობის წონა | 0.35Კგ |
4: Instructions for use
1: გადამცემის
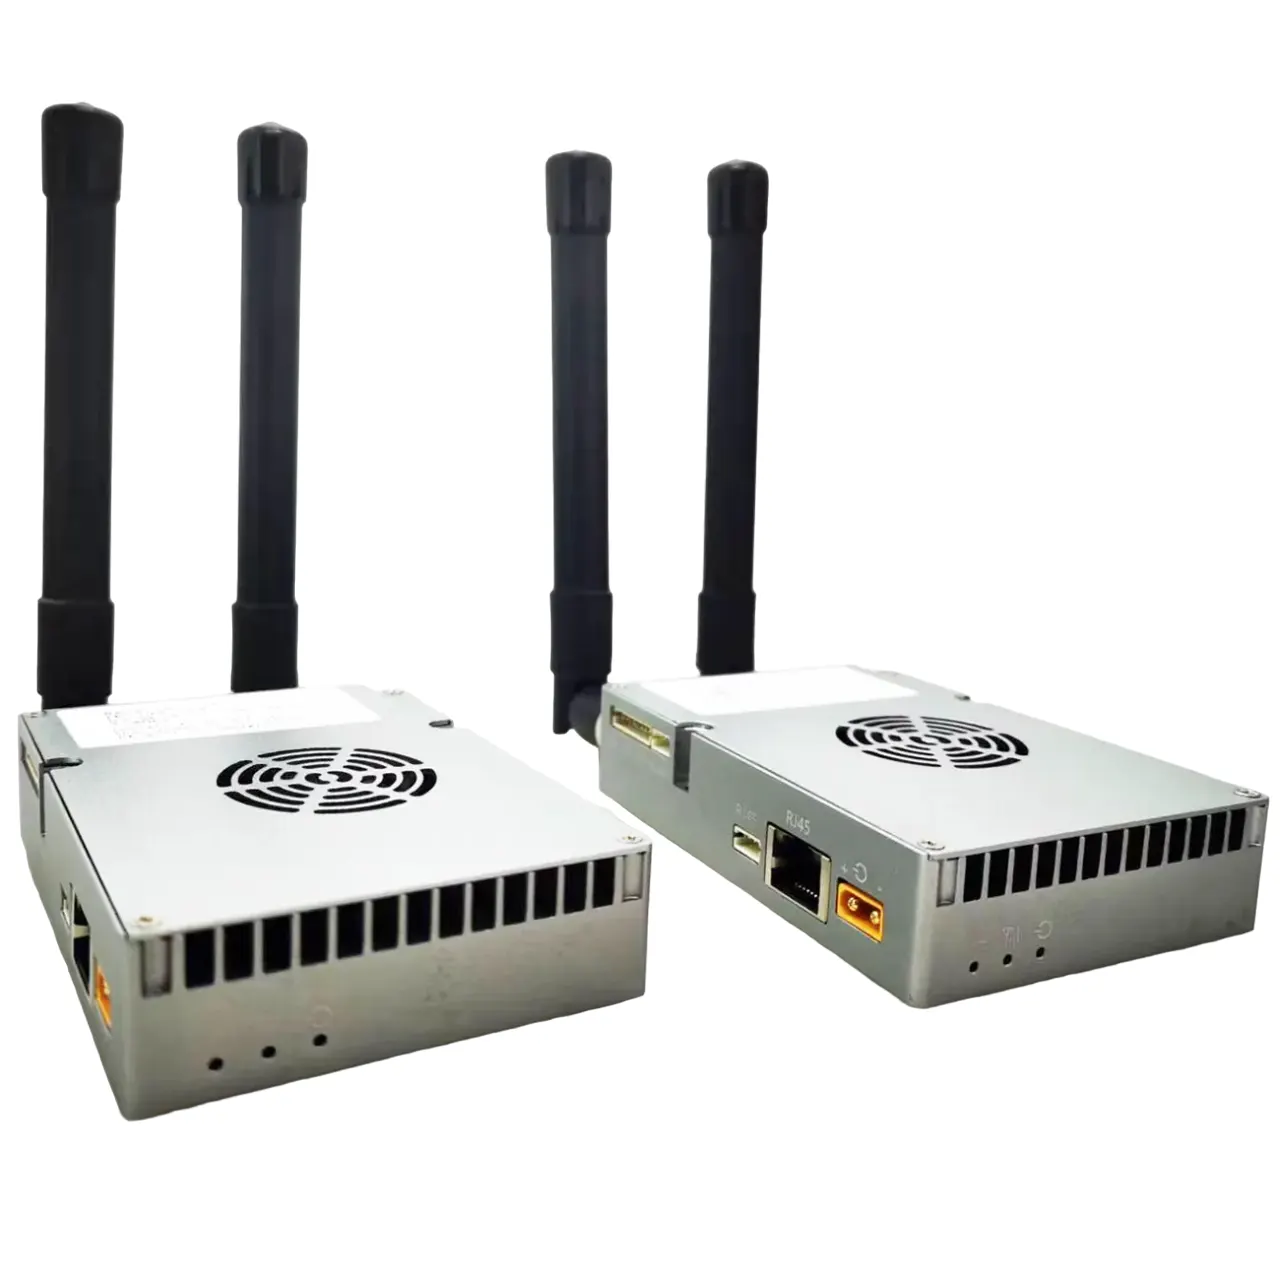
- Functional area description
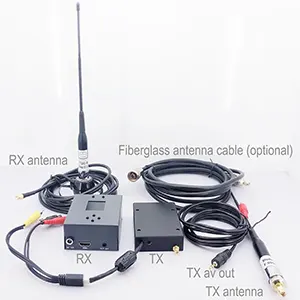
“ANT”: Transmitting antenna interface, please connect the antenna before powering on
“HDMI”: High-definition video input interface, input below 1080/50P
“Ctrl”: Transmitter tuner connection interface
“DC 12V”: DC12V power input port. “+” is the positive pole of the power supply, “-” is the negative pole of the power supply
“DC” is: დენის ინდიკატორი ნათურა, when the light is always on, it means that the power input of the transmitting module is normal
“TS”: Video input detection indicator light, this light is always on to indicate video input and normal encoding
- Parameter Configuration Description
Connect the transmitter parameter adjuster, press the “MENU/OK” key to enter the menu, the encryption key and data serial port parameters are displayed first, press the left or right key to move the cursor, and the up and down keys to adjust the parameters


After the parameter setting is completed, press “MENU/OK” to enter the next menu, and the interface is displayed as shown in the figure


Press the left or right key to move the cursor, press the up or down key to adjust the required parameters, the interface prompts as shown in the figure


After all parameter settings are completed, press the “MENU/OK” key to confirm, and the display will be as shown in the figure.


After the setting is completed, the parameters are written successfully, and the display is as shown in the figure


- General Troubleshooting
ა: The light is off after the power is turned on: Check whether the power input meets the standard
ბ: “TS” indicator light is off: Check the video input connection cable, check whether the video input format conforms, and check whether the camera is interfered with (you can judge by holding the antenna with your hand).
C: The temperature of the transmitter is very low: check whether the current is normal (the deviation can be ±0.2A within the standard current).
დ: Three lights are always on, and one of them is super bright: it means that the transmitter has failed the detection, and you can try to power off and restart (uncommon)
2: მიმღები
- Functional area description
“RF in1” “RF in2”: receiving antenna interface, it is recommended to connect the antenna and then turn on the power switch, because the static electricity of the human body may cause the receiver to crash.
“HDMI”: ვიდეო გამომავალი ინტერფეისი, the output video format can be adjusted through the “HDMI” menu on the control panel.
“DC 12V”: დენის შეყვანის ინტერფეისი, please strictly follow the power supply voltage requirements, and overvoltage input is strictly prohibited
“ON/OFF”: power switch.
“USB”: video storage interface, when the U disk is inserted, press the “EXIT” button to start the video recording, after the recording is successful, the video display will display the video recording time, and the stored file name is “TS”.
- LCD parameter description
ა:CH01 UNLOCKED(LCKED)
“CH01” means the channel number of the receiver, “UNLOCKED” means the received signal is unlocked, and “LCKED” means the signal is locked. “CH00” of the receiver is the initial writing channel, and the default channel corresponding to the normal operation of the transmitter is “CH001”
ბ: FREQ:602.0MHz
“602.0MHz” is the receiving frequency of the receiver, this frequency must be consistent with the frequency set by the transmitter, otherwise the receiver will not search or receive the signal from the transmitter
გ: BW:6.0MHz
“BW” bandwidth, as shown in the figure, “BW: MHz” is understood as the RF bandwidth is 6MHz, this bandwidth must be consistent with the bandwidth set by the transmitter, otherwise the receiver will search for or cannot receive the signal from the transmitter
დ: FEC:1/2
“FEC: 1/2” is the channel error correction, this parameter synchronizes the parameters set by the transmitter, and the receiver cannot be modified
ე: GI:1/32
“GI:1/32” is the channel guard interval, this parameter is set by the transmitter synchronously, and the receiver cannot be modified
ვ:რუკა: QPSK
“MAP: QPSK” is the modulation mapping, this parameter number is set by the transmitter synchronously, and the receiver cannot be modified
ზ: SNR:0.0dB(SNR:15.0dB)
“SNR: 15.0dB” is the signal quality (ანუ, the signal-to-noise ratio, the larger the value, the better). When “0.0dB” is displayed, the signal quality is 0, and the receiver will not be able to lock
"(SNR:15.0dB)” means the receiving signal-to-noise ratio is greater than 15dB. In the “QPSK” modulation mapping state, as long as the signal-to-noise ratio is greater than 6dB, the receiver can lock
h: PW:-72.1dBm(PW:-72.1)
PW is the received signal strength, (reference level value), the farther the transceiver end is relative to the distance, the weaker the signal strength is, and the larger the displayed value is, when the transmitter is not turned on, if the signal strength of the receiver is greater than -90dBm (such as -79.7dBm), it can be considered as adjacent frequency interference
- Parameter Configuration Description
Power on the receiver, and press the “MENU/OK” button to enter the menu, the first display is the menu of adjustable parameters, if you search for a specified frequency, directly press the “MENU/OK” button to enter the menu; if you want to remove the channel, press Press down to select “ListanbulChannel”, and then press “MENU/OK” to enter the menu operation; if you need to change the video output format, move the cursor to the “HDMI Mode” menu, press “MENU/OK” to enter, and select the video to be output After formatting, press the “MENU/OK” key to confirm.


The frequency search method is as follows. After entering the frequency setting menu, the interface is displayed as shown in the figure. Press the left or right key to move the cursor, press the up or down key to adjust the frequency, RF სიჩქარეს, and secret key that match the transmitter, and press the “MENU /OK” key to search. Note that the transmitter must be turned on at this time, წინააღმდეგ შემთხვევაში,, the receiver will not be able to lock because it cannot find the signal.
COFDM Mobile Video Wireless Transmission with a cheap price is including a transmitter and receiver for China directly


When the search is completed, press “MENU/OK” to confirm, and the channel is saved in the register of the assistant board, as shown in the figure. To save the channel to the receiver register, press the “MENU/OK” key and the right key at the same time.


After the receiver parameter setting is completed, the functions of the panel keys are as follows
"↑”“↓": each individually selectable receiver channel “CH**”
"←”“→": You can choose to view the hidden parameters of the receiver
“EXIT”: start and stop recording
- Video function
Insert the storage device into the “USB” interface of the receiver, press the “EXIT” button to start recording, and a blue recording time box will appear on the upper left corner of the video display as shown below


- General Troubleshooting
ა: The value after the receiver displays “-” is very low (Tx is not turned on): It means that the current channel has serious electromagnetic interference, and the normal value is -90- -100.
ბ: Cannot record video: check the U disk or replace the U disk.
C: No signal received: Check whether the channel frequency is consistent with the transmitter.
დ: No video output: Check the connection line, გამორთვა, and restart to check whether there is a boot interface.
