
HD eramangarria COFDM Bideo mugikorra Haririk gabeko transmisio sistemaren erabiltzailearen eskuliburua
COFDM Mobile Video Wireless Transmission COFDM-908T eta COFDM-912T erabiltzailearen eskuliburua
COFDM Mugikorreko Bideo Haririk gabeko Transmisiorako Erabiltzaileen Eskuliburua
COFDM-912T eta COFDM-908T-ren eskuliburua da hau. Testuan HD sarrera aipatzen bada, COFDM-908T modeloari egiten dio erreferentzia. SD sarrera testuan aipatzen bada, COFDM-912T ereduari egiten dio erreferentzia. Mesedez, arreta jarri bereizketari.


Edukien taula
1. Ezaugarriak
- oso integratuta, diseinu modular
- Hartu COFDM modulazio-teknologia, H.264 irudiak kodetzeko teknologia
- 1080P HDMI seinale bat eta noranzko bakarreko datu bat 230400Kbps-ra igor ditzake
- latentzia txikiko, amaierako gutxieneko latentzia 350 ms-koa da
- Integralak komunikazio, Ez hormak eraikitzen beldur
- Abiadura handiko bidaiaren arteko komunikazioa,
- Transmisore bero harraska motako aluminiozko kaxa, kolpeak eta kolpeak erresistenteak
- Ez-line ikuspen- (RNE) transmisio mugikorra, 2W potentziaren transmisio distantzia ez da baino txikiagoa 30 kilometroak interferentziarik ez izateko baldintzapean, 5W potentziaren transmisio distantzia ez da baino txikiagoa 50 kilometroak, eta 10W potentziaren transmisio distantzia ez da baino txikiagoa 80 kilometroak
- Mugitzeko gehieneko abiadura 600 km / ordukoa izan daiteke (neurtuta)
- Audio eta bideo seinaleen harrera sinkronikoa, bereizmen handiko HDMI1080P formatu anitzeko aukerakoa, definizio estandarreko irudi DVDaren kalitatea
- Hartzaileak bideo grabaketa eta babeskopia funtzioak egin ditzake
- 128-bit AES enkriptatzea eta deszifratzea
- Pertsonalizazio osoa eskain dezake
2. Aplikazio
Produktu hau segurtasun publikoko eta segurtasuneko ikuskapeneko sailen azterketa teknikoan eta ebidentzia bilketan erabiltzen da batez ere, droneen eta tripulaziorik gabeko ontzien denbora errealeko irudien transmisioa, irrati- eta telebista-difusioa, zuzeneko emisioa emanez: emisio eremu, kirol emisioa, social albisteak、aireko zuzeneko、estudioan, mendi espedizioak eta gehiago. Egokia da kalitate handiko irudiak denbora errealean mugikorrean igortzeko, ingurune konplexu batzuetan, hala nola hirietan, itsasoak, eta mendiak.
3: Parametro-adierazleak
1: igorlea (irudi normalizatuak soilik, pertsonalizazioa izan ezik)


Produktuaren parametroak:
| Modulazio | COFDM |
| Tentsio eragileak | DC11V~DC17V |
| Lan egungo | 1W:≤1.3A DC12V,5W:≤2.5A DC12V,10W:≤5.2A DC12V, |
| kontrol interfazea | RS232 interfaze estandarra, 8 datuak bit, 1 stop bit, are parekotasuna, baud: 19200 |
| datu interfaze gardena | Norabide bakarreko serie ataka gardenaren transmisioa, 8 datuak bit, 1 stop bit, onartzen bakoitiak parekotasuna, are parekotasuna, haririk gabeko parekotasuna, baud: 1200, 2400, 4800, 9600, 19200, 38400, 57600, 115200 、230400 |
| Encryption | Onartu 128 biteko enkriptatzea |
| modulazioaren mapaketa | QPSK(4QAM)、16QAM、64QAM |
| Aurrera error zuzenketa | 1/2 2/3 3/4 5/6 7/8 |
| guardia tarte | 1/32 1/16 1/8 1/4 |
| eramaile kopurua | 2k |
| maiztasun banda zabalera | 2/3/4/5/6/7/8M erregulagarria |
| garraio korrontea | 2000kbs~20000kbs erregulagarria |
| transmititu power | 1W/5W/10W |
| transmisio maiztasuna | Edozein maiztasuna pertsonaliza daiteke, maiztasuna etengabe erregulagarria da, erregulagarria den tartea ±20MHz da, eta urratsa 1MHz-koa da |
| Power lautasuna | 0,2 dB baino gutxiago 10 MHz-ko bandan |
| Sorbalda ratio | Sorbaldatik sorbalda erlazioa -28dB baino hobea da potentzia osoko irteeran |
| bigarren harmonikoa | ≤-45dB |
| GEHIAGO | 32dB |
| sarrera bideoa | 720×480 60I(NTSC), 720×576 50I(PAL), 720 50P, 720 60P, 1080 50I, 1080 60I, 1080 24P, 1080 25P, 1080 30P, 1080 50P, hainbat modu egokitzen dira. |
| HD interfazea | HDMI |
| bideo kodetze formatua | H.264 |
| Babes estandarra | All-aluminiozko erradiadorearen mota xasis, korrosioaren, kolpearen aurkako diseinua |
| tamaina orokorra | 102*80*30mm (1w)/102*90*30mm(5W)/188*47*34mm(10W)/228*55*40mm(20W) |
| Pisu osoa | ≤0.20KG (1W) / ≤0.27KG (5W) ≤1.5KG (10W) ≤2KG (20W) |
2: hargailuen

Produktuaren parametroak:
| Portable multi-bandwidth HD receiver parameters | |
| Jaso maiztasun tartea | 170-860MHz VHF&UHF |
| maiztasun banda zabalera | 2/3/4/5/6/7/8MHz, aukerako |
| RF sarrera maila | -94dBm ~ -15dBm (8M banda zabalera tan)/-98dBm ~ -15dBm (at 2M bandwidth) |
| RF sarrera inpedantzia | 50 ohms |
| RF sarrera konektorea | N burua |
| demodulazio metodoa | COFDM |
| Constellation way | QPSK, 16QAM, 64QAM (aukerako) |
| Aurrera error zuzenketa | 1/2,2/3,3/4,5/6,7/8 (aukerako) |
| eramaile kopurua | 2k, |
| guardia tarte | 1/32,1/16,1/8,1/4 (aukerako) |
| bideo deskodetzea | MPEG-2MP@ML/H.264 |
| screen aspect ratio | 4:3 16:9 |
| Video output image | 720*576@8MHz 1080P@60P、50P、50I、30P、 |
| audio irteera modua | Stereo unbalanced 300/ 200mv |
| Audio irteera | 2Audio irteera + 2Video irteera |
| Tentsio eragileak | AC220V/DC12V <0.4A |
| tenperatura eragileak | -20℃ ~ + 50 ℃ |
| physical dimension | 136*115*35mm non-standard all-aluminum shell |
| ekipoaren pisua | 0.35Kg |
4: Erabiltzeko jarraibideak
1: igorlea
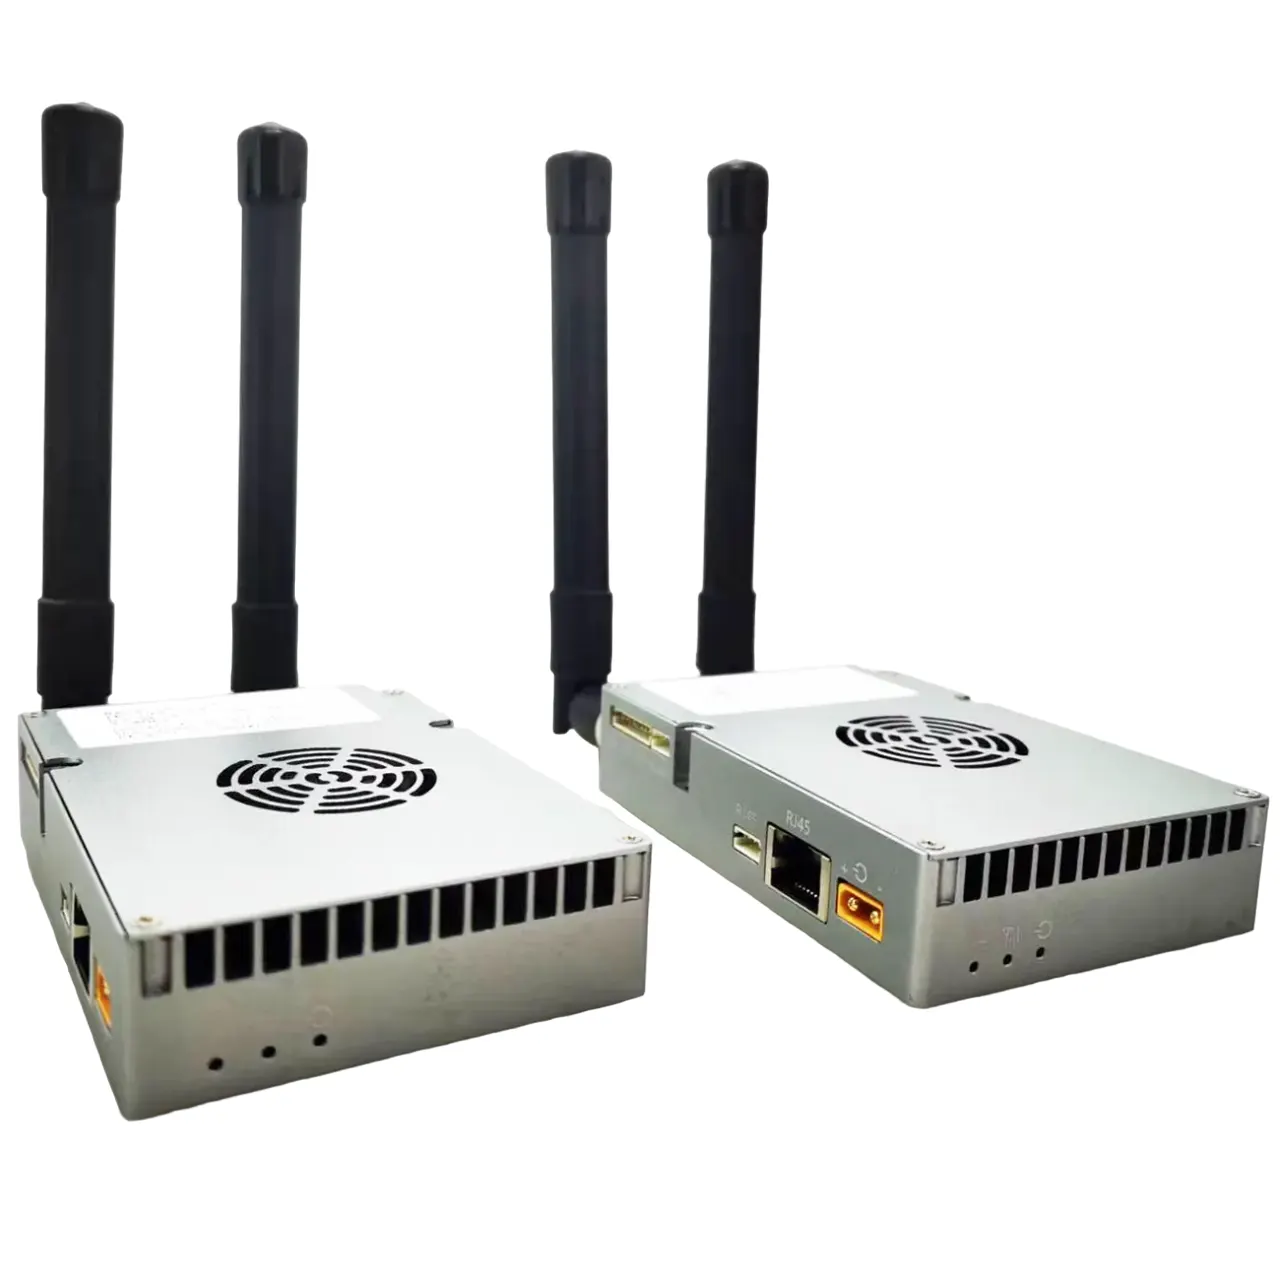
- Functional area description
“ANT”: Transmitting antenna interface, please connect the antenna before powering on
“HDMI”: High-definition video input interface, input below 1080/50P
“Ktrl”: Transmitter tuner connection interface
“DC 12V”: DC12V power input port. “+” is the positive pole of the power supply, “-” is the negative pole of the power supply
“DC” dago: Potentzia adierazle argia, when the light is always on, it means that the power input of the transmitting module is normal
“TS”: Video input detection indicator light, this light is always on to indicate video input and normal encoding
- Parameter Configuration Description
Connect the transmitter parameter adjuster, sakatu “MENU/OK” key to enter the menu, the encryption key and data serial port parameters are displayed first, press the left or right key to move the cursor, and the up and down keys to adjust the parameters

After the parameter setting is completed, prentsa “MENU/OK” to enter the next menu, and the interface is displayed as shown in the figure

Press the left or right key to move the cursor, press the up or down key to adjust the required parameters, the interface prompts as shown in the figure

After all parameter settings are completed, sakatu “MENU/OK” key to confirm, and the display will be as shown in the figure.

After the setting is completed, the parameters are written successfully, and the display is as shown in the figure

- General Troubleshooting
a: The light is off after the power is turned on: Check whether the power input meets the standard
b: “TS” indicator light is off: Check the video input connection cable, check whether the video input format conforms, and check whether the camera is interfered with (you can judge by holding the antenna with your hand).
C: The temperature of the transmitter is very low: check whether the current is normal (the deviation can be ±0.2A within the standard current).
d: Three lights are always on, and one of them is super bright: it means that the transmitter has failed the detection, and you can try to power off and restart (uncommon)
2: hargailuen
- Functional area description
“RF in1” “RF in2”: receiving antenna interface, it is recommended to connect the antenna and then turn on the power switch, because the static electricity of the human body may cause the receiver to crash.
“HDMI”: Bideo irteerako interfazea, the output video format can be adjusted through the “HDMI” menu on the control panel.
“DC 12V”: Power sarrerako interfaze, please strictly follow the power supply voltage requirements, and overvoltage input is strictly prohibited
“PIZTU ITZALI”: power switch.
“USB”: video storage interface, when the U disk is inserted, sakatu “EXIT” button to start the video recording, after the recording is successful, the video display will display the video recording time, and the stored file name is “TS”.
- LCD parameter description
a:CH01 UNLOCKED(LCKED)
“CH01” means the channel number of the receiver, “UNLOCKED” means the received signal is unlocked, eta “LCKED” means the signal is locked. “CH00” of the receiver is the initial writing channel, and the default channel corresponding to the normal operation of the transmitter is “CH001”
b: FREQ:602.0MHz
“602.0MHz” is the receiving frequency of the receiver, this frequency must be consistent with the frequency set by the transmitter, otherwise the receiver will not search or receive the signal from the transmitter
c: BW:6.0MHz
“BW” banda zabalera, as shown in the figure, “BW: MHz” is understood as the RF bandwidth is 6MHz, this bandwidth must be consistent with the bandwidth set by the transmitter, otherwise the receiver will search for or cannot receive the signal from the transmitter
d: FEC:1/2
“FEC: 1/2” is the channel error correction, this parameter synchronizes the parameters set by the transmitter, and the receiver cannot be modified
e: GI:1/32
“GI:1/32” is the channel guard interval, this parameter is set by the transmitter synchronously, and the receiver cannot be modified
f:MAP: QPSK
“MAP: QPSK” is the modulation mapping, this parameter number is set by the transmitter synchronously, and the receiver cannot be modified
g: SNR:0.0dB(SNR:15.0dB)
“SNR: 15.0dB” is the signal quality (hori da, the signal-to-noise ratio, the larger the value, the better). Noiz “0.0dB” is displayed, the signal quality is 0, and the receiver will not be able to lock
“(SNR:15.0dB)” means the receiving signal-to-noise ratio is greater than 15dB. In the “QPSK” modulation mapping state, as long as the signal-to-noise ratio is greater than 6dB, the receiver can lock
h: PW:-72.1dBm(PW:-72.1)
PW is the received signal strength, (reference level value), the farther the transceiver end is relative to the distance, the weaker the signal strength is, and the larger the displayed value is, when the transmitter is not turned on, if the signal strength of the receiver is greater than -90dBm (such as -79.7dBm), it can be considered as adjacent frequency interference
- Parameter Configuration Description
Power on the receiver, and press the “MENU/OK” button to enter the menu, the first display is the menu of adjustable parameters, if you search for a specified frequency, directly press the “MENU/OK” button to enter the menu; if you want to remove the channel, press Press down to select “ListanbulChannel”, eta gero sakatu “MENU/OK” to enter the menu operation; if you need to change the video output format, move the cursor to the “HDMI Mode” menua, prentsa “MENU/OK” to enter, and select the video to be output After formatting, sakatu “MENU/OK” key to confirm.

The frequency search method is as follows. After entering the frequency setting menu, the interface is displayed as shown in the figure. Press the left or right key to move the cursor, press the up or down key to adjust the frequency, RF banda zabalera, and secret key that match the transmitter, and press the “MENU /OK” key to search. Note that the transmitter must be turned on at this time, Besterik, the receiver will not be able to lock because it cannot find the signal.
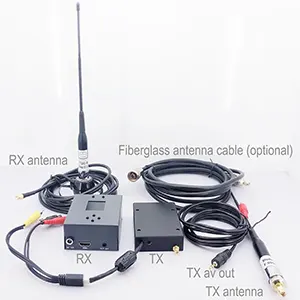
COFDM Mobile Video Wireless Transmission with a cheap price is including a transmitter and receiver for China directly


When the search is completed, prentsa “MENU/OK” baieztatzeko, and the channel is saved in the register of the assistant board, as shown in the figure. To save the channel to the receiver register, sakatu “MENU/OK” key and the right key at the same time.

After the receiver parameter setting is completed, the functions of the panel keys are as follows
“↑”“↓“: each individually selectable receiver channel “CH**”
“←”“→“: You can choose to view the hidden parameters of the receiver
“EXIT”: start and stop recording
- Video function
Insert the storage device into the “USB” interface of the receiver, sakatu “EXIT” button to start recording, and a blue recording time box will appear on the upper left corner of the video display as shown below

- General Troubleshooting
a: The value after the receiver displays “-” is very low (Tx is not turned on): It means that the current channel has serious electromagnetic interference, and the normal value is -90- -100.
b: Cannot record video: check the U disk or replace the U disk.
C: No signal received: Check whether the channel frequency is consistent with the transmitter.
d: No video output: Check the connection line, power off, and restart to check whether there is a boot interface.
