
Encoder Modulator Decoder Demodulator Module Parameter Configuration Instructions COFDM AT Command
Encoder Modulator Decoder Demodulator Module Parameter Configuration Instructions COFDM AT Command

Download the Encoder Modulator Decoder Demodulator Module Parameter Configuration Instructions below if you need a PDF file.
Update Record:
| ვერსია | თარიღი | აღწერა |
| 1.0 1.1 1.2 1.3 1.4 1.5 1.6 1.7 1.8 1.9 2.0 2.1 | 2016-10-24 2016-11-1 2016-12-26 2017-2-14 2017-2-28 2017-3-27 2017-4-19 2017-5-18 2017-9-12 2018-3-15 2019-6-25 2023-2-24 | Initial version ATDR reply distinguishing module ATSE, ATGE add audio switch Add ATSP protocol Add ATST, ATGT protocol ATGE command add AESfor status acquisition Added ATGB protocol AV and HDMI output control Support for obtaining the current AV output standard Added ATSU, ATGUcommands Added ATOSD, ATSIP, ATGIP commands Added ATSAD, ATGAD commands |
Users may need to modify the configuration parameters of the module during the use of the COFDM modulator and demodulator module. In order to simplify the user’s operation, we design the parameter configuration into a few simple AT commands. The user only needs to use the specified AT command and pass the corresponding parameters to complete the parameter setting of the COFDM module.
Suitable Models
-
 COFDM Relay Repeater მოდული დრონის UAV უკაბელო ვიდეო გადამცემისა და მიმღებისთვის Vcan1870
 -
 COFDM Modulator Demodulator Module Encoder Decoder HDMI CVBS AV შეყვანა AES 256 FHD RF ნაკადი
 -
 უკაბელო ვიდეო გადამცემი და მიმღები კამერისთვის, HDMI HD H265 264 შიფრატორი 1W/2.5W PA 1080P60 Vcan1726
 -
 HDMI To IP შიფრატორის მოდულატორი CVBS H.265 H.264 კოდირების დაფა pcba Ethernet RSTP UDP UAV Drone Robotic-ისთვის
Command Introduction
The AT command for configuring COFDM module parameters starts with “AT” and ends with an underscore “_”. Each AT command has several or no parameters, and each AT command has a return value. For details, please refer to the introduction of the following commands.
Users can configure the parameters of the module through the configuration serial port (TTL დონეზე, 3.3V) of the COFDM module. For detailed serial port configuration, refer to the figure below. Please use tools such as “Serial Port Debugging Assistant” to send AT commands to the COFDM module, pay attention to the use of ტექსტი, მაგალითად:

Command Classification
The AT commands for configuring COFDM module parameters are mainly divided into the following two categories:
| Query Commands | ATDR, ATGD, ATGE, ATGI , ATGR, ATGT, ATGB, ATGU, ATGIP |
| Setting Commands | ATSD, ATSG, ATSM, ATSE, ATSI, ATSO, ATSR, ATSP, ATST, ATSU,ATOSD, ATSIP |
From the perspective of whether to save after power-off, the setting commands can be divided into:
| Power-off Saving Commands | ATSD, ATSE, ATSI, ATSO, ATSR, ATSP, ATST, ATSU, ATSIP |
| Power-off Not Saving Commands | ATSG, ATSM, ATOSD |
According to the configuration transmitter or receiver, the classification is as follows:
| Sender Configuration Commands | ATDR, ATSD, ATGD, ATSG, ATSM, ATSE, ATGE, ATSI, ATGI, ATSO, ATSP, ATST, ATGT, ATSU, ATGU, ATOSD |
| Receiver Configuration Commands | ATDR, ATSR, ATGR, ATSP, ATST, ATGT, ATGB, ATSIP, ATGIP |
Command Details
Ping Command
| ფორმატი | ATDR_ |
| პარამეტრი | არარის |
| გამოყენება | for the integrated system to check whether the serial port is connected and identify the connected modules. |
| დაბრუნების ღირებულება | RCB returns the “device profile” string SUE1 returns “ATDRSUE1 OK” string SHD1 returns “ATDRSHD1 OK” string |
| შენიშვნა | შეკითხვის ბრძანება |
Set Device Command
| ფორმატი | ATSD $(mimo), $(gi), $(COFDM უკაბელო გადამცემი სისტემის გადაცემის სიჩქარის გაანგარიშება), $ (თანავარსკვლავედი), $(სიხშირე(KHz)), $(bw(KHz)), $(tx1_gain), $(tx2_gain)_ მაგალითი: ATSD0,1,0,0,800000,8000,86.0,86.0_ |
| პარამეტრი | One Antenna/Dual antenna mimo: 0 mimo disable; 1 mimo enable Guard Interval GI: 0 1/32; 1 1/16; 2 1/8; 3 1/4 Convolution Code Rate: 0 1/2; 1 2 /3; 2 3/4; 3 5/6; 4 7/8; Constellation: 0 QPSK; 1 QAM16; 2 QAM64; RCB Carrier Center Frequency(kHz) 200000~2700000(200MHz~2.7GHz, 1KHz ნაბიჯი) RC900 Carrier center Frequency(kHz) 750000~930000(750MHz ~ 930MHz, 1KHz ნაბიჯი) RCB Channel bandwidth bw(KHz) 2000~8000(2MHz ~ 8 MHz, 1KHz ნაბიჯი) RCB Channel bandwidth bw(KHz) 2000~8000 (2MHz ~ 8 MHz, 1KHz ნაბიჯი) Transmitting antenna 1 gain tx1_gain 0.0~89.75dB, 0.25dB stepping Transmitting antenna 2 gain tx2_gain 0.0~89.75dB, 0.25dB stepping |
| Return Value | როგორიცაა:ATSD0,1,0,0,800000,8000,86.0,86.0_ SISO,GI: 1/16, CR:1/2, MOD: QPSK, სიხშირე:800000KHz,bw:8000KHz,tx1_gain:86.000000 tx2_gain:86.000000 კარგი |
| შენიშვნა | Set command, save when power off. Different Bandwidths, დაცვის ინტერვალით, Convolution code rates, Data rate calculation formulas corresponding to constellations Air interface rate Rate(COFDM უკაბელო გადამცემი სისტემის გადაცემის სიჩქარის გაანგარიშება) COFDM უკაბელო გადამცემი სისტემის გადაცემის სიჩქარის გაანგარიშება (სიჩქარის(MHz) * 8.0/7.0) / (1+GI) * 1512/2048*COFDM უკაბელო გადამცემი სისტემის გადაცემის სიჩქარის გაანგარიშება(COFDM უკაბელო გადამცემი სისტემის გადაცემის სიჩქარის გაანგარიშება) * COFDM უკაბელო გადამცემი სისტემის გადაცემის სიჩქარის გაანგარიშება * 188/204. Taking 8MHz bandwidth as an example, different guard intervals, convolution code rates, data rates corresponding to constellations and required receiving signal-to-noise ratios  |
სet Gain Command
| ფორმატი | ATSG$( tx1_gain),$( tx1_gain)_ მაგალითი: ATSG85.0,85.0_ |
| პარამეტრი | tx1_gain: გადამცემის 1 მოგება tx2_gain: გადამცემის 2 მოგება |
| გამოყენება | To dynamically adjust the output power. If the signal SNR/RSSI of the receiver is high, the output power can be reduced through the remote control link. When the SNR/RSSI of the end signal is low, increase the output power (გადამცემი) |
| Return Value, | მაგალითი: ATSG85.0,85.0_set gain 85.000000 85.000000 კარგი |
| შენიშვნა | setting command, power off will not save. |
Set Modulation Mode commanდ
| ფორმატი | ATSM$(gi), $(COFDM უკაბელო გადამცემი სისტემის გადაცემის სიჩქარის გაანგარიშება), $(თანავარსკვლავედი)_ მაგალითი: ATSM1,1,2_ |
| პარამეტრი | Gard interval GI: 0 1/32; 1 1/16; 2 1/8; 3 1 /4; Convolution code rate: 0 1/2; 1 2/3; 2 3/4; 3 5/6; 4 7/8; Constellation: 0 QPSK; 1 QAM16; 2 QAM64 |
| გამოყენება | Dynamically adjust the air interface rate, the air interface rate can be increased when the distance is short, and the air interface rate can be reduced when the distance is long (გადამცემი) |
| Return Value | მაგალითი:ATSM1,1,2_GI:1/16, CR:2/3, MOD: QAM64, კარგი |
| შენიშვნა | setting command, power off will not save. |
Get Device Status Command
| ფორმატი | ATGD_ |
| პარამეტრი | არარის |
| გამოყენება | query the current number of transmit antennas, დაცვის ინტერვალი, convolution code rate, number of constellations, transmit frequency, სიჩქარის, gain parameters (გადამცემი) |
| Return Value | მაგალითი: ATGD_ SISO, GI:1 /16, CR: 1/2, MOD: QPSK, სიხშირე: 800000KHz, bw: 8000KHz, tx1_gain: 86.000000 tx2_gain: 86.000000 კარგი |
| შენიშვნა | შეკითხვის ბრძანება |
Set Encoder Command
| ფორმატი | ATSE$(llc),$(rt),$(bitrate) ,$(gop),$(აუდიო)_ მაგალითი: ATSE0,0,0.0,0,0_ |
| პარამეტრი | 1. Enhanced data reliability option llc: 0 disable; 1 enable (requires the receiving end to enable this option at the same time, use in pairs, because more redundant data is added to enhance reliability, the video bit rate of the transmitting end should be set when this option is turned off half of) 2. Real-time priority/quality priority rt: 0 image quality priority; 1 real-time priority; 3. ბიტრეიტი: 0 let system decide; >0 specify bitrate(float) 4. I frame interval GOP: 0 let system decide; >0 specify GOP 5. Audio encoding option audio: 0 disable; 1 enable |
| გამოყენება | Used to set encoding parameters (გადამცემის) |
| Return Value | მაგალითი:ATSE0, 0,0.0,0,0_ MODE:0,RT:0,bitrate: 0.0Mbps,gop:0,აუდიო:0,კარგი |
| შენიშვნა | setting command, save when power is off. |
Get Encoder Command
| ფორმატი | ATGE_ |
| პარამეტრი | არარის |
| გამოყენება | querying encoding parameters (sending end) |
| Return Value | მაგალითი:ATGE_MODE:0, RT:0,bitrate:4.0Mbps,gop:10,აუდიო:0,aes:0, კარგი |
| შენიშვნა | Query command AES means the current encryption status: 0 disable; 1 enable |
Get Input Command
| ფორმატი | ATGI_ |
| პარამეტრი | არარის |
| გამოყენება | query the current camera input parameters (გადამცემი) |
| Return Value | მაგალითი:ATGI_input_size: 1080p, input_rate: 60fps, sensor_type: hdmi,კარგი |
| შენიშვნა | შეკითხვის ბრძანება |
Set Input Command
| ფორმატი | ATSI$(input_size),$(input_rate)_ მაგალითი: ATSI1080,25_ |
| პარამეტრი | 1. Input resolution input_size: 0 let the system detect; >0 specify input size 2. Input frame rate input_rate: 0 let the system detect; > 0 specify input fps |
| გამოყენება | To specify the input resolution and frame rate to meet some special signal sources, or some special application needs (გადამცემი) |
| Return Value | მაგალითი: ATSI1080,25_ Input_size:1080p,input_rate: 25fps, კარგი |
| შენიშვნები | After the user specifies the input resolution and frame rate through this command, the system will no longer detect the signal source (use with caution). The user can restore the default through the following command: ATSI0,0_Set the command and save it after power-off. |
Set Output Command
| ფორმატი | ATSO$(output_size),$(output_rate)_ მაგალითი: ATSO720,30_ |
| პარამეტრი | 1. გადამცემის: encoding output resolution output_size: 0 equal to input_size; >0 specify output size 2. მიმღები: HDMI output resolution (720, 1080) 3. გადამცემის: encoding output frame rate output_rate: 0 equal to input_rate; >0 specify output_rate (fps) 4. მიმღები: HDMI output frame rate 720p supports frame rate (50, 60); 1080p supports frame rate (24, 25, 30, 50, 60) |
| გამოყენება | 1. გადამცემის: Used to specify the encoding output resolution and frame rate to meet the requirements of certain applications for zooming and frame reduction 2. მიმღები: used to configure the resolution and frame rate of HDMI output |
| Return Value | მაგალითი: ATSO720,30_ output_size: 720p, output_rate: 30fps, კარგი |
| შენიშვნები | 1. For HDMI input only, this command is invalid for AV input 2. Output_size <= input_size; output_rate<=input_rate 3. Set the command and save it after the power is off. |
Set Input Sources Command (switch HDMI / CVBs input)
| ფორმატი | ATSU$(vin),$(ain)_ მაგალითი: ATSU0,1 _ |
| პარამეტრი | 1. Video input selection VIN: 0 let the system detect; 1 force CVBS input; 2 force hdmi/SDI input 2. Audio input selection AIN: 0 let the system detect; 1 force analog input |
| გამოყენება | Used to meet specific application requirements (მაგალითი: HDMI/SDI input video, MIC input audio) |
| Return Value | მაგალითი: ATSU0,1_ ATSU0,1 OK |
| შენიშვნა | setting command, power-off save. |
Get User Command
| ფორმატი | ATGU _ მაგალითი: ATGU_ |
| პარამეტრი | არარის |
| გამოყენება | To query user-specific configuration |
| Return Value | მაგალითი: ATGU_ ATGU0,1 OK |
| შენიშვნა | შეკითხვის ბრძანება return parameter description please refer to the ATSU command |
Set Receiver Command
| ფორმატი | ATSR $(სიხშირე), $(bw ), $(llc), $(cvbs)_ მაგალითი: ATSR320000,6000,0,0_ |
| პარამეტრი | 1. DR2C carrier frequency freq(KHz) 200000~860000(200MHz ~ 860MHz, 1KHz ნაბიჯი) 2. DR900 carrier center frequency freq(KHz) 200000~1600000(200MHz~1.6GHz, 1KHz ნაბიჯი) 3. DR2C channel bandwidth bw(KHz) 2000~8000(2MHz ~ 8 MHz, 1KHz ნაბიჯი) 4. DR900 channel bandwidth bw(KHz) 3200~8000(3.2MHz ~ 8 MHz, 1KHz ნაბიჯი) 5. Enhanced data reliability option llc: 0 disable; 1 enable (it is required that the transmitter should also enable this option at the same time, and use it in pairs. Since more redundant data is added to enhance reliability, the video bit rate of the transmitter should be set to when this option is turned off half of) 6. AV output system cvbs: 0 pal; 1 ntsc |
| გამოყენება | To set the receiver parameter |
| Return Value | example: ATSR320000,6000,0,0_ ATSR320000,6000,0,0 OK |
| შენიშვნა | setting command, save when power is off. |
Get Receiver Command
| ფორმატი | ATGR_ |
| პარამეტრი | არარის |
| ATGR_ | the receiving end parameter |
| Return Value | მაგალითი: ATGR_ ATGR320000,6000,0,aes:0,cvbs:0 კარგი |
| შენიშვნა | 1. Query command 2. Aes parameter indicates the current encryption status: 0 disable;1 enable 3. CVBS parameter Indicates the current AV output standard: 0 pal;1 ntsc |
Get Bit Error Rate Command
| ფორმატი | ATGB_ |
| პარამეტრი | არარის |
| გამოყენება | querying the bit error rate and signal strength of the dual antennas at the receiving end |
| Return Value | მაგალითი: ATGB_ ATGB ber1:0.00% ber2:0.00% RSSI1 :54 RSSI2:53 Lock1:1 Lock2:1 კარგი |
| შენიშვნები | 1. Query commands 2. Ber1 and ber2 respectively indicate the bit error rate of each antenna, დაწყებული 0.0% to 100.0% 3. RSSI1 and RSSI2 respectively indicate the signal strength of each antenna, დაწყებული 0 to 100 4. Lock1 and Lock2 respectively indicate the signal locking status of each antenna (1 Represents signal lock) |
Set Password Command
| ფორმატი | ATSP$(პაროლი), $(პაროლი)_ მაგალითი: ATSP123456, 123456_ |
| პარამეტრი | AES key password: 6-digit password (ASCII) AES key password: 6-digit password (ASCII) (repeat it for confirmation) |
| გამოყენება | Used to set the AES key of the transceiver (გადამცემი და მიმღები) |
| Return Value | მაგალითი: ATSP123456_ ATSP123456 OK |
| შენიშვნა | 1. When the password is all 0, AES encryption is turned off. 2. Set the command and save it after powering it off. |
Set Data Transfer Command
| ფორმატი | ATST$(baud განაკვეთი), $( parity)_ მაგალითი: ATST115200,0_ |
| პარამეტრი | 1. Baud rate baud rate: 1200、2400、4800、9600、19200、38400、57600、115200 2. Check Code: 0: არცერთი; 1: Odd; 2: Even |
| გამოყენება | Used to set the baud rate and parity bit of the serial port for data transparent transmission |
| Return Value | მაგალითი: ATST115200,0_ ATST115200,0 OK |
| შენიშვნები | Set command |
Get Data Transfer Command
| ფორმატი | ATGT_ |
| პარამეტრი | არარის |
| გამოყენება | Used to query the baud rate and check code |
| Return Value | მაგალითი: ATGT_ ATGT115200,0 OK |
| შენიშვნები | Query command |
Set IP Address Command
| ფორმატი | ATSIP$(ip), $(ip)_ მაგალითი: ATSIP192.168.1.215,192.168.1.215_ |
| Პარამეტრები | Local IP address Local IP address (repeat to confirm) |
| გამოყენება | Used to set the receiver IP address |
| Return Value | მაგალითი: ATSIP_192.168.1 .215,192.168.1.215_ ATSIP192.168.1.215 OK |
| შენიშვნები | 1. After setting the IP address, the receiving end needs to be restarted to take effect. 2. Set the command and save it after powering it off. |
Get IP Address Command
| ფორმატი | ATGIP_ მაგალითი: ATGIP_ |
| პარამეტრი | არარის |
| გამოყენება | მიმღების ამჟამინდელი IP მისამართის დასადგენად |
| დაბრუნების ღირებულება | მაგალითი: ATGIP_ ATGIP192.168.0.215 OK |
| შენიშვნა | შეკითხვის ბრძანება |
OSD Overlay Protocol
| ფორმატი | ATOSD$(idx), $(x), $(წ), $(str)_ მაგალითი:ATOSD0,40,20,height: 100m_ |
| პარამეტრი | 1. IDX index: 0~7 (supports OSD overlay for 8 areas) 2. X-coordinate: 0~1919 3. Y coordinate: 0~1079 4. str: the string to be displayed at the corresponding coordinates (the space symbol is used to clear the display) |
| გამოყენება | on the video screen.OSD information |
| დაბრუნების ღირებულება | არარის |
| შენიშვნები | 1. The user specifies the x and y coordinates of the OSD display according to the maximum 1920×1080 pixels, and the system will correct the coordinates according to the actual display situation. 2. The ‘_’ character cannot be contained in the str parameter |
Set Gain To Adjust
| ფორმატი | ATSAD$(სიხშირე),$(adjust) _ მაგალითი:ATSAD700000,2.5_ |
| პარამეტრი | wireless central working frequency: სიხშირე(KHz) 200000~2700000(200MHz~2.7GHz, step: 1KHz) Adjust the value(dB): ATSD cmd will subtract this value to set the wireless gain |
| ფუნქცია | Specify and adjust the value for the wireless gain setting using by ATSD cmd |
| კავშირი | მაგალითი: ATSAD700000,2.5_ freq:700000,adjust:2.50 კარგი |
| კომენტარები | Setting command is still valid when stopping power or resetting. |
Get Gain To Adjust
| ფორმატი | ATGAD[$(სიხშირე)]_ მაგალითი:ATGAD700000_ |
| პარამეტრი | wireless central working frequency: სიხშირე(KHz) 200000~2700000(200MHz~2.7GHz, step: 1KHz) When no parameter provides, it will list all the freq that have adjusted value. |
| ფუნქცია | Inquiry adjust the value for wireless gain setting using ATSD cmd |
| კავშირი | მაგალითი: ATGAD700000_ freq:700000,adjust:2.50 OK ATGAD_ freq:700000 750000 კარგი |
| კომენტარები | Inquiry command. |
Serial Port Utility software download
https://www.alithon.com/downloads
კითხვა-პასუხი
1. How can I return to the No Password setting with 000000 indications after the change?
Reset the password to 000000 (one must not be missing) through the Parameter Configuration Panel Board.
or set it through ის ATSP_command
2. I see that Gain is the output power of the transmitter. Please tell me the range of settings of this parameter. All setting level (Gain) good for linear output operation? Or do you suggest some limited range for better linear operation?
The Gain of the COFDM configuration is the internal Gain, not the actual output power of the transmitter. The internal gain range is 0~89.75dB and the linear output:
1. At around 300~500MHz, the Gain is set to 89.75, and the actual output power of the transmitter module is about -5dBm.
2. At around 1000~1500MHz, the Gain is set to 89.75, and the actual output power of the transmitter module is about -6dBm to -10dBm.
3. I tried to set – B bandwidth (kHz) and E bit rate (Mbps). When I set E, the new value does not apply. Ისე. the E setting is only for monitoring of available bitrate? if I wish to change the E (ბიტრეიტი) I have to change only B (სიჩქარის)? Am I right?
It is not recommended to modify the video bit rate ‘E’ directly, because if the output video bit rate is greater than the wireless air interface rate, the system will not work normally.
By default, the internal video bit rate ‘E’ will be set to 0 for automatic. Customers only need to modify ‘B’ to modify the wireless parameters, and the video bit rate will automatically adapt.
You can also adjust the wireless air interface rate by modifying GI and CR.
For more details on the Encoder Modulator Decoder Demodulator Module, please send an inquiry to us.


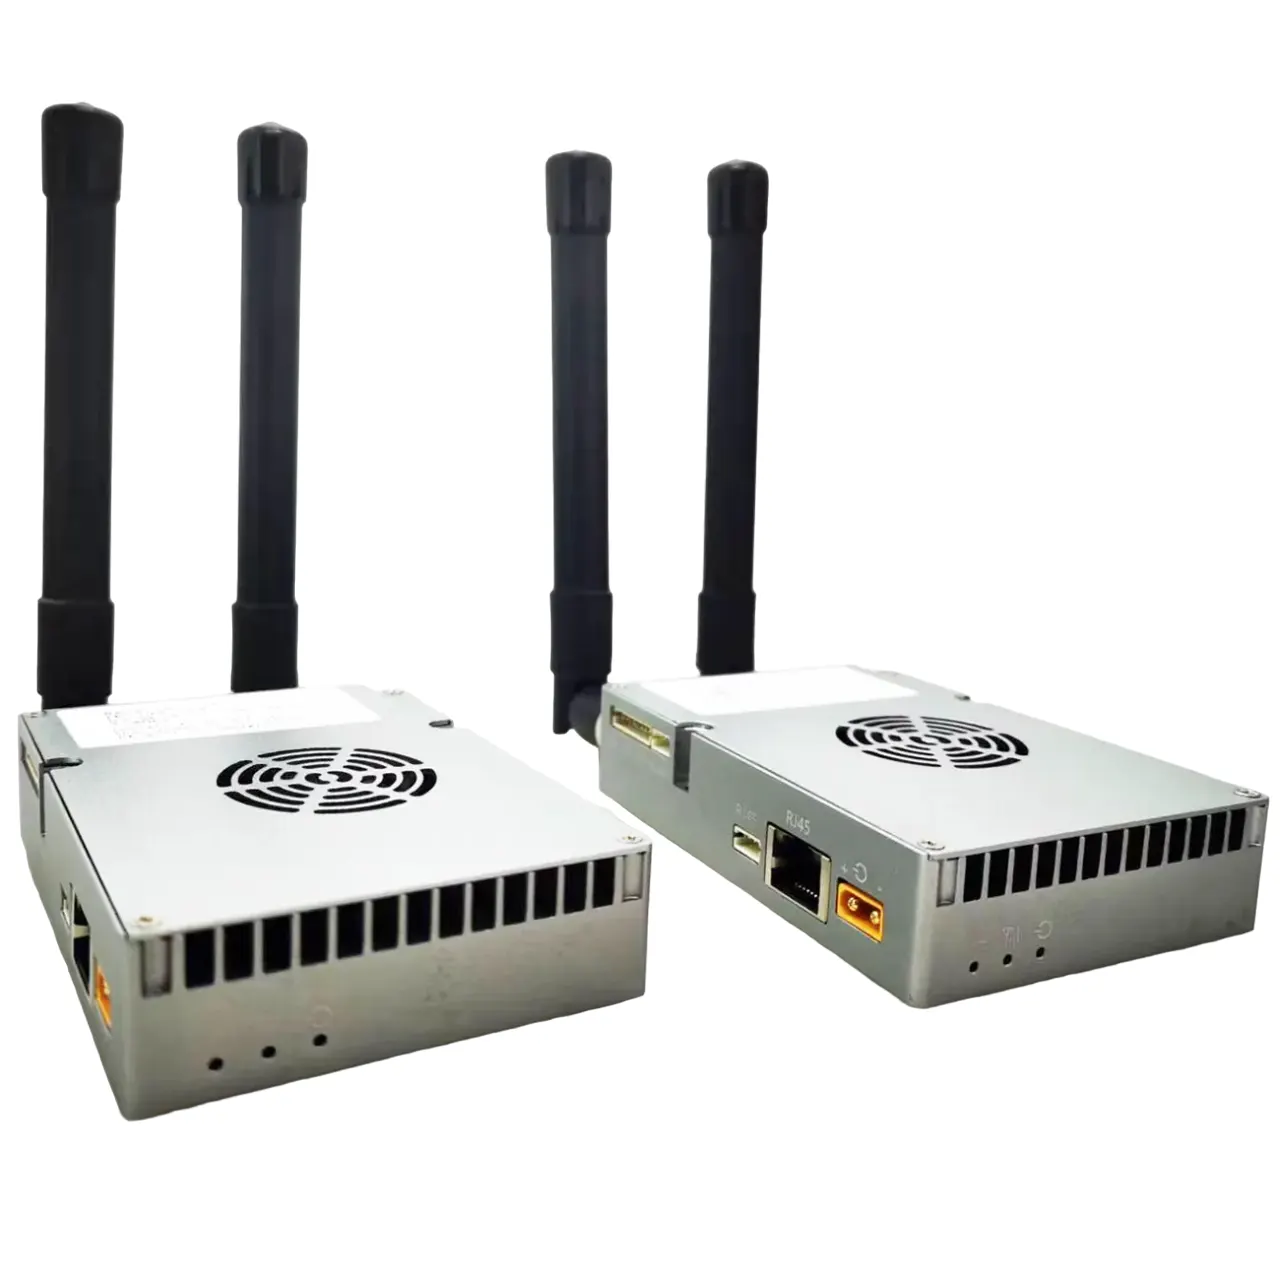
COFDM Modulator Demodulator Module Encoder Decoder HDMI CVBS AV შეყვანა AES 256 FHD RF ნაკადი
COFDM Modulator Demodulator Module Encoder Decoder HDMI CVBS AV შეყვანა AES 256 FHD RF ნაკადი

Სარჩევი
კიდევ ერთი გვერდითი ხედი


COFDM Encoder მოდული, CVBs / HDMI input, IP გამომავალი

დამატებითი ინფორმაციისთვის COFDM ენკოდერის დაფის შესახებ, გთხოვთ ეწვიოთ აქ
COFDM Encoder მოდულის უპირატესობა:
- ულტრა დაბალი შეყოვნება H.265/H.264 აუდიო და ვიდეო კოდირების მაქსიმალური მხარდაჭერა 1080P@60 რეალურ დროში ვიდეოს გადაღებისა და კოდირების
- HDMI ან AV აუდიო და ვიდეო შეყვანა, კოდირების შემდეგ, Ethernet პორტის გამომავალი ან გამომავალი უკაბელო მოდული, ვიდეო კოდირების ბიტის სიჩქარის დინამიურად კონფიგურაცია შესაძლებელია
- მხარდაჭერა აუდიო შემავალი და აუდიო დეკოდირების გამომავალი
- ორი ვიდეოს მხარდაჭერა (HDMI + AV) ერთდროული შეყვანის კოდირება (ვარიანტი, ნაგულისხმევი არის HDMI ან AV კოდირება, აირჩიეთ ორიდან ერთი შეყვანის წყაროდან). )
- ვებ UI ან სერიული პორტი UART AT ბრძანება კონფიგურაციის მართვისთვის

COFDM გადამცემის მოდული


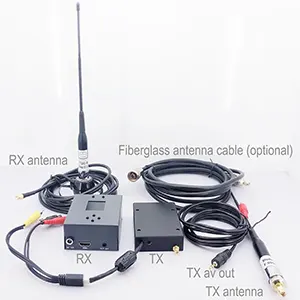
COFDM მოდულატორი-დემოდულატორი მონაცემთა ფურცლის ჩამოტვირთვა
COFDM დემოდულატორი Vcan1776RX-H264 მონაცემთა ფურცელი

TX RX დაფის ბოლო ვერსია
TX: V6.5.6p
RX: 4.1.2p
ხშირად დასმული კითხვები

- კითხვა 1: იქნებ მითხრათ ამ კომპონენტის ნაწილის ნომერი, ჩვენ ვცდილობთ ვიპოვოთ ადგილობრივი და შევამოწმოთ. პასუხი 1: ეს არის ინდუქციური სახელი LOH32PN2R2NNC.

- შესთავაზეთ გამშვები პუნქტები: თუ დაფის ელექტრომომარაგების დენი კარგია, მაგრამ არ არის RF გამომავალი, შესაძლოა ქვემოთ მოყვანილი კომპონენტი TC1-1-13MX+ ზოგადად დაზიანებულია.
- ტრანსპორტირებისას ამ მოწყობილობის დაზიანების თავიდან ასაცილებლად (თავად მოწყობილობა შედარებით მაღალია), ჩვენ შევუკვეთეთ წითელი წებოს დაცვა ამ მოწყობილობისთვის, როდესაც ის გამოვაგზავნეთ.

- ინჟინერი ასევე გთავაზობთ, რომ შეამოწმოთ, არის თუ არა კაბელი ფხვიერი ან ცუდი კონტაქტით.
- გთხოვთ, შეცვალოთ FPC კაბელი, რომელიც აკავშირებს ორ დაფას
- We can provide spare parts if you're sure which one.
რა თქმა უნდა
გთხოვთ, შეამოწმოთ ქვემოთ მოცემული ბმული.
Encoder Modulator Decoder Demodulator Module Parameter Configuration Instructions COFDM AT Command

3. კითხვა, თუ ჩვენი კამერის ხარისხი საკმარისად კარგია ორივესთვის 4 MHz და 8 MHz სიჩქარეს. ამ შემთხვევაში, მომხმარებელმა უნდა აირჩიოს 4 MHz ან 8 MHz?
პასუხი: ჩვენი ცალმხრივი COFDM გადაზიდვები ნაგულისხმევად იყენებს 4Mz უკაბელო სიჩქარეს, შესაბამისი ვიდეო ბიტის სიჩქარით 3.12 Mbps, რაც საკმარისია 1080p; თუ შეიცვალა 8MHz უკაბელო გამტარობა იმავე პირობებში, ვიდეოს ბიტის სიხშირე გაორმაგდება 6.24 Mbps-მდე. ყველა მომხმარებელს შეუძლია აირჩიოს უკაბელო სიჩქარეს შორის 4MHz და 8MHz, 6MHz-იც კი შეიძლება ჩაითვალოს.
4. კითხვა: რომელია უკეთესი ამ tx+rx ნაკრებისთვის მიღების მგრძნობელობის ხედიდან?
პასუხი: უკაბელო ბმულებისთვის, უბრალოდ შეიძლება ჩაითვალოს, რომ მიმღების მგრძნობელობა უფრო მაღალი იქნება უკაბელო დაბალ გამტარობებზე. მგრძნობელობის მიღების პერსპექტივიდან, 4MHz>6MHz>8MHz
რა თქმა უნდა
გთხოვთ, შეამოწმოთ ქვემოთ მოცემული ბმული
COFDM Relay Repeater მოდული დრონის UAV უკაბელო ვიდეო გადამცემისა და მიმღებისთვის Vcan1870

ერთი არხის მიღების მგრძნობელობა:
-97+/-1dbm QPSK 8MHz-ზე,
-98+/-1dbm QPSK 6MHz-ზე,
ორმაგი ანტენით მიღებისას მგრძნობელობა გაიზარდა 3დბმ-ით
მიმღების ნაგულისხმევი firmware მხარს უჭერს RTSP პლეერს, ზოგიერთ კლიენტს ურჩევნია UDP მოთამაშე, რომელიც ჩვენ ასევე შეგვიძლია შემოგთავაზოთ, then RTSP player doesn't support. (RTSP-ს და UDP-ს შეუძლიათ აირჩიონ მხოლოდ ერთი ორი firmware)
გთხოვთ ჩამოტვირთოთ ქვემოთ მოცემულ ბმულზე.
Splayer_v4.2_2020.6.6
https://drive.google.com/file/d/1ihzUhfnx2Wo3zLO8UAs1aUQeLswonJD-/view?usp=sharing
Splayer_v4.3_2022.10.22
https://drive.google.com/file/d/1PQc-LZ55qGnjeMsjkHYSloHfY3NEUsGH/view?usp=drive_link
რა თქმა უნდა, გთხოვთ, გადახედოთ ქვემოთ მოცემულ სურათს.

ჯერ კიდევ მაქვს შეკითხვა?
გთხოვთ დაგვიკავშირდეთ დამატებითი ინფორმაციისთვის.
გაგზავნეთ თქვენი შეკითხვა
როგორ გადავრთოთ HDMI ან CVBS ვიდეო შეყვანა UART AT ბრძანების მეშვეობით?
როგორ განაახლოთ COFDM ვიდეო მიმღები
როგორ განაახლოთ COFDM დრონის ვიდეო ენკოდერის მოდულატორის დაფა

იყავი პირველი ვინც განიხილავს "COFDM Modulator Demodulator Module Encoder Decoder HDMI CVBS AV შეყვანა AES 256 FHD RF ნაკადი”
მსგავსი პროდუქტები


HDMI IP შიფრატორი
მინი ზომის HDMI ენკოდერის დაფა IP Ethernet RJ45 გამომავალი მოდულატორი H.265 HTTP RSTP UDP ONVIF TCP

მიმოხილვა
არ არსებობს არის დაწერილი მიმოხილვა.